
|
|
相关文章推荐

|
很酷的草稿纸 · android中调用requestFocus ...· 1 年前 · |
|
|
勤奋的鸭蛋 · 悬停子元素时如何设置父元素的样式?-腾讯云开 ...· 1 年前 · |
|
|
豪气的荒野 · [PyQt6]简开发学习记录Chapter3 ...· 2 年前 · |
|
|
痴情的橙子 · 只談MySQL (第28天) 語法結構 - ...· 2 年前 · |
|
|
刚分手的人字拖 · nginx启动失败之nginx: ...· 3 年前 · |

- 1. Introduction
- 2. License & Disclaimer
- 3. Operating systems and installation
- 4. Management
- 5. Data analysis
- 6. Citations and codes
- 7. Troubleshooting
- 8. Acknowledgements
- 1. 简介
- 2. 许可与免责声明
- 3. 操作系统与安装
- 4. 管理
- 5. 数据分析
- 6. 引用与代码
- 7. 故障排除
- 8. 致谢
1. Introduction
1.1. Background
1.2. Functions

2. License & Disclaimer
2.1. License
PhyloSuite is a free software, and you are welcome to redistribute it under certain conditions. It is released under the GNU General Public License, Version 3. See http://www.gnu.org/licenses/gpl-3.0.en.html .
2.2. Disclaimer
3. Operating systems and installation
3.1. Install compiled PhyloSuite
Installers for all platforms can be downloaded from https://github.com/dongzhang0725/PhyloSuite/releases .
3.1.1. Windows
3.1.2. Mac OSX & Linux
1 |
cd path/to/PhyloSuite |
If you encounter an error of “permission denied”, try to use the following command:
1 |
chmod -R 755 path/to/PhyloSuite(folder) |
Note that both 64 bit and 32 bit Windows is supported (Windows 7 and above), whereas only 64 bit has been tested in Linux (Ubuntu 14.04.1 and above) and Mac OSX (macOS Sierra version 10.12.3 and above).
3.2. Install using pip
1 |
pip install PhyloSuite |
It will take some time to install. If it installs successfully, PhyloSuite will be automatically added to the environment variables. Then open the terminal again and type:
1 |
PhyloSuite |
If the above
pip
command failed to install PhyloSuite, you can use compiled PhyloSuite (see
section 1
) or find and download the source codes here (
https://pypi.org/project/PhyloSuite/#files
or
https://github.com/dongzhang0725/PhyloSuite
), and install it manually.
4. Management
4.1. Interface operation

PhyloSuite uses a workplace for data management (although you don’t have to use it), which is set when you first use the program. Later you can change it through the
WorkPlace
menu. There are two kinds of root folders in each workplace,
GenBank_File
and
Other_File
. The
GenBank_File
folder is used to manage GenBank files and deposit the results of related analyses. The
Other_File
folder is used to manage other types of sequence files and Word annotation files (nucleotide and amino acid sequences), as well as deposit related results. Below (one level down) from the root folders, you will find work folders, which contain the associated results folders (another level down). In each root folder, PhyloSuite will add
files
and
flowchart
work folders by default. You can create a new work folder to deposit your new work (recommended) by mousing over the root folder (GenBank_File and Other_File), either via the green ‘plus’ icon on the right or via the context (right-click) menu. You can remove a work folder via the context menu of the selected folder or by pressing the
Delete
button in your keyboard. Deleted folders are stored in, and can be recovered from, the
recycled
folder of the root folder. Once a folder is deleted from the recycle bin, it cannot be recovered. However, it is recommended to delete folders/files from your local file system, as that will enable you to recover them using the inbuilt operating system file recovery function.
Note that almost all of the selected settings, such as the window size, position, parameter settings, etc., will be remembered automatically when you close the windows (i.e., there is no need to save the settings before you close a window).
You can access a brief example demo of each function via the
question mark
button in the window of the corresponding function.
4.1.1. Brief example
-
Clicking
GenBank_FileorOther_Fileroot folders will display the home page of PhyloSuite. Hover mouse over the root folder to viewAdd Work FolderandOpen in Explorerbuttons; the former can be used to create new work folders, whereas the latter opens the folder in your local file explorer;

-
Selecting any of your work folders (one level below the root folders) will display a list of your saved datasets. Lists of GenBank records are stored in the
GenBank_Fileroot folder, and sequence files are stored in theOther_Fileroot folder. Hover mouse over work folders to seeOpen in ExplorerandGenBank File Information Display Settingbuttons; the later can be used to control which data (for each ID) will be displayed on the main page.

-
Selecting results folder (one level below the work folders) will display the results. Hover mouse over results folder to see
Open in Explorer button;

-
Double-clicking any of the above folders (root, work and results) will open the folder in your local file explorer;

-
Hovering mouse over menu bar to select functions to use.

- If Python 2.7, Perl 5, Java (JRE > 1.5), HmmCleaner.pl and trimAl have been installed and added to the environment variable ($PATH), they will be automatically detected by PhyloSuite.
- If you already have these programs installed on your computer, you can specify the executable file directly (as indicated in the table above). Note that for PartitionFinder2 you should specify the ‘partitionfinder-2.1.1’ folder.
- If you don’t have these programs, you can use the download button to download and install them automatically. Note: Anaconda Python distribution will download for Python 2.7 (because it contains all of the dependencies required by PartitionFinder2: numpy, pandas, pytables, pyparsing, scipy and sklearn). As it is around 500M in size, so your download may take some time.
- GenBank file: *.gb, *.gbk, *.gbf, *.gbff
- fasta: *.fas, *.fasta
- phylip: *.phy, *.phylip
- nexus: *.nex, *.nxs, *.nexus
- Word document file: *.docx
-
By using the
Import file(s) or ID(s)function under the File menu orOpen file(s)in the main display area . This mode supports the import of complete GenBank files and lists of GenBank accession numbers (IDs), which will then be automatically retrieved from the GenBank by PhyloSuite; - Drag-and-drop GenBank format files into the display area .
- Copy GenBank file contents and paste them into the display area .
- Select any of the work folders (here I chose files);
- Click Open file(s)/Input ID(s) to open the input window.
- Copy the IDs into the text box (spaces, line breaks, tabs, etc. are supported as separators);
- Enter your email (tell NCBI who is downloading the sequences);
- Click Start to download.
- Files (IDs) can be added to the dataset that you are working on either by drag/drop or via the context menu (”Add file”).
-
The annotation of GenBank files can be standardized (this includes the gene names unification, discussed above) via the
File --> Standardize GenBank filefunction or via the context menu asStandardization. This function opens a new pop-up window, displaying eventual errors and warnings in your dataset, in which you may manually edit the files (mitogenome data only). These usually involve missing genes or non-standardized annotation. For the latter, you may click on the gear button (Settings) in the upper right corner of this window, which opens the GenBank File Extracting settings window discussed above. By ticking the Set NCR threshold box, you may prompt PhyloSuite to recognize the non-coding regions as well (this allows you extract them later using theextractfunction). You can set the threshold for the size (in bp) of the NCRs you wish to be recognized. -
For mitogenomic data, a
Predict tRNA (LEU and SER)button is available, via which you may reannotate ambiguously annotated tRNAs with the help of ARWEN. -
You can select the information contained within the files you wish to display via the
Settings --> GenBank File Information Display. Examples are: ID, organism, lineages, references, source, etc. (see Information Display section). -
The IDs containing identical sequences (
duplicates
) can be identified and automatically deleted using the
Highlight Identical Sequencesbutton (star-shaped, bottom/right) -
You can use the button adjacent to it,
Find Records by IDs, to search for specific IDs. - Each ID can be opened with any text viewer program (Notepad for example) through the context menu, and then manually edited.
- Selected IDs can be exported (context menu) as a GenBank (.gb) file, or a table (.csv) containing the information displayed in the GUI.
- Selected IDs can be imported into a different work folder via drag-and-drop.
-
Using
Import file(s) or ID(s)function under the File menu orOpen file(s)in the display area . - Drag-and-drop the files into the display area .
- For multiple sequence files, the number of sequences in the file and alignment status (aligned or non-aligned) will be displayed.
- Files and sequences can be deleted, exported, or added.
-
The alignment can be directly used as input file for any (relevant) plug-in function:
MAFFT,Gblocks,Concatenate Sequence,Convert Sequence Format,Sequence Viewer,Partitionfinder2,ModelFinder,IQ-TREE, andMrBayesfunctions. -
Parse Annotationfunction is available only for *.docx files. -
All alignments could be managed in
Sequence Viewer, they can be reversed , complement , reverse complement and pruned . -
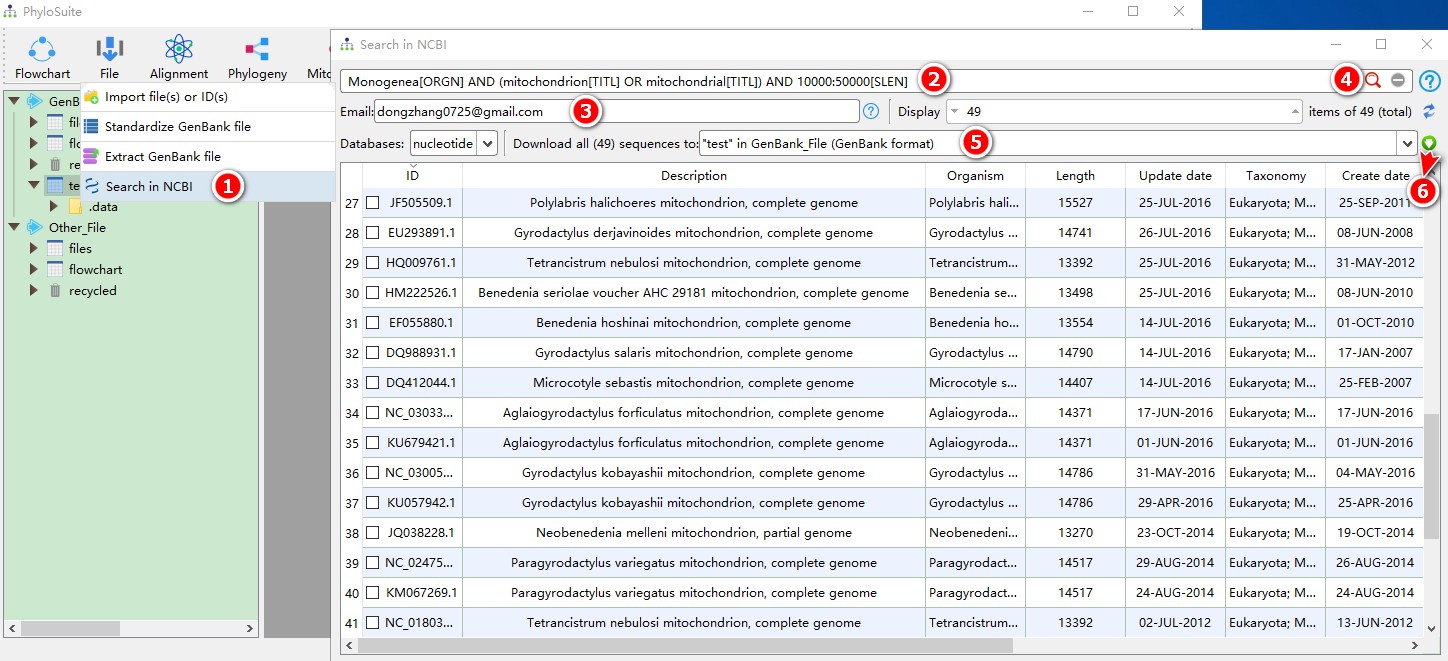
Open
File-->Search in NCBIin the menu bar; -
Enter keywords (
Monogenea[ORGN] AND (mitochondrion[TITL] OR mitochondrial[TITL]) AND 10000:50000[SLEN]); - Enter your email to tell NCBI who is downloading the sequences;
- Press Enter key or click search button to start searching;
-
After the search is completed, select a work folder to deposit the sequences; selecting a work folder within the
GenBank_Fileroot folder will download sequences in the GenBank format, whereas selecting a work folder within theOther_Fileroot folder will download sequences in the FASTA format; -
Click the
Downloadbutton to start downloading.
- First, you can define which features you wish to extract, such as CDS , rRNA and tRNA etc.
-
Second, you can define the value of a GenBank file
qualifiers
that is to be used as the name of a feature. For example, you can select to extract only the value of the qualifier
productfor rRNA , and simultaneously select to extract the value of the qualifiersgeneandproductfor CDS . In this case, PhyloSuite will first search the value/name ofgenefor CDS, if there is nogenequalifier it will search the value/name ofproduct( note that qualifiers can be reordered by dragging ). If none of the specified qualifiers are found for features, it will be recorded in a table file when using the GenBank File Extracter function, or marked as an error when using the Standardization function. -
Finally, you can uniformize the annotation of your dataset by replacing the
values/names
searched in the previous step via the
Names unificationtable. The ‘Old Name’ will be replaced with the ‘New Name’ if found in the corresponding qualifiers when using GenBank File Extracter or Standardization functions. If you wish to extract only a subset of features (genes) for which value/name are available in this table, you may do so by checking theOnly extract these genescheckbox. This table can be exported, or imported (export/import settingsfunction below the table) from a comma-separated table (*.csv). There is a convenient way to uniformize names: if you extract genes without any settings for the first time, a “name_for_unification.csv” file will be generated, which can be used to set the new names and then imported into the settings (“csv” format is mandatory). Note that values/names of all qualifiers of all features are included in a single table. -
If you open
IQ-TREE
with the listed folders or alignment files selected, they will auto load to
IQ-TREE
.

-
Every time when you open the
IQ-TREE
, PhyloSuite will search the entire workplace, and sort all acceptable input files for
IQ-TREE
.

- If you are in the interface of the IQ-TREE without an input file, clicking on the input box shall open the selection from the step 2.
- Drag files into the “Input” box;
- Click the ‘open folder’ icon to the right of the input box.
-
Extract genes defined (selected) in the
GenBank File Extracting settings
and save them in the fasta format. For example, if you select to extract
CDS,tRNAandrRNAfeatures , this function will extract these features from all selected GenBank files and store them in correspondingly named folders (CDS, tRNA, rRNA). Additionally,CDSfeature will be split into two folders: ‘CDS_AA’ folder contains the amino acid sequences extracted from thetranslationqualifier , whereas ‘CDS_NUC’ folder contains the nucleotide sequences. For the Mitogenome version, there is an additional “self-translated_AA” folder that contains the amino acid sequences translated from the nucleotide sequences (CDS) by the PhyloSuite. Note that there may exist duplicated genes within one ID, in which case PhyloSuite will number the duplicated gene names in the order they occur. For example, if there are threecox1genes, then they will be saved ascox1.fas,cox1_copy2.fasandcox1_copy3.fas. Additionaly, PhyloSuite also providesResolve gene duplicatesfunction (available inParameterstab) to automatically identify and remove duplicated genes. - Extract overlapping and intergenic regions.
-
Generate statistics files and files used for other analyses:
-
Generates an extraction overview file (
overview.csv), which records the data type settings used for extraction, all features found in the sequences, missing features or qualifiers, and genes found in each species. - The information about the species (IDs) included in the dataset, including organism name, lineages, A/T/C/G content, and AT/GC skewness. [ StatFiles/used_species.csv ]
-
A name table for editing the
Names unificationtable in the GenBank File Extracting settings . Using this table, you can modify the names in the ‘New Name’ column and then import it into theNames unificationtable. This table is extremely useful when extracting genes for the first time. [ StatFiles/name_for_unification.csv ] -
If
Only extract these genesis checked and none of the qualifier values conform to the name inNames unificationtable, then these values will be recorded in thename_not_included.csvtable. [ StatFiles/name_not_included.csv ] - Overall statistics of the mitogenome, including nucleotide composition of the whole genome, protein-coding genes (PCGs), rRNA genes and tRNA genes. [ StatFiles/used_species.csv, Mitogenome version ]
- Initial and stop codon, nucleotide content, skewness as well as length statistics for each PCG and rRNA genes. [ StatFiles/geneStat.csv, Mitogenome version ]
- Nucleotide skewness for each codon site of PCGs. [ StatFiles/CDS/[PCGsCodonSkew.csv | firstCodonSkew.csv | secondCodonSkew.csv | thirdCodonSkew.csv], Mitogenome version ]
- Nucleotide content and skewness of individual elements and the complete mitogenome of all species (IDs) (see Fig. 2 in https://parasitesandvectors.biomedcentral.com/articles/10.1186/s13071-017-2404-1 and Fig. 1 in https://doi.org/10.1186/s12862-018-1249-3 ) [ StatFiles/geom_line.csv, Mitogenome version ]
- Nucleotide statistics of each species (IDs). [ StatFiles/speciesStat/*IDs.csv, Mitogenome version ]
- Organization table for each species (IDs). [ StatFiles/speciesStat/*IDs_org.csv, Mitogenome version ]
- Relative synonymous codon usage table. Note that the abbreviated stop codons (T–, TA-) are removed before the calculation. [ StatFiles/RSCU/*IDs_RSCU.csv, Mitogenome version ]
- Amino acid usage table. [ StatFiles/RSCU/*IDs_AA_usage.csv, Mitogenome version ]
-
Making
ITOL
datasets (will be activated if you check the
ITOL datasetscheckbox)- These are simple *.txt files that you can directly drag-and-drop onto corresponding dendrograms in the iTOL web interface ( https://itol.embl.de )
- Replacing tip labels in batch. [ itolFiles/[itol_labels.txt | itol_gb_labels.txt | itol_ori_labels.txt] ]
-
Assigning colors to different lineages. Colors for each taxon (or lineage) can be specified in
Lineage color. If you don’t select colors for all taxons, PhyloSuite will randomly assign colors to the remaining taxons. For adding or removing lineages, please clickConfigurebutton (see Fig. 1 in https://journals.plos.org/plosone/article?id=10.1371/journal.pone.0181699 ). [ itolFiles/[itol_xxx_ColourStrip.txt | itol_xxx_Text.txt | itol_xxx_Colour.txt] ] - Mapping histogram to the tree (see Fig. 2 in https://parasitesandvectors.biomedcentral.com/articles/10.1186/s13071-017-2245-y ). [ itolFiles/[itolAT.txt | itolLength.txt | itolLength_stack.txt] ]
-
Mapping gene order to the tree. The color, length and shape of each gene icon, as well as the space between the icons (Gene Interval), for the gene order display can be modified using the
Gene order displayfunction. At this step you can also select NCRs to be visualized (if you have set up the PhyloSuite to recognize and extract them, including setting the size threshold, during theStandardizationstep) (see Fig. 6 in https://bmcevolbiol.biomedcentral.com/articles/10.1186/s12862-018-1249-3 ). [ files/itol_gene_order.txt, Mitogenome version ] - Gene order file which can be used to conduct relative analysis using CREx and/or treeREx.
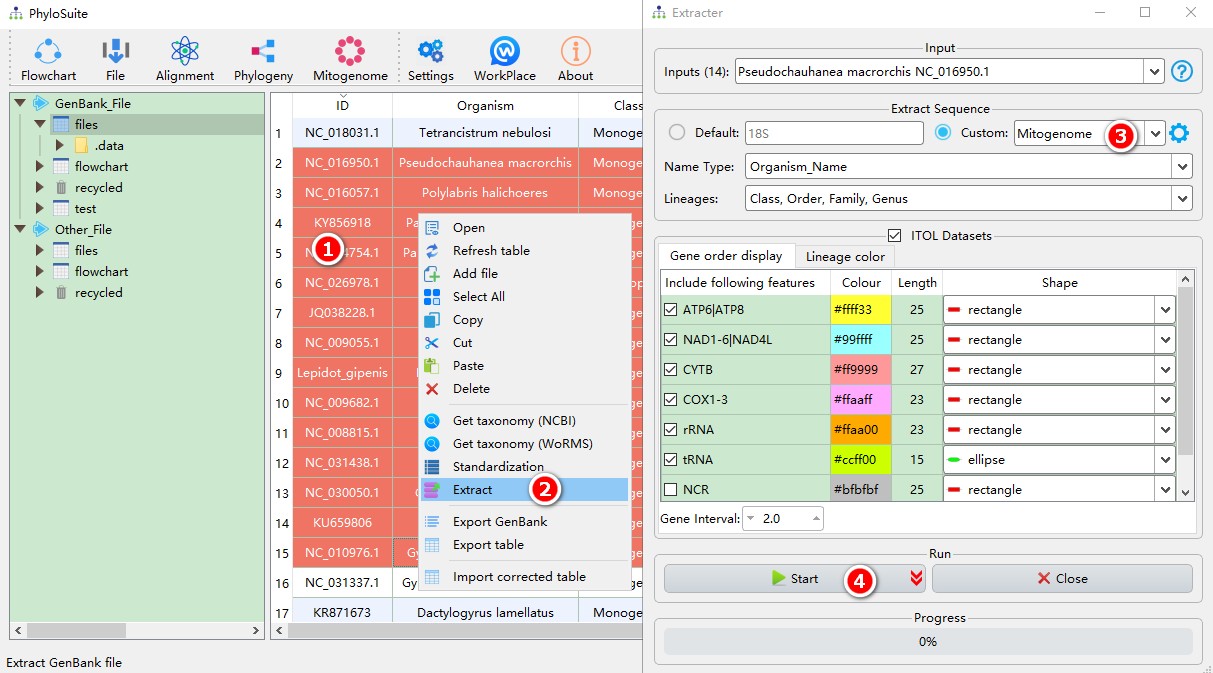
- Select IDs to extract (refer to this to see how to import GenBank records into PhyloSuite);
-
Open
Extractvia right-click, and the sequences will be imported automatically; -
Parameters can be set according to your own needs (if your data are mitochondrial genomes, select
Mitogenomedata-type); -
Start the program.
- Normal mode: align sequence normally.
- Codon mode ( added by PhyloSuite ): the nucleotide sequences of protein-coding genes are translated into AA sequences first, then the AA sequences are aligned by MAFFT, finally the AA alignments are back-translated into corresponding codons. Note that you should choose a proper code table first.
- N2P mode ( added by PhyloSuite ) is identical to the previous mode minus the last step (back-translation): PCGs are translated into AAs and aligned. The result is the AA alignment.
- Select all 12 files;
-
Open
Alignment-->MAFFTthrough the menu bar; - Drag all 12 sequences into the file input box;
-
Parameters can be set according to your own needs (make sure to select the correct
Code Tablefor protein-coding genes, here is 9); -
Start the program.

- Select all 3 files;
-
Open
Alignment-->MACSE (for CDS)through the menu bar; -
Drag all 3 sequences into the
Seq.input box; -
Parameters can be set according to your own needs (make sure to select the correct
Code Table; in the example we selected 9); -
parameters that are not included in the GUI can be added via the
View | Edit commandfunction in the dropdown arrow of the ‘Start’ button; -
Start the program.

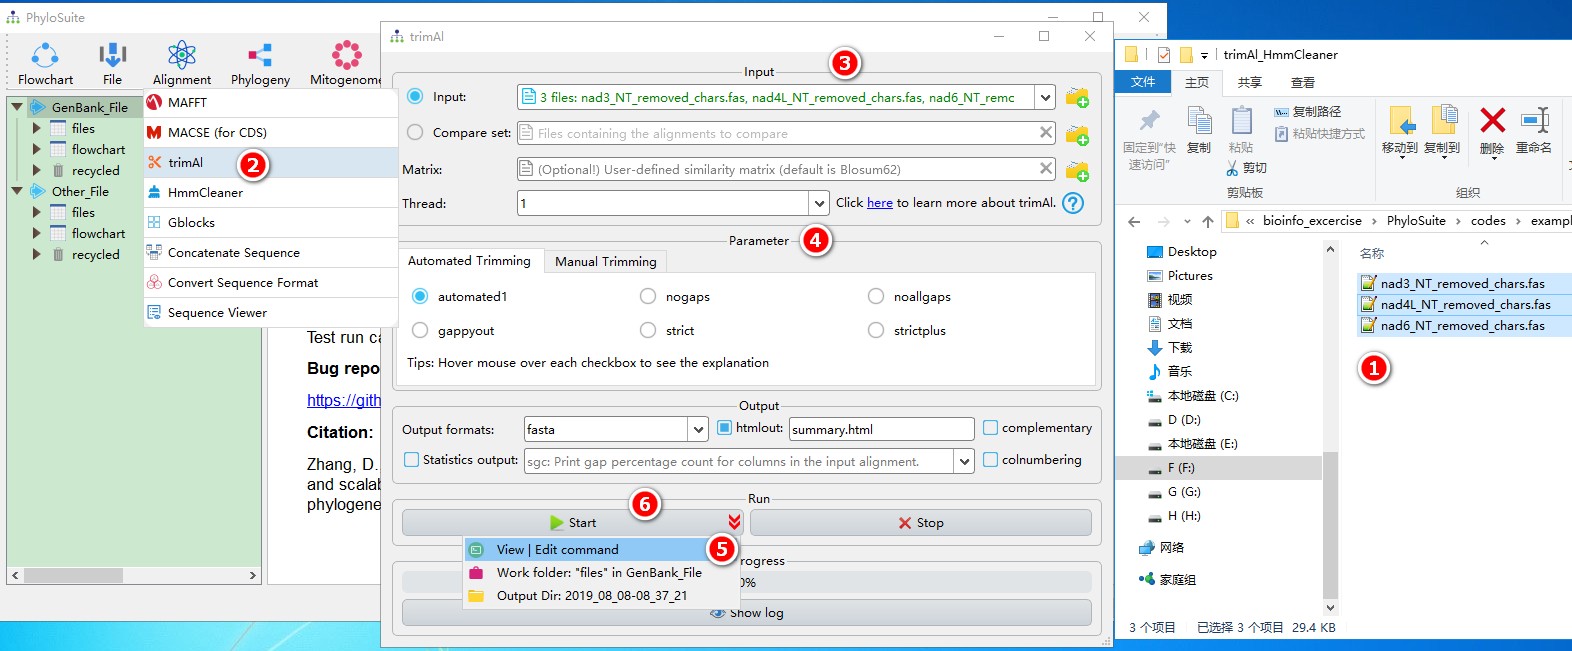
- Select all 3 files;
-
Open
Alignment-->trimAlthrough the menu bar; - Drag all 3 sequences into the input box;
- Parameters can be set according to your own needs;
-
Parameters that are not included in the GUI can be added via the
View | Edit commandfunction in the dropdown arrow of the ‘Start’ button; -
Start the program.
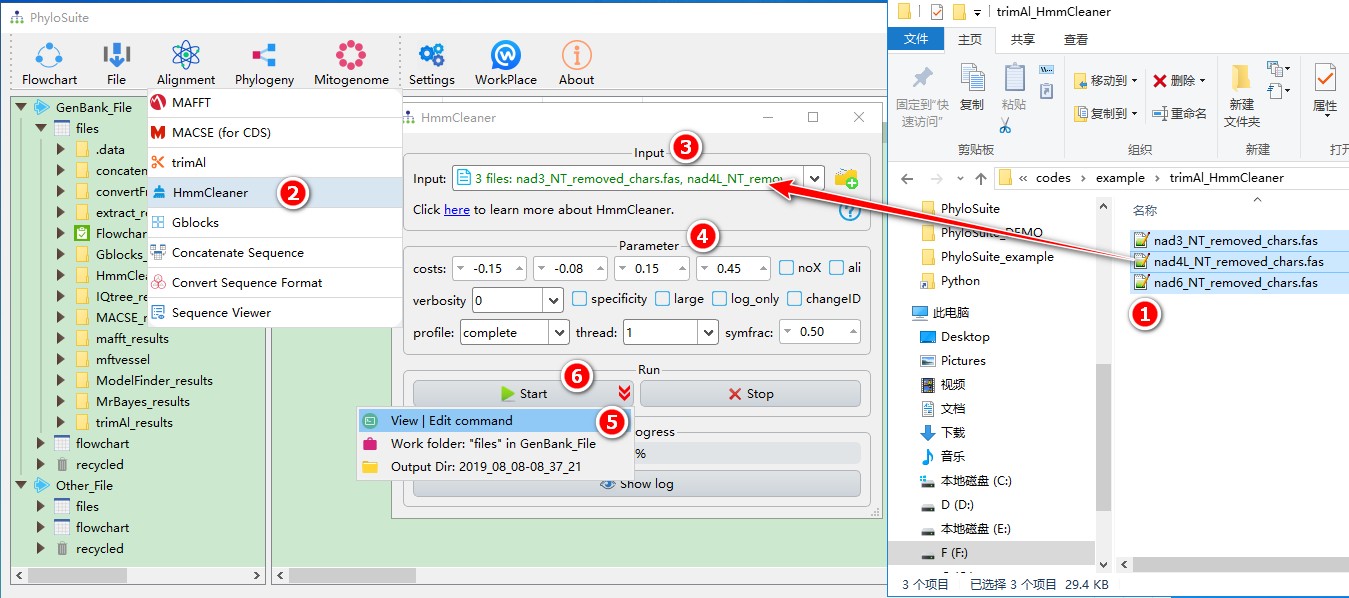
- Select all 3 files;
-
Open
Alignment-->HmmCleanerthrough the menu bar; - Drag all 3 sequences into the input box;
- Parameters can be set according to your own needs;
-
parameters that are not included in the GUI can be added via the
View | Edit commandfunction in the dropdown arrow of the ‘Start’ button; -
Start the program.
- Select all 12 files;
-
Open
Alignment-->Gblocksthrough the menu bar; - Drag all 12 sequences into the file input box;
- Parameters can be set according to your own needs (ensure you choose proper data types, here it should be codons);
-
Start the program.

- Select all 36 files;
-
Open
Alignment-->Concatenate Sequencethrough the menu bar; - Drag all the sequences into the file input box;
-
Output formats could be selected according to your own needs, you may also select
Linear figurefunction if you wish to visualize the concatenated dataset; -
Start the program.

- Select ‘cox1_AA_mafft.fas’ and ‘cox1_NUC_mafft.fas’;
-
Open
Alignment-->Convert Sequence Formatthrough the menu bar; - Drag them into the file input box;
- Select output formats;
-
Start the program.

-
Right click a result in
concatenate_resultsfolder (if not available, please see here for how to make one), then selectImport to ModelFinderin the context menu; - The concatenated dataset with the position index of each gene will be automatically imported;
-
Double-click the text box or click the edit button to open the partition editor window to configure
data blocks(for how to operate partition editor, please see below ); -
Parameters can be set according to your own needs; parameters that are not included in the GUI can be added using the
View | Edit commandfunction in the dropdown arrow of the ‘Start’ button; -
Start the program.

-
Right click a result in
concatenate_resultsfolder (if not available, please see here for how to make one), then selectImport to PartitionFinder2in the context menu; - The concatenated dataset with the position index of each gene will be automatically imported;
-
Double-click the text box or click the edit button to open the partition editor window to configure
data blocks(for how to operate partition editor, please see below ); - Other parameters can be set according to your own needs (make sure you choose proper data types);
-
Start the program.

-
The number
3shown to the left of the data block name indicates that the length of the sequence is a multiple of 3, select one or more data blocks (make sure they are protein-coding genes) exhibiting the icon3and then clickCodon Modebutton, the partition(s) will be changed to codon mode, in which icons1,2, and3correspond to partitions comprising first, second and third codon position of the gene, respectively.;

-
Select gene name(s) with icons
1,2, and3, then clickCancel Codon Modeto change back to the normal partiton mode.

-
The
Name,StartandStopcolumns can be modified via double-clicking the corresponding cells;

-
Closing the window will automatically save the modified partitions;

-
If you want to manually add partition to data blocks, you can paste the text in partition format in the text box below, and then click the
Recognizebutton.

- Select ‘concatenation.phy’ file;
-
Open
Phylogeny-->IQ-TREEthrough the menu bar; - Drag it into the file input box;
-
Select best-fit evolutionary model and associated parameters (+I, +G, etc.) (here if you choose
Auto, IQ-TREE will select the best-fit model and immediately continue with the tree reconstruction, see above); -
Parameters can be set according to your own needs (if you don’t have a partition file, remember to uncheck
Partition Mode), parameters that are not included in the GUI can be added via theView | Edit commandfunction in the dropdown arrow of the ‘Start’ button; -
Start the program.

-
Select
input.nexfile; -
Open
Phylogeny-->MrBayesthrough the menu bar; - Drag it into the file input box;
- Select best-fit evolutionary model and associated parameters (+I, +G, etc.);
- Parameters can be set according to your own needs;
-
Start the program.

-
If you want to export the settings to run MrBayes on CIPRES, click
Show MrBayes Data Block, then select ‘Save to File’, upload this file to CIPRES to run directly (remember to checkMy Data Contains a MrBayes Data Block).

-
If you want to view the tree and convergence diagnostics results when it is running, you can achieve this through the
Stop the run and infer the treeoption accessed via the dropdown arrow of theStopbutton.

-
If you wish to restart a previous run (unfinished or finished), click
Continue Previous Analysis.

-
As shown in the figure below, the execution order of these programs is [
MAFFTand/orMACSE]–>[GblocksortrimAlorHmmCleaner]–>Concatenation–>[ModelFinderorPartitionFinder]–>[IQ-TREEandMrBayes].

-
If you simultaneously choose
MAFFTandMACSE, protein-coding sequences should be used as input, and the results ofMAFFTwill be subsequently refined byMACSE - Only one of the three alignment optimization programs can be selected.
- Only one of the two model selection programs can be selected.
-
Except for the model selection programs and
Concatenation, other programs do not have to be selected (whenMAFFT,MACSE,trimAl,HmmCleaner, orGblocksis selected,Concatenationmust be retained because it serves as a bridge that connects these programs with downstream programs, even for a single gene). -
Only the first program requires an input file(s), whereas the input file(s) of other programs will be autodetected from the results of upstream analyses.
Note that the two
Tree Reconstructionprograms can use either the results ofModelFinderorPartitionFinder, and they can run in parallel. -
As the
Minimum Number Of Sequences For A Conserved PositionandMinimum Number Of Sequences For A Flank Positionoptions are enabled only when files are input directly into Gblocks , these two options are set by default to the most ‘relaxed’ values (i.e. lowest values) in the Flowchart mode, unless ifGblocksis the first program in a Flowchart analysis, in which case you can set the two options as you would normally. -
For the model selection and tree reconstruction, if only
ModelFinderandIQ-TREEare selected,IQ-TREEwill use the best-fit model calculated byModelFinder; if onlyModelFinderandMrBayesare selected, thenMrbayesoption must be selected in theModel formenu ofModelFinder; and finally, ifModelFinder,IQ-TREEandMrBayesare selected, the results ofModelFinderwill be used only forMrBayes(thus it will use the same settings as described in the preceding note), whereasIQ-TREEwill first conduct the best-fit model selection inbuilt in the algorithm, and conduct the tree inference (using theAutooption in theModelsmenu, equivalent to-m TESTor-m MFP). -
PhyloSuite also provides a function to check and autocorrect the parameters between selected programs, including those specified in the previous note, conflicting sequence types, conflicting partition modes, etc.

-
When the flowchart is finished, the parameter settings and the citations of corresponding software programs will be summarized in the
display area
of the
flowchart. - Select ‘Diplectanum_longipenis_mtDNA.docx’ file (you can open this file to see how to annotate the sequence);
-
Open
Mitogenome-->Parse Annotationthrough the menu bar; - Drag the file into the file input box;
- Click the blue word (as shown in figure) to generate a template file;
-
Drag the template file into the
Template Fileinput box; -
Fill in necessary information, such as
Organism,Lineage,Code Table, etc. - Other Parameters can be set according to your own needs;
-
Start the program.
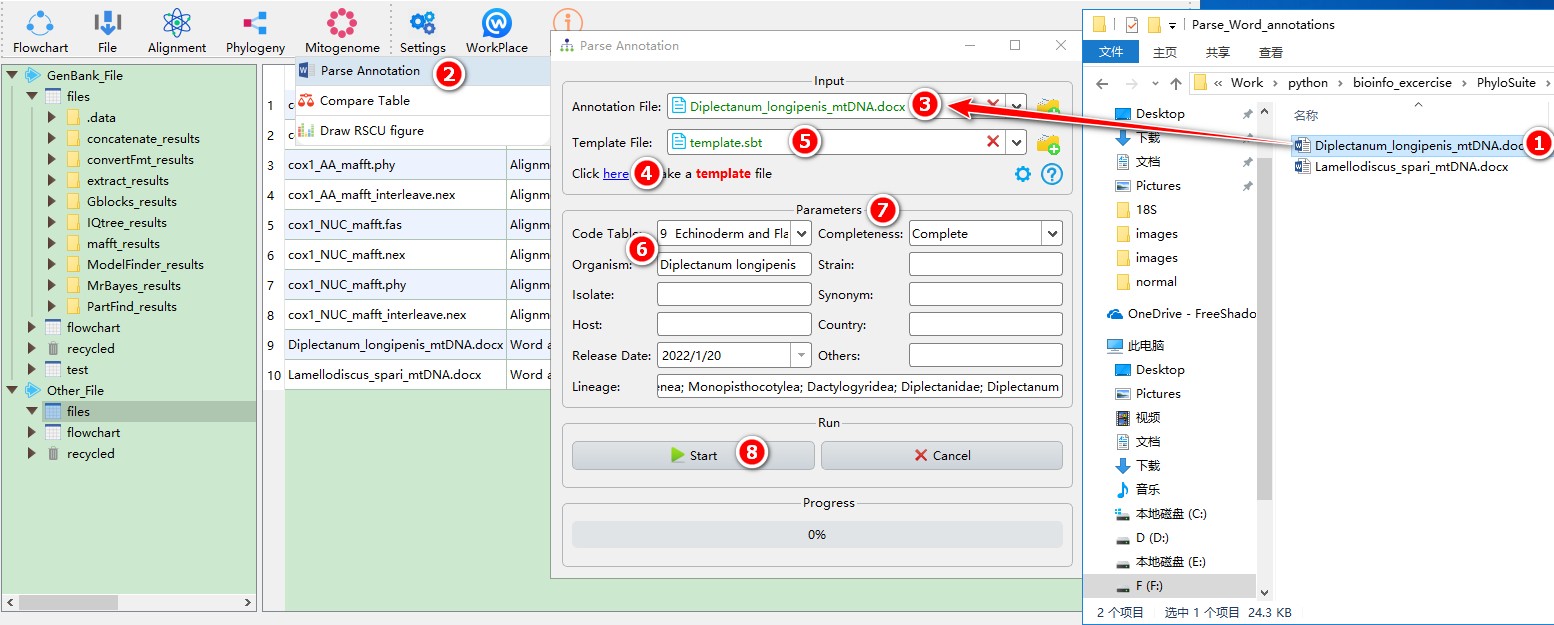
-
Select the
extract_resultsfolder (if not available, please see here for how to make one, mitogenome datatype only); -
Open
Mitogenome-->Compare Tablethrough the menu bar; -
All extracted organization tables will be automatically imported; remove the tables you are not interested in using the
removebutton; -
Check
Calculate pairwise similarityif you want to calculate pairwise similarity for homologous genes; -
Start the program;

-
If you want to compare nucleotide composition and skewness table (identified by no ‘_org’ in its name in the results folder), you should open the
extract_resultsfolder first, then enter ‘extract_results\StatFiles\speciesStat’, select interested files, drag them into theTablesbox, uncheckCalculate pairwise similarity, then Start the program.

-
Select the
extract_resultsfolder (if not available, please see here for how to make one, mitogenome datatype only); -
Open
Mitogenome-->Draw RSCU figurethrough the menu bar; -
All extracted RSCU tables will be automatically imported, remove the tables you are not interested in using the
removebutton; - Parameters can be set according to your own needs;
-
Start the program;
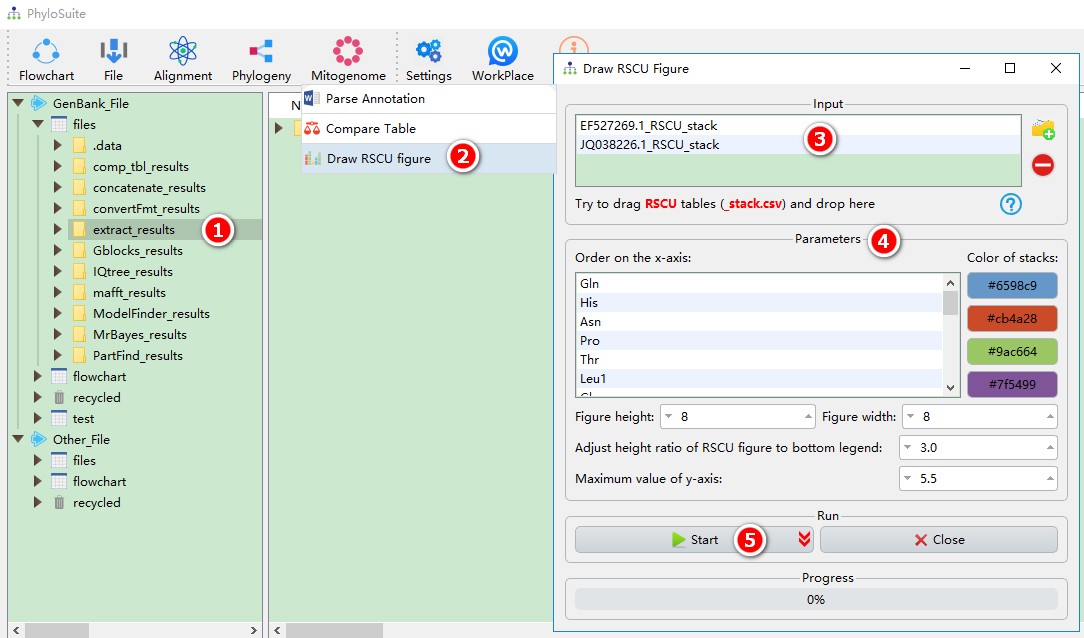
-
First you should download the latest PhyloSuite package at
https://github.com/dongzhang0725/PhyloSuite/releases
or
https://dongzhang0725.github.io/dongzhang0725.github.io/installation/#Chinese_download_link
(China).
Note: for Windows, you should download
PhyloSuite_xxx_Win.rar, instead of the installer file. -
Unzip the package, select and copy all files, go to the installation path of PhyloSuite, open the
PhyloSuitefolder, paste the copied files directly into this folder (if prompted so, confirm that you wish to replace files with the same name).

-
Open PhyloSuite, you should find that you are running an updated version, and that your previous settings have been retained.

7.2. PhyloSuite run failed
If the execution of PhyloSuite fails, please first try shutting down your antivirus program.
7.3. MrBayes does not work
If you get ‘msvcr120.dll is missing’ error in Windows, you can fix it via this solution .
For other problems, please search the
error codein the website.7.4. PhyloSuite get stuck
7.5. MAFFT error
If you encounter errors with MAFFT, such as:
-
/usr/bin/awk: cannot execute binary file -
-gt: unary operator expected -
options: check source file - Reinstall MAFFT from the official website: https://mafft.cbrc.jp/alignment/software/ .
- Specify the MAFFT executable file in PhyloSuite . For detailed instructions, see How to configure plugins in PhyloSuite .
-
Important:
For MAFFT, make sure to specify the
mafft.batfile as the executable in PhyloSuite. - 检索、提取、组织和管理分子序列数据,包括 GenBank 条目、核苷酸和氨基酸序列,以及 Word 文档中注释的序列;
- 使用 MAFFT 进行序列批量比对,我们为此添加了密码子比对(翻译比对)模式;
- 使用 MACSE 对蛋白质编码序列进行批量比对或比对优化;
- 使用 trimAl、HmmCleaner 或 Gblocks 批量优化模糊比对区域;
- 批量转换比对格式(FASTA、PHYLIP、PAML、AXT 和 NEXUS);
- 将多个比对串联成单个数据集,并为下游分析准备分区文件;
- 使用 ModelFinder 或 PartitionFinder 选择最佳拟合的进化模型和/或分区方案;
- 使用 IQ-TREE(最大似然法)和/或 MrBayes(贝叶斯推断)重建系统发育树;
- 将功能 (ii) 到 (viii) 链接成一个工作流;
- 使用功能 (i) 生成的数据集在 iTOL 网络工具中注释系统发育树;
- 对线粒体基因组进行全面的生物信息学分析;
- 使用类似 MEGA 的序列查看器可视化和编辑序列;
-
在 PhyloSuite 工作区中存储、组织和可视化每次分析的数据和结果。
-
点击
GenBank_File或Other_File根文件夹将显示 PhyloSuite 的主页。将鼠标悬停在根文件夹上可查看添加工作文件夹和在资源管理器中打开按钮;前者可用于创建新的工作文件夹,后者则在您的本地文件资源管理器中打开该文件夹;
-
选择您的任意工作文件夹(根文件夹下一级)将显示您保存的数据集列表。GenBank 记录列表存储在
GenBank_File根文件夹中,序列文件存储在Other_File根文件夹中。将鼠标悬停在工作文件夹上可看到在资源管理器中打开和GenBank 文件信息显示设置按钮;后者可用于控制每个 ID 的哪些数据将显示在主页面。
-
选择结果文件夹(工作文件夹下一级)将显示结果。将鼠标悬停在结果文件夹上可看到
在资源管理器中打开按钮;
-
双击上述任意文件夹(根文件夹、工作文件夹和结果文件夹)将在您的本地文件资源管理器中打开该文件夹;
-
将鼠标悬停在菜单栏上以选择要使用的功能。
- 如果 Python 2.7、Perl 5、Java (JRE > 1.5)、HmmCleaner.pl 和 trimAl 已安装并添加到环境变量 ($PATH) 中,它们将被 PhyloSuite 自动检测到。
- 如果您的计算机上已安装这些程序,您可以直接指定可执行文件(如上表所示)。 请注意,对于 PartitionFinder2,您应指定 ‘partitionfinder-2.1.1’ 文件夹。
- 如果您没有这些程序,可以使用下载按钮自动下载并安装它们。 注意:Python 2.7 将下载 Anaconda Python 发行版(因为它包含了 PartitionFinder2 所需的所有依赖项:numpy, pandas, pytables, pyparsing, scipy 和 sklearn)。由于其大小约为 500M,因此下载可能需要一些时间。
- GenBank 文件:*.gb, *.gbk, *.gbf, *.gbff
- fasta:*.fas, *.fasta
- phylip:*.phy, *.phylip
- nexus:*.nex, *.nxs, *.nexus
- Word 文档文件:*.docx
-
使用
文件
菜单下的
导入文件或ID功能或主 显示区域 中的打开文件。此模式支持导入完整的 GenBank 文件和 GenBank accession 号(ID)列表,PhyloSuite 将自动从 GenBank 检索这些文件; - 将 GenBank 格式文件拖放到 显示区域 中。
- 复制 GenBank 文件内容并将其粘贴到 显示区域 中。
- 选择任意工作文件夹(这里我选择了 files);
-
点击
打开文件/输入ID打开输入窗口。 - 将 ID 复制到文本框中(支持空格、换行符、制表符等作为分隔符);
- 输入您的电子邮件(告知 NCBI 是谁在下载序列);
-
点击
开始进行下载。 - 可以通过拖放或上下文菜单(”添加文件”)将文件(ID)添加到您正在处理的数据集中。
-
可以通过
文件 --> 标准化 GenBank 文件功能或上下文菜单中的标准化来标准化 GenBank 文件的注释(这包括上面讨论的基因名称统一)。此功能会打开一个新的弹出窗口,显示数据集中可能存在的错误和警告,您可以在其中手动编辑文件(仅限线粒体基因组数据)。这些通常涉及缺失的基因或非标准化的注释。对于后者,您可以点击此窗口右上角的齿轮按钮(设置),打开上面讨论的 GenBank 文件提取设置 窗口。通过勾选设置 NCR 阈值框,您可以提示 PhyloSuite 也识别非编码区域(这允许您稍后使用提取功能提取它们)。您可以设置希望识别的 NCR 大小(以 bp 为单位)的阈值。 -
对于线粒体基因组数据,可以使用
预测 tRNA (LEU 和 SER)按钮,通过该按钮您可以在 ARWEN 的帮助下重新注释模糊注释的 tRNA。 -
您可以通过
设置 --> GenBank 文件信息显示选择您希望显示的文件中包含的信息。例如:ID、organism、lineages、references、source 等(参见 信息显示 部分)。 -
包含相同序列(
重复项
)的 ID 可以使用
高亮相同序列按钮(星形,底部/右侧)识别并自动删除。 -
您可以使用其旁边的
按 ID 查找记录按钮搜索特定的 ID。 - 每个 ID 可以通过上下文菜单用任何文本查看器程序(例如记事本)打开,然后手动编辑。
- 选定的 ID 可以(通过上下文菜单)导出为 GenBank (.gb) 文件,或包含 GUI 中显示信息的表格 (.csv)。
- 选定的 ID 可以通过拖放导入到不同的工作文件夹中。
-
使用
文件
菜单下的
导入文件或ID功能或 显示区域 中的打开文件。 - 将文件拖放到 显示区域 中。
- 对于多序列文件,将显示文件中的序列数量和比对状态(已比对或未比对)。
- 可以删除、导出或添加文件和序列。
-
比对可以直接用作任何(相关)插件功能的输入文件:
MAFFT、Gblocks、串联序列、转换序列格式、序列查看器、Partitionfinder2、ModelFinder、IQ-TREE和MrBayes功能。 -
解析注释功能仅适用于 *.docx 文件。 -
所有比对都可以在
序列查看器中管理,它们可以被_反向_、 互补 、 反向互补_和_修剪 。 -
打开菜单栏中的
文件-->在 NCBI 中搜索; -
输入关键词(
Monogenea[ORGN] AND (mitochondrion[TITL] OR mitochondrial[TITL]) AND 10000:50000[SLEN]); - 输入您的电子邮件以告知 NCBI 是谁在下载序列;
- 按 Enter 键或点击搜索按钮开始搜索;
-
搜索完成后,选择一个工作文件夹来存放序列;选择
GenBank_File根文件夹下的工作文件夹将以 GenBank 格式下载序列,而选择Other_File根文件夹下的工作文件夹将以 FASTA 格式下载序列; -
点击
下载按钮开始下载。
- 首先,您可以定义希望提取哪些 特征 ,例如 CDS 、 rRNA 和 tRNA 等。
-
其次,您可以定义 GenBank 文件
限定符
的值,该值将用作特征的名称。例如,您可以选择仅提取
rRNA
的限定符
product的值,同时选择提取 CDS 的限定符gene和product的值。在这种情况下,PhyloSuite 将首先搜索 CDS 的gene的 值/名称 ,如果没有gene限定符,它将搜索product的 值/名称 ( 注意限定符可以通过拖拽重新排序 )。如果在特征中找不到任何指定的限定符,在使用 GenBank 文件提取器 功能时,它将被记录在一个表格文件中,或者在使用标准化功能时被标记为错误。 -
最后,您可以通过
名称统一表替换上一步中搜索到的 值/名称 来统一数据集的注释。当使用 GenBank 文件提取器 或标准化功能时,如果在相应的限定符中找到 ‘旧名称’,它将被替换为 ‘新名称’。如果您希望仅提取此表中 值/名称 可用的特征(基因)子集,您可以通过勾选仅提取这些基因复选框来实现。此表可以导出,或从逗号分隔表 (*.csv) 导入(表下方的导出/导入设置功能)。有一个统一名称的便捷方法:如果您第一次没有任何设置就提取基因,将生成一个 “name_for_unification.csv” 文件,可用于设置新名称,然后导入到设置中(必须使用 “csv” 格式)。 请注意,所有特征的所有限定符的值/名称都包含在单个表中。 -
如果您在选择了列出的文件夹或比对文件的情况下打开
IQ-TREE
,它们将自动加载到
IQ-TREE
中。
-
每次您打开
IQ-TREE
时,PhyloSuite 都会搜索整个工作区,并为
IQ-TREE
排序所有可接受的输入文件。
- 如果您在 IQ-TREE 界面中没有输入文件,点击输入框将打开步骤 2 中的选择。
- 将文件拖入 “输入” 框;
- 点击输入框右侧的 ‘打开文件夹’ 图标。
-
提取在
GenBank 文件提取设置
中定义(选择)的基因,并以 fasta 格式保存它们。例如,如果您选择提取
CDS、tRNA和rRNA特征 ,此功能将从所有选定的 GenBank 文件中提取这些特征,并将它们存储在相应命名的文件夹(CDS, tRNA, rRNA)中。此外,CDS特征将被分成两个文件夹:’CDS_AA’ 文件夹包含从translation限定符 提取的氨基酸序列,而 ‘CDS_NUC’ 文件夹包含核苷酸序列。对于 线粒体基因组 版本,还有一个额外的 “self-translated_AA” 文件夹,其中包含由 PhyloSuite 从核苷酸序列(CDS)翻译而来的氨基酸序列。 请注意,一个 ID 内可能存在重复的基因,在这种情况下,PhyloSuite 将按出现顺序对重复的基因名称进行编号。例如,如果有三个cox1基因,那么它们将被保存为cox1.fas、cox1_copy2.fas和cox1_copy3.fas。此外,PhyloSuite 还提供了解析基因重复功能(在参数选项卡中可用)来自动识别和移除重复的基因。 - 提取重叠区和基因间区。
-
生成统计文件和其他分析使用的文件:
-
生成提取概览文件 (
overview.csv),其中记录了用于提取的数据类型设置、序列中发现的所有特征、缺失的特征或限定符,以及每个物种中发现的基因。 - 数据集中包含的物种(ID)信息,包括物种名称、谱系、A/T/C/G 含量以及 AT/GC 偏度。[ StatFiles/used_species.csv ]
-
用于编辑
GenBank 文件提取设置
中
名称统一表的名称表。使用此表,您可以修改 ‘新名称’ 列中的名称,然后将其导入到名称统一表中。在首次提取基因时,此表非常有用。[ StatFiles/name_for_unification.csv ] -
如果勾选了
仅提取这些基因且没有任何限定符值符合名称统一表中的名称,则这些值将被记录在name_not_included.csv表中。[ StatFiles/name_not_included.csv ] - 线粒体基因组的总体统计,包括全基因组的核苷酸组成、蛋白质编码基因(PCGs)、rRNA 基因和 tRNA 基因。[ StatFiles/used_species.csv,线粒体基因组版本 ]
- 每个 PCG 和 rRNA 基因的起始和终止密码子、核苷酸含量、偏度以及长度统计。[ StatFiles/geneStat.csv,线粒体基因组版本 ]
- PCGs 每个密码子位点的核苷酸偏度。[ StatFiles/CDS/[PCGsCodonSkew.csv | firstCodonSkew.csv | secondCodonSkew.csv | thirdCodonSkew.csv],线粒体基因组版本 ]
- 所有物种(ID)的单个元件和完整线粒体基因组的核苷酸含量和偏度(参见 https://parasitesandvectors.biomedcentral.com/articles/10.1186/s13071-017-2404-1 中的图 2 和 https://doi.org/10.1186/s12862-018-1249-3 中的图 1)[ StatFiles/geom_line.csv,线粒体基因组版本 ]
- 每个物种(ID)的核苷酸统计。[ StatFiles/speciesStat/*IDs.csv,线粒体基因组版本 ]
- 每个物种(ID)的组织结构表。[ StatFiles/speciesStat/*IDs_org.csv,线粒体基因组版本 ]
- 相对同义密码子使用表。请注意,在计算之前会移除简写的终止密码子(T–, TA-)。[ StatFiles/RSCU/*IDs_RSCU.csv,线粒体基因组版本 ]
- 氨基酸使用表。[ StatFiles/RSCU/*IDs_AA_usage.csv,线粒体基因组版本 ]
-
制作
ITOL
数据集(如果勾选
ITOL 数据集复选框将被激活)- 这些是简单的 *.txt 文件,您可以直接将它们拖放到 iTOL 网络界面( https://itol.embl.de )中相应的系统树上。
- 批量替换末端标签。[ itolFiles/[itol_labels.txt | itol_gb_labels.txt | itol_ori_labels.txt] ]
-
为不同的谱系分配颜色。每个分类单元(或谱系)的颜色可以在
谱系颜色中指定。如果您没有为所有分类单元选择颜色,PhyloSuite 将为剩余的分类单元随机分配颜色。要添加或移除谱系,请点击配置按钮(参见 https://journals.plos.org/plosone/article?id=10.1371/journal.pone.0181699 中的图 1)。[ itolFiles/[itol_xxx_ColourStrip.txt | itol_xxx_Text.txt | itol_xxx_Colour.txt] ] - 将柱状图映射到系统树上(参见 https://parasitesandvectors.biomedcentral.com/articles/10.1186/s13071-017-2245-y 中的图 2)。[ itolFiles/[itolAT.txt | itolLength.txt | itolLength_stack.txt] ]
-
将基因顺序映射到系统树上。基因顺序显示中每个基因图标的颜色、长度和形状,以及图标之间的间距(基因间隔),可以使用
基因顺序显示功能进行修改。在此步骤中,您还可以选择要可视化的 NCRs(如果您已在标准化步骤中设置了 PhyloSuite 来识别和提取它们,包括设置大小阈值)(参见 https://bmcevolbiol.biomedcentral.com/articles/10.1186/s12862-018-1249-3 中的图 6)。[ files/itol_gene_order.txt,线粒体基因组版本 ] - 可用于使用 CREx 和/或 treeREx 进行相关分析的基因顺序文件。
- 选择要提取的 ID(参考 此处 了解如何将 GenBank 记录导入 PhyloSuite);
-
通过右键单击打开
提取,序列将自动导入; -
参数可根据您自己的需要进行设置(如果您的数据是线粒体基因组,请选择
线粒体基因组数据类型); -
启动程序。
- 常规模式:正常比对序列。
- 密码子模式( 由 PhyloSuite 添加 ):首先将蛋白质编码基因的核苷酸序列翻译成 AA 序列,然后通过 MAFFT 比对 AA 序列,最后将 AA 比对结果反向翻译回相应的密码子。 请注意,您应首先选择合适的密码子表。
- N2P 模式( 由 PhyloSuite 添加 )与前一模式相同,但省略最后一步(反向翻译):将 PCGs 翻译成 AAs 并进行比对。结果是 AA 比对。
- 选择全部 12 个文件;
-
通过菜单栏打开
比对-->MAFFT; - 将所有 12 个序列拖放到文件输入框中;
-
参数可根据您自己的需要进行设置(确保为蛋白质编码基因选择正确的
密码子表,此处为 9); -
启动程序。
- 选择全部 3 个文件;
-
通过菜单栏打开
比对-->MACSE (用于 CDS); -
将所有 3 个序列拖放到
Seq.输入框中; -
参数可根据您自己的需要进行设置(确保选择正确的
密码子表;在示例中我们选择了 9); -
可以通过 ‘开始’ 按钮下拉箭头中的
查看 | 编辑命令功能添加 GUI 中未包含的参数; -
启动程序。
- 选择全部 3 个文件;
-
通过菜单栏打开
比对-->trimAl; - 将所有 3 个序列拖放到输入框中;
- 参数可根据您自己的需要进行设置;
-
可以通过 ‘开始’ 按钮下拉箭头中的
查看 | 编辑命令功能添加 GUI 中未包含的参数; -
启动程序。
- 选择全部 3 个文件;
-
通过菜单栏打开
比对-->HmmCleaner; - 将所有 3 个序列拖放到输入框中;
- 参数可根据您自己的需要进行设置;
-
可以通过 ‘开始’ 按钮下拉箭头中的
查看 | 编辑命令功能添加 GUI 中未包含的参数; -
启动程序。
- 选择全部 12 个文件;
-
通过菜单栏打开
比对-->Gblocks; - 将所有 12 个序列拖放到文件输入框中;
- 参数可根据您自己的需要进行设置(确保选择合适的数据类型,此处应为密码子);
-
启动程序。
- 选择全部 36 个文件;
-
通过菜单栏打开
比对-->串联序列; - 将所有序列拖放到文件输入框中;
-
输出格式可根据您自己的需要选择,如果您希望可视化串联数据集,也可以选择
线性图功能; -
启动程序。
- 选择 ‘cox1_AA_mafft.fas’ 和 ‘cox1_NUC_mafft.fas’;
-
通过菜单栏打开
比对-->转换序列格式; - 将它们拖放到文件输入框中;
- 选择输出格式;
-
启动程序。
-
右键单击
concatenate_results文件夹中的一个结果(如果不可用,请参阅 此处 了解如何创建),然后在上下文菜单中选择导入到 ModelFinder; - 带有每个基因位置索引的串联数据集将自动导入;
-
双击文本框或点击编辑按钮打开分区编辑器窗口以配置
数据块(关于如何操作分区编辑器,请参阅 下文 ); -
参数可根据您自己的需要进行设置;可以通过 ‘开始’ 按钮下拉箭头中的
查看 | 编辑命令功能添加 GUI 中未包含的参数; -
启动程序。
-
右键单击
concatenate_results文件夹中的一个结果(如果不可用,请参阅 此处 了解如何创建),然后在上下文菜单中选择导入到 PartitionFinder2; - 带有每个基因位置索引的串联数据集将自动导入;
-
双击文本框或点击编辑按钮打开分区编辑器窗口以配置
数据块(关于如何操作分区编辑器,请参阅 下文 ); - 其他参数可根据您自己的需要进行设置(确保选择正确的数据类型);
-
启动程序。
-
数据显示块名称左侧显示的数字
3表示序列长度是 3 的倍数,选择一个或多个显示3图标的数据块(确保它们是蛋白质编码基因),然后点击密码子模式按钮,分区将更改为密码子模式,其中图标1、2和3分别对应包含该基因第一、第二和第三密码子位置的分区;
-
选择带有图标
1、2和3的基因名称,然后点击取消密码子模式以切换回正常的分区模式。
-
名称、起始和终止列可以通过双击相应的单元格进行修改;
-
关闭窗口将自动保存修改后的分区;
-
如果您想手动向数据块添加分区,可以在下面的文本框中粘贴分区格式的文本,然后点击
识别按钮。
- 选择 ‘concatenation.phy’ 文件;
-
通过菜单栏打开
系统发育-->IQ-TREE; - 将其拖放到文件输入框中;
-
选择最佳拟合进化模型及相关参数(+I, +G 等)(这里如果您选择
自动,IQ-TREE 将选择最佳拟合模型并立即继续进行树重建,见上文); -
参数可根据您自己的需要进行设置(如果您没有分区文件,请记住取消勾选
分区模式),可以通过 ‘开始’ 按钮下拉箭头中的查看 | 编辑命令功能添加 GUI 中未包含的参数; -
启动程序。
-
选择
input.nex文件; -
通过菜单栏打开
系统发育-->MrBayes; - 将其拖放到文件输入框中;
- 选择最佳拟合进化模型及相关参数(+I, +G 等);
- 参数可根据您自己的需要进行设置;
-
启动程序。
-
如果您想导出设置以在 CIPRES 上运行 MrBayes,请点击
显示 MrBayes 数据块,然后选择 ‘保存到文件’,将此文件上传到 CIPRES 直接运行(记住勾选我的数据包含 MrBayes 数据块)。
-
如果您想在运行时查看树和收敛诊断结果,可以通过
停止按钮下拉箭头中的停止运行并推断树选项来实现。
-
如果您希望重新启动先前的运行(未完成或已完成),请点击
继续先前分析。
-
如下图所示,这些程序的执行顺序是 [
MAFFT和/或MACSE]–>[Gblocks或trimAl或HmmCleaner]–>串联–>[ModelFinder或PartitionFinder]–>[IQ-TREE和MrBayes]。
-
如果您同时选择
MAFFT和MACSE,应使用蛋白质编码序列作为输入,并且MAFFT的结果随后将由MACSE进行优化。 - 只能选择三种比对优化程序中的一种。
- 只能选择两种模型选择程序中的一种。
-
除了模型选择程序和
串联外,其他程序不必选择(当选择MAFFT、MACSE、trimAl、HmmCleaner或Gblocks时,必须保留串联,因为它充当连接这些程序与下游程序的桥梁,即使是单基因也是如此)。 -
只有第一个程序需要输入文件,而其他程序的输入文件将从上游分析的结果中自动检测。
请注意,两个
树重建程序可以使用ModelFinder或PartitionFinder的结果,并且它们可以并行运行。 -
由于
保守位置的最小序列数和侧翼位置的最小序列数选项仅在文件直接输入到 Gblocks 时才启用,因此在工作流模式下,这两个选项默认设置为最“宽松”的值(即最低值),除非Gblocks是工作流分析中的第一个程序,在这种情况下,您可以像通常那样设置这两个选项。 -
对于模型选择和树重建,如果仅选择
ModelFinder和IQ-TREE,则IQ-TREE将使用ModelFinder计算出的最佳拟合模型;如果仅选择ModelFinder和MrBayes,则必须在ModelFinder的模型用于菜单中选择Mrbayes选项;最后,如果选择了ModelFinder、IQ-TREE和MrBayes,则ModelFinder的结果将仅用于MrBayes(因此它将使用前述说明中描述的相同设置),而IQ-TREE将首先执行算法内置的最佳拟合模型选择,然后进行树推断(使用模型菜单中的自动选项,相当于-m TEST或-m MFP)。 -
PhyloSuite 还提供了一个功能,用于检查和自动校正所选程序之间的参数,包括前述说明中指定的参数、冲突的序列类型、冲突的分区模式等。
-
当工作流完成时,相应软件程序的参数设置和引用将汇总在
工作流的 显示区域 中。 - 选择 ‘Diplectanum_longipenis_mtDNA.docx’ 文件(您可以打开此文件查看如何注释序列);
-
通过菜单栏打开
线粒体基因组-->解析注释; - 将文件拖放到文件输入框中;
- 点击蓝色文字(如图所示)生成模板文件;
-
将模板文件拖放到
模板文件输入框中; -
填写必要信息,例如
物种、谱系、密码子表等。 - 其他参数可根据您自己的需要进行设置;
-
启动程序。
-
选择
extract_results文件夹(如果不可用,请参阅 此处 了解如何创建,仅限线粒体基因组数据类型); -
通过菜单栏打开
线粒体基因组-->比较表格; -
所有提取的组织结构表将自动导入;使用
移除按钮移除您不感兴趣的表格; -
如果要计算同源基因的成对相似性,请勾选
计算成对相似性; -
启动程序;
-
如果要比较核苷酸组成和偏度表(通过结果文件夹中名称不包含 ‘_org’ 来识别),您应首先打开
extract_results文件夹,然后进入 ‘extract_results\StatFiles\speciesStat’,选择感兴趣的文件,将它们拖放到表格框中,取消勾选计算成对相似性,然后启动程序。
-
选择
extract_results文件夹(如果不可用,请参阅 此处 了解如何创建,仅限线粒体基因组数据类型); -
通过菜单栏打开
线粒体基因组-->绘制 RSCU 图; -
所有提取的 RSCU 表将自动导入,使用
移除按钮移除您不感兴趣的表格; - 参数可根据您自己的需要进行设置;
-
启动程序;
-
首先,您应该下载最新的 PhyloSuite 包,地址为
https://github.com/dongzhang0725/PhyloSuite/releases
或
https://dongzhang0725.github.io/dongzhang0725.github.io/installation/#Chinese_download_link
(中国)。
注意:对于 Windows,您应该下载
PhyloSuite_xxx_Win.rar,而不是安装程序文件。 -
解压包,选择并复制所有文件,转到 PhyloSuite 的安装路径,打开
PhyloSuite文件夹,将复制的文件直接粘贴到此文件夹中(如果提示,请确认您希望替换同名的文件)。
-
打开 PhyloSuite,您应该会发现您正在运行更新后的版本,并且您以前的设置已被保留。
7.2. PhyloSuite 运行失败
如果 PhyloSuite 执行失败,请首先尝试关闭您的杀毒软件。
7.3. MrBayes 无法工作
有时 MrBayes 会立即完成,但不报告错误。通常您可以尝试在终端中执行 MrBayes 来查找问题:
如果您在 Windows 中遇到 ‘msvcr120.dll 丢失’ 错误,您可以通过 此解决方案 进行修复。
对于其他问题,请在网站上搜索
错误代码。7.4. PhyloSuite 卡顿
如果 PhyloSuite 变得越来越卡顿,这可能是由于工作区中的数据不断增加造成的。要解决此问题,您应该创建一个新的工作区。通常,PhyloSuite 鼓励用户创建多个工作区来保存他们的工作。
7.5. MAFFT 错误
-
/usr/bin/awk: 无法执行二进制文件 -
-gt: 需要一元运算符 -
选项:检查源文件 - 从官方网站重新安装 MAFFT: https://mafft.cbrc.jp/alignment/software/ 。
- 在 PhyloSuite 中指定 MAFFT 可执行文件。详细说明请参阅 如何在 PhyloSuite 中配置插件 。
-
重要提示:
对于 MAFFT,请确保在 PhyloSuite 中将
mafft.bat文件指定为可执行文件。
在
自定义菜单中,您可以选择在 GenBank 文件提取设置 中预设的数据类型。在谱系菜单中,您可以选择在结果中包含哪些谱系。关于序列的名称,用户可以通过名称类型功能自定义,其中 ID、organism、科、纲、isolate、strain 等都是可用的。5.1.1. 简要 示例
关于自定义提取,请参阅 自定义提取
关于综合演示,请参阅 多基因教程 和 单基因教程 。关于如何使用生成的 iTOL 数据集,请参阅 系统发育树注释 。5.2. MAFFT
关于 MAFFT 的安装,请参阅 插件安装 部分。关于 MAFFT 的输入文件,请参阅 输入文件 部分。 请注意,输入文件应为 FASTA 格式。 关于 MAFFT 的结果,请参阅 输出文件 部分。
PhyloSuite 使 MAFFT 能够使用同一组参数__批量运行多个文件__,这意味着您可以同时将多个文件输入到 MAFFT 中。PhyloSuite 为 MAFFT 提供了三种比对模式:
当使用密码子模式进行比对时,如果存在内部终止密码子,PhyloSuite 将弹出一个警告窗口。如果您了解此问题,可以忽略它并继续比对(选择‘忽略’),否则终止比对并检查问题(选择‘是’)。
-adjustdirection可以自动调整某些序列的方向(即反向互补)。其他参数也可用,例如比对策略、导出格式和线程等。输入文件并设置参数后,您可以点击
开始按钮启动程序。可以通过显示日志按钮查看运行日志。程序完成后,MAFFT的参数设置和引用将保存在summary.txt文件中。5.2.1. 简要示例
当您在 PhyloSuite 根目录下时,进入 ‘example\MAFFT\mtDNA_36_genes\CDS_NUC’ 文件夹(如果您没有最新的示例文件夹,请从 此处 下载),
关于综合演示,请参阅 多基因教程 和 单基因教程 。关于 MAFFT 的完整手册,请访问 https://mafft.cbrc.jp/alignment/software/manual/manual.html 。
5.3. MACSE
关于 MACSE 的安装,请参阅 插件安装 部分。关于 MACSE 的输入文件,请参阅 输入文件 部分。 请注意,输入文件应为 FASTA 格式。 关于 MACSE 的结果,请参阅 输出文件 部分。
PhyloSuite 使 MACSE 能够使用同一组参数__批量运行多个文件__,这意味着您可以同时将多个文件输入到 MACSE 中。此外,还允许多核操作,允许多个文件(取决于设置的线程数)同时运行。
MACSE 有许多子程序,并且它本身已有 GUI,因此我们只将
alignSequences和refineAlignment两个子程序添加到 PhyloSuite 中。我们认为这两个在弥补 MAFFT 的不足方面最适合 PhyloSuite。MACSE 的输入应该是蛋白质编码序列(用于alignSequences)或其他程序(例如MAFFT)生成的比对(用于refineAlignment)。关于批量处理,如果Seq.和Seq_lr.框中都有多个文件,这些文件将依次组合,例如,Seq.的第一个文件(-seq 1st_seq_file)将与Seq_lr.的第一个文件(-seq_lr 1st_seq_lr_file)组合。值得注意的是,seq和seq_lr选项必须一起使用,或者在与Refine(refineAlignment)结合使用时完全不使用。请注意,PhyloSuite 还在 ‘开始’ 按钮的下拉箭头中提供了查看 | 编辑命令功能,这为有经验的用户提供了足够的自由度来修改和添加 GUI 中未包含的参数。特别是,由于生成的比对文件可能包含感叹号(
!)或星号(*)符号(强调 MACSE 检测到的移码),这可能会导致下游分析出错。因此,PhyloSuite 会生成一个名称中包含_removed_chars_的附加文件,该文件将这些符号替换为?。输入文件并设置参数后,您可以点击
开始按钮启动程序。可以通过显示日志按钮查看运行日志。程序完成后,MACSE的参数设置和引用将保存在summary.txt文件中。5.3.1. 简要示例
当您在 PhyloSuite 根目录下时,进入 ‘example\MACSE’ 文件夹(如果您没有最新的示例文件夹,请从 此处 下载),
关于 MACSE 的完整手册,请访问 https://bioweb.supagro.inra.fr/macse/index.php?menu=intro 。
5.4. trimAl
关于 trimAl 的安装,请参阅 插件安装 部分。关于将文件输入 trimAl,请参阅 输入文件 部分。关于 trimAl 的结果,请参阅 输出文件 部分。
PhyloSuite 使 trimAl 能够使用同一组参数__批量运行多个文件__,这意味着您可以同时将多个文件输入到 trimAl 中。此外,还允许多核操作,允许多个文件(取决于设置的线程数)同时运行。请注意,PhyloSuite 还在 ‘开始’ 按钮的下拉箭头中提供了
查看 | 编辑命令功能,这为有经验的用户提供了足够的自由度来修改和添加 GUI 中未包含的参数。如果您想将 trimAl 的结果应用于下游分析,请确保选择
fasta作为输出格式。如果您选择统计输出,这些结果将保存到后缀为 “.log” 的文件中。由于输出文件扩展名_trimAl被下游功能识别,因此无法更改。输入文件并设置参数后,点击
开始按钮运行程序。您可以通过显示日志按钮查看运行日志。trimAl的参数设置和引用将保存在summary.txt文件中。5.4.1. 简要示例
当您在 PhyloSuite 根目录下时,进入 ‘example\trimAl_HmmCleaner’ 文件夹(如果您没有最新的示例文件夹,请从 此处 下载),
关于 trimAl 的完整手册,请访问 http://trimal.cgenomics.org 。
5.5. HmmCleaner
关于 HmmCleaner 的安装,请参阅 插件安装 部分。关于将文件输入 HmmCleaner,请参阅 输入文件 部分。关于 HmmCleaner 的结果,请参阅 输出文件 部分。
PhyloSuite 使 HmmCleaner 能够使用同一组参数__批量运行多个文件__,这意味着您可以同时将多个文件输入到 HmmCleaner 中。此外,还允许多核操作,允许多个文件(取决于设置的线程数)同时运行。由于 HmmCleaner 的设计限制,此程序仅适用于 Linux 和 Mac 用户。如果您想将 HmmCleaner 的结果应用于下游分析,请确保取消勾选
ali输出格式。输入文件并设置参数后,点击
开始按钮运行程序。您可以通过显示日志按钮查看运行日志。HmmCleaner的参数设置和引用将保存在summary.txt文件中。5.5.1. 简要示例
当您在 PhyloSuite 根目录下时,进入 ‘example\trimAl_HmmCleaner’ 文件夹(如果您没有最新的示例文件夹,请从 此处 下载),
关于 HmmCleaner 的完整手册,请访问 https://metacpan.org/pod/distribution/Bio-MUST-Apps-HmmCleaner/bin/HmmCleaner.pl 。
5.6. Gblocks
关于 Gblocks 的安装,请参阅 插件安装 部分。关于将文件输入 Gblocks,请参阅 输入文件 部分。 请注意,输入文件应为 FASTA 或 NBRF/PIR 格式。 关于 Gblocks 的结果,请参阅 输出文件 部分。
PhyloSuite 使 Gblocks 能够使用同一组参数__批量运行多个文件__,这意味着您可以同时将多个文件输入到 Gblocks 中。
保守位置的最小序列数和侧翼位置的最小序列数这两个选项将在输入文件后启用。因为前者变量必须 > 序列数的一半,而后者变量必须 ≥ 前者变量的值。这两个变量的可用值将根据此规则变化。 因此,在对多个文件进行批量分析时,每个文件中的序列数必须相同。由于默认的输出文件扩展名 ‘_gb’ 被下游功能识别,因此无法更改。
输入文件并设置参数后,点击
开始按钮运行程序。您可以通过显示日志按钮查看运行日志。Gblocks的参数设置和引用将保存在summary.txt文件中。5.6.1. 简要示例
当您在 PhyloSuite 根目录下时,进入 ‘example\Gblocks\mtDNA_36_genes\CDS_NUC’ 文件夹(如果您没有最新的示例文件夹,请从 此处 下载),
关于 Gblocks 的完整手册,请访问 http://molevol.cmima.csic.es/castresana/Gblocks/Gblocks_documentation.html 。
5.7. 串联序列
关于输入文件,请参阅 输入文件 部分。允许 FASTA、PHYLIP、AXT、PAML 和 NEXUS 格式。关于结果,请参阅 输出文件 部分。 请注意,输出文件的名称可以更改。
可以使用此功能将多个比对串联成一个单一的比对。首先,PhyloSuite 将扫描每个比对并收集所有序列名称,然后通过在每个比对中搜索名称来串联这些比对。如果在比对中找不到某个名称,它将被记录在 ‘missing_genes.txt’ 文件中。
可以为输出文件选择多种常见格式,例如 PHYLIP、NEXUS、AXT、PAML 和 FASTA。此外,该功能可以记录串联过程中每个基因的索引,并生成一个分区文件,该文件可用于
PartitionFinder、ModelFinder、IQ-TREE和MrBayes。用户还可以选择在此分析中移除任何密码子位点(例如第三密码子位点)。您可以通过拖拽文件重新排序来更改比对串联的顺序。
5.7.1. 简要示例
当 您在 PhyloSuite 根目录下时,进入 ‘example\Concatenation\mtDNA_36_genes\36_genes_NUC’ 文件夹(如果您没有最新的示例文件夹,请从 此处 下载),
5.8. 转换格式
关于输入文件,请参阅 输入文件 部分。关于结果,请参阅 输出文件 部分。
支持 PHYLIP、NEXUS、AXT、PAML 和 FASTA 格式(输入和输出文件均支持)。此功能还支持__批量格式转换__,这意味着您可以同时输入多个文件。
5.8.1. 简要示例
当您在 PhyloSuite 根目录下时,进入 ‘example\Convert_format’ 文件夹(如果您没有最新的示例文件夹,请从 此处 下载),
5.9. ModelFinder
关于 ModelFinder (IQ-TREE) 的安装,请参阅 插件安装 部分,关于输入比对文件请参阅 输入文件 部分(允许 FASTA、PHYLIP、NEXUS 和 CLUSTAL 格式),关于结果文件请参阅 输出文件 部分。
您可以选择提供两个额外的可选文件:一个树文件( newick 格式 )和一个分区文件。关于分区文件的格式,请参阅 http://www.iqtree.org/doc/Advanced-Tutorial 。最方便的选项是直接使用
串联序列( concatenate_results ) 的结果作为 ModelFinder 的输入文件。串联的比对和分区文件将自动加载到 ModelFinder 中(参见下面的简要示例)。PhyloSuite 为 ModelFinder 设置提供了一个附加参数:
ModelFinder 中的对应参数 MrBayes -m TESTONLY -mset mrbayes RaxML -m TESTONLY -mset raxml PhyML -m TESTONLY -mset phyml IQ-TREE -m TESTNEWONLY BEAST1 -mset JC69,TrN,TrNef,K80,K2P,F81,HKY,SYM,TIM,TVM,TVMef,GTR -mrate E,G BEAST2 -mset JC69,TrN,TrNef,K80,K2P,F81,HKY,SYM,TIM,TVM,TVMef,GTR -mrate E,G模型用于。此参数允许您选择一组希望测试的模型,适用于不同的系统发育程序(参见下表)。这非常有用,因为不同的算法通常使用不同的模型类型。输入文件并设置参数后,您可以点击
开始按钮运行程序。可以通过显示日志按钮查看运行日志。程序完成后,IQ-TREE的参数设置和引用将保存在summary.txt文件中。5.9.1. 简要示例
关于综合演示,请参阅 多基因教程 和 单基因教程 。关于 ModelFinder 的完整手册,请访问 http://www.iqtree.org/doc/ 和 http://iqtree.cibiv.univie.ac.at/ 。
5.10. PartitionFinder
关于 PartitionFinder2 的安装,请参阅 插件安装 部分,关于输入比对文件( PHYLIP 格式 )请参阅 输入文件 部分,关于结果请参阅 输出文件 部分。您也可以提供一个树文件( 可选,newick 格式 )。
使用 PartitionFinder2 最方便的方法是使用
串联序列( concatenate_results ) 的结果作为输入文件。串联的比对和分区文件将自动加载到 PartitionFinder2 中。PartitionFinder2 需要一个数据块才能运行,其默认格式如下(参见
数据块窗口):Gene1_codon1 = 1-999\3;
Gene1_codon2 = 2-999\3;
Gene1_codon3 = 3-999\3;
Gene2 = 1000-1665;
intron = 1666-2000;PhyloSuite 提供了一个分区编辑器功能,您可以在其中添加/删除/修改分区,并将选定的数据块转换/取消转换为密码子格式。关于如何使用此功能,请参阅 下文 。
请注意,在
命令行选项中,--all-states和--min-subset-size仅当在搜索菜单中选择kmeans时才能使用。搜索菜单中的hcluster、rclusterf和rcluster选项以及命令行选项中的--rcluster-max和--weights仅当在命令行选项中勾选了--raxml时才会启用。应谨慎使用分支长度菜单中的unlinked选项,因为在使用分区结果在 MrBayes 中进行分析时,它可能会阻碍收敛(因为unlink brlens=(all);)。输入文件并设置参数后,您可以启动程序(
开始按钮),并通过显示日志按钮查看运行日志。程序完成后,PartitionFinder2的参数设置和引用将保存在summary.txt文件中。5.10.1. 简要示例
PhyloSuite 的一个设计特点是
串联的输出与PartitionFinder2的输入之间有直接链接:关于综合演示,请参阅 多基因教程 。关于 PartitionFinder2 的完整手册,请访问 http://www.robertlanfear.com/partitionfinder/assets/Manual_v2.1.x.pdf 。
5.10.2. 分区编辑器简要教程
5.11. IQ-TREE
关于 IQ-TREE 的安装,请参阅 插件安装 部分;关于结果,请参阅 输出文件 部分;关于输入文件,请参阅 输入文件 部分。允许 FASTA、PHYLIP、NEXUS 和 CLUSTAL 格式。
可选地,您可以输入一个分区文件(勾选复选框)。关于分区文件的详细格式要求,请参阅 http://www.iqtree.org/doc/Advanced-Tutorial 。最方便的选项是使用
串联序列( concatenate_results ) 的结果作为 IQ-TREE 的输入文件:串联的比对和分区文件将自动加载到 IQ-TREE 中。类似地,当使用PartitionFinder2或ModelFinder的结果作为 IQ-TREE 的输入文件时,比对文件、分区和计算出的最佳拟合模型也将自动加载到 IQ-TREE 中。或者,IQ-TREE 可以通过将
模型设置为自动并勾选(-m TESTNEW)或不勾选(-m TEST)’FreeRate 异质性 [+R]’ 来选择最佳拟合模型并立即继续进行树重建(使用推断出的模型)。我们还使 IQ-TREE 能够批量重建系统发育树,这可用于推断超树。输入文件并设置参数后,您可以启动程序(
开始按钮),并通过显示日志按钮查看运行日志。程序完成后,IQ-TREE的参数设置和引用将保存在summary.txt文件中。5.11.1. 简要示例
当您在 PhyloSuite 根目录下时,进入 ‘example\IQ-TREE\mtDNA_36_genes\36_genes_NUC\normal’ 文件夹(如果您没有最新的示例文件夹,请从 此处 下载),
IQ-TREE 可以直接使用 ModelFinder 和/或 PartitionFinder2 的输出,请参阅 多基因教程 和 单基因教程 。关于 IQ-TREE 的完整手册,请访问 http://www.iqtree.org/doc/ 和 http://iqtree.cibiv.univie.ac.at/ 。
5.12. MrBayes
关于 MrBayes 的安装,请参阅 插件安装 部分;关于结果文件,请参阅 输出文件 部分;关于 输入文件 ,请参阅输入文件部分。 请注意,仅允许 NEXUS 格式;如果使用 自动检测 功能,比对将自动转换为 NEXUS 格式。 当使用
PartitionFinder2或ModelFinder的结果作为 MrBayes 的输入文件时,比对文件和计算出的最佳拟合模型将自动加载到 MrBayes 中。如果加载的比对文件包含命令块,您可以选择直接使用此命令块运行。
外群和模型参数仅在比对加载后启用。PhyloSuite 提供了一个编辑分区文件的窗口(通过点击
分区模型激活),您可以在其中输入子集的名称、起始和终止位置以及该子集的最佳模型。编辑后,您可以点击生成命令块按钮为编辑后的分区生成相应的命令块。有时,在完成分析后,您可能会认为结果尚未完全收敛,并希望继续分析;对于这种情况,PhyloSuite 提供了
继续先前分析功能,允许您在设置额外的代数后继续任何分析(已完成或未完成)。在计算汇总统计量时,有两种丢弃 MCMC 样本(非代数)的方法:您可以设置特定的样本数量(
Burnin 框)或所有样本的比例(Burnin 分数框)。共识树格式参数控制共识树的格式,其中简单设置生成一个简单的共识树,其格式可被各种程序(TreeView、iTOL 等)读取;而Figtree设置生成一个为 FigTree 程序格式化的共识树,带有丰富的汇总统计信息。显示 MrBayes 数据块按钮允许您添加 GUI 中未包含的参数,或导出配置的文件并在服务器(如 CIPRES,参见简要示例)上运行。输入文件并设置参数后,您可以导出比对和相应的命令块以单独执行 MrBayes(通过
显示 MrBayes 数据块),或者点击开始按钮在 PhyloSuite 内运行程序。可以通过显示日志按钮查看运行日志。程序完成后,MrBayes的参数设置和引用将保存在summary.txt文件中。5.12.1. 简要示例
当您在 PhyloSuite 根目录下时,进入 ‘example\MrBayes\mtDNA_36_genes\36_genes_NUC\normal’ 文件夹(如果您没有最新的示例文件夹,请从 此处 下载),
MrBayes 可以直接使用 ModelFinder 和/或 PartitionFinder2 的输出,请参阅 多基因教程 和 单基因教程 。关于 MrBayes 的完整手册,请访问 http://mrbayes.sourceforge.net/manual.php 。
5.13. 工作流
使用此功能时,有几件事需要牢记:
5.13.1. 简要示例
提示:如果您更改了工作流设置,请记住使用
添加按钮保存它,否则它将不会被记住。关于综合演示,请参阅 多基因教程 和 单基因教程 。5.14. 线粒体基因组
5.14.1. 解析注释
此功能可以解析记录在 Microsoft Word 文档中的注释(仅支持 *.docx 扩展名)。注释 tRNA 时,应将每个 tRNA 基因的反密码子添加到基因名称的末尾(在括号中),例如:tRNA-Cys(GCA)(另请参见下图中的示例)。关于基因的名称,PhyloSuite 允许您通过
配置名称替换按钮访问的来自 Word 的名称表来将名称替换为其他名称。此外,您可以为每个蛋白质编码基因定义product限定符 的名称,以及用于组织结构表的 tRNA 基因的缩写。Word 文档中线粒体基因组注释示例:

包含作者和单位信息的 GenBank 提交模板文件可以 在此处 生成。来自 PhyloSuite 的几个数据集可用于生成注释部分,包括
物种、品系、谱系等。发布日期参数定义您序列的发布日期。 请注意,您的计算机上应安装有 Office 套件。5.14.1.1. 简要示例
当您在 PhyloSuite 根目录下时,进入 ‘example\Parse_Word_annotations’ 文件夹(如果您没有最新的示例文件夹,请从 此处 下载),
5.14.2. 比较表格
此功能可以比较和汇总
extract_results文件夹下speciesStat子文件夹中的表格。对于组织结构表,允许进行成对相似性计算,其中调用 MAFFT 进行比对,并使用 Biopython 中的 DistanceCalculator 包计算序列的同一性。可以通过选择希望排除的行数(从顶部开始)来将表格的标题从比较中省略。关于表格示例,请参阅 https://bmcevolbiol.biomedcentral.com/articles/10.1186/s12862-018-1249-3 中的表 1 和 https://parasitesandvectors.biomedcentral.com/articles/10.1186/s13071-018-2910-9 中的表 2。5.14.2.1. 简要示例
5.14.3. 绘制 RSCU 图
关于 Rscript 的安装,请参阅 插件安装 部分,关于结果,请参阅 输出文件 部分。
此功能可以根据
extract_results/StatFiles/RSCU文件夹下 “RSCU” 子文件夹中的表格绘制 RSCU 图。您可以通过拖拽重新排序输入文件和 x 轴上的氨基酸。关于图形示例,请参阅 https://parasitesandvectors.biomedcentral.com/articles/10.1186/s13071-017-2404-1 中的图 3。5.14.3.1. 简要示例
5.15. 分子钟分析
请参阅 https://dongzhang0725.github.io/PhyloSuite-demo/Molecular-dating-analysis/ 或 http://phylosuite.jushengwu.com/dongzhang0725.github.io/PhyloSuite-demo/Molecular-dating-analysis/
6. 引用与代码
如果您在科学论文中使用 PhyloSuite 生成的数据,请使用以下引用:
Zhang, D., F. Gao, I. Jakovlić, H. Zou, J. Zhang, W.X. Li, and G.T. Wang, PhyloSuite: An integrated and scalable desktop platform for streamlined molecular sequence data management and evolutionary phylogenetics studies. Molecular Ecology Resources, 2020. 20(1): p. 348–355. DOI: 10.1111/1755-0998.13096.
还请注意的是,PhyloSuite 是一个插件程序,您还应引用您在分析中使用的、非我们设计和编译的任何(及每一个)插件程序。这适用于以下插件:
MAFFT
Katoh, K., and Standley, D.M. (2013). MAFFT multiple sequence alignment software version 7: improvements in performance and usability. Mol Biol Evol 30, 772-780.
MACSE
Ranwez V, Douzery EJP, Cambon C, Chantret N, Delsuc F. 2018. MACSE v2: Toolkit for the alignment of coding sequences accounting for frameshifts and stop codons. Mol Biol Evol. 35: 2582-2584. doi: 10.1093/molbev/msy159.
Gblocks
Talavera, G., and Castresana, J. (2007). Improvement of phylogenies after removing divergent and ambiguously aligned blocks from protein sequence alignments. Syst Biol 56, 564-577.
trimAl
Capella-Gutierrez S, Silla-Martinez JM, Gabaldon T. 2009. trimAl: a tool for automated alignment trimming in large-scale phylogenetic analyses. Bioinformatics. 25: 1972-1973. doi: 10.1093/bioinformatics/btp348.
HmmCleaner
Di Franco A, Poujol R, Baurain D, Philippe H. 2019. Evaluating the usefulness of alignment filtering methods to reduce the impact of errors on evolutionary inferences. BMC Evol Biol. 19: 21. doi: 10.1186/s12862-019-1350-2.
IQ-TREE
Nguyen, L.T., Schmidt, H.A., von Haeseler, A., and Minh, B.Q. (2015). IQ-TREE: a fast and effective stochastic algorithm for estimating maximum-likelihood phylogenies. Mol Biol Evol 32, 268-274.
PartitionFinder2
Lanfear, R., Frandsen, P.B., Wright, A.M., Senfeld, T., and Calcott, B. (2017). PartitionFinder 2: new methods for selecting partitioned models of evolution for molecular and morphological phylogenetic analyses. Mol Biol Evol 34, 772-773.
MrBayes
Ronquist, F., Teslenko, M., van der Mark, P., Ayres, D.L., Darling, A., Höhna, S., Larget, B., Liu, L., Suchard, M.A., and Huelsenbeck, J.P. (2012). MrBayes 3.2: efficient Bayesian phylogenetic inference and model choice across a large model space. Syst Biol 61, 539-542.
对于其余功能,我们主要使用自己的 Python 代码,使用 Python 3.6.7 和 PyQT5 编写。某些功能使用了 Biopython 包,例如从 GenBank 文件中提取特征,这是使用 SeqIO 模块进行的。
Cock, P.J., Antao, T., Chang, J.T., Chapman, B.A., Cox, C.J., Dalke, A., Friedberg, I., Hamelryck, T., Kauff, F., Wilczynski, B., et al. (2009). Biopython: freely available Python tools for computational molecular biology and bioinformatics. Bioinformatics 25, 1422-1423.
7. 故障排除
7.1. 更新失败:如何恢复到以前的设置和插件
在极少数情况下,用户在更新 PhyloSuite 时可能会遇到错误。因为这可能导致您丢失一些设置和配置,这里我们将演示如何将您的设置和插件恢复到更新前的状态。
请尝试以下步骤:
7.6. 无法在MAC系统运行PhyloSuite

对于MAC用户,如果遇到
安全性/隐私问题或Apple无法验证“某某文件”问题,可尝试使用以下命令解决:1
sudo xattr -rd [PhyloSuite_installation_path]/PhyloSuite
8. 致谢
-
生成提取概览文件 (
In the
Custommenu, you can choose among the data types pre-set in GenBank File Extracting settings . In theLineagesmenu, you can choose which lineages to include in the results. Regarding the names of sequences, user can customize them viaName Typefunction, in which ID, organism, Family, Class, isolate, strain, etc. are available.5.1.1. Brief example
For customizing the extraction, please see Customizing the extraction
For comprehensive demos, please see multi-gene tutorial and single-gene tutorial . For how to use the generated iTOL datasets, please see phylogenetic tree annotation .5.2. MAFFT
For installation of MAFFT, please see Plugins Installation section. For input files for MAFFT, please see Input Files section. Note that the input file should be in the FASTA format. For the results of MAFFT, please see Output Files section.
PhyloSuite enables MAFFT to run multiple files in batches using the same set of parameters, which means that you can input multiple files into MAFFT simultaneously. PhyloSuite provides three alignment modes for MAFFT:
When aligning with codon mode, if there are internal stop codons, PhyloSuite will pop up a warning window. If you are aware of this problem, feel free to ignore it and continue the alignment (select ‘Ignore’), otherwise terminate the alignment and inspect the problem (select ‘Yes’).
-adjustdirectioncan auto-adjust the direction of some sequences (i.e. reverse complement). Other parameters are also available, such asalign strategy,export formatandthreadetc.After inputting files and setting parameters, you are ready to click the
Startbutton and start the program. The run log can be viewed throughShow logbutton. Once the program is finished, the parameter settings and the citation ofMAFFTwill be saved in thesummary.txtfile.5.2.1. Brief example
When you are in the PhyloSuite root folder, go to ‘example\MAFFT\mtDNA_36_genes\CDS_NUC’ folder (if you don’t have the newest example folder, please download it from here ),
For comprehensive demos, please see multi-gene tutorial and single-gene tutorial . For a comprehensive manual of MAFFT, please visit https://mafft.cbrc.jp/alignment/software/manual/manual.html .
5.3. MACSE
For installation of MACSE, please see Plugins Installation section. For input files for MACSE, please see Input Files section. Note that the input file should be in the FASTA format. For the results of MACSE, please see Output Files section.
PhyloSuite enables MACSE to run multiple files in batches using the same set of parameters, which means that you can input multiple files into MACSE simultaneously. In addition, multi-core operation is also allowed, which allows several files (depends on threads set) to run simultaneously.
MACSE has many subprograms and it already has a GUI, so we only added
alignSequencesandrefineAlignmentsubprograms to PhyloSuite. We believe these two are most suitable for PhyloSuite, in terms of complementing the shortcomings of MAFFT. The input of MACSE should be either protein-coding sequences (foralignSequences) or an alignment (forrefineAlignment) generated by other programs (e.g.MAFFT). Regarding batch processing, if there are multiple files in bothSeq.andSeq_lr.boxes, these files will be combined successively, for example, the first file ofSeq.(-seq 1st_seq_file) will combine with the first file ofSeq_lr.(-seq_lr 1st_seq_lr_file). Noteworthy, theseqandseq_lroptions must be used together or not at all in combination withRefine(refineAlignment). Please note that PhyloSuite also provides theView | Edit commandfunction in the dropdown arrow of the ‘Start’ button, which gives sufficient freedom for experienced users to modify and add parameters that are not included in the GUI.In particular, as the generated alignment files may contain exclamation (
!) or star (*) symbols (emphasize the frameshifts detected by MACSE), which may cause errors in downstream analyses. Therefore, PhyloSuite generates an additional file with_removed_chars_in its name, which replaces these symbols with?.After inputting files and setting parameters, you are ready to click the
Startbutton and start the program. The run log can be viewed throughShow logbutton. Once the program is finished, the parameter settings and the citation ofMACSEwill be saved in thesummary.txtfile.5.3.1. Brief example
When you are in the PhyloSuite root folder, go to ‘example\MACSE’ folder (if you don’t have the newest example folder, please download it from here ),
For a comprehensive manual of MACSE, please visit https://bioweb.supagro.inra.fr/macse/index.php?menu=intro .
5.4. trimAl
For the installation of trimAl, please see Plugins Installation section. For inputting files into trimAl, please see Input Files section. For the results of trimAl, please see Output Files section.
PhyloSuite enables trimAl to run multiple files in batches using the same set of parameters, which means you can input multiple files into trimAl simultaneously. In addition, multi-core operation is also allowed, which allows several files (depends on threads set) to run simultaneously. Please note that PhyloSuite also provides the
View | Edit commandfunction in the dropdown arrow of the ‘Start’ button, which gives sufficient freedom for experienced users to modify and add parameters that are not included in the GUI.If you want to apply the results of trimAl to downstream analyses, please ensure that you select
fastaas output format. If you select theStatistics output, these results will be saved to a file with the suffix “.log”. As the output file extension_trimAlis recognized by downstream functions, it cannot be changed.After inputting files and setting parameters, clicking the
Startbutton runs the program. You can view the running log through theShow logbutton. Parameter settings and citation fortrimAlwill be saved in thesummary.txtfile.5.4.1. Brief example
When you are in the PhyloSuite root folder, go to ‘example\trimAl_HmmCleaner’ folder (if you don’t have the newest example folder, please download it from here ),
For a comprehensive manual of trimAl, please visit http://trimal.cgenomics.org .
5.5. HmmCleaner
For the installation of HmmCleaner, please see Plugins Installation section. For inputting files into HmmCleaner, please see Input Files section. For the results of HmmCleaner, please see Output Files section.
PhyloSuite enables HmmCleaner to run multiple files in batches using the same set of parameters, which means you can input multiple files into HmmCleaner simultaneously. In addition, multi-core operation is also allowed, which allows several files (depends on threads set) to run simultaneously. Due to HmmCleaner design contraints, this program is available only to linux and mac users. If you want to apply the results of HmmCleaner to downstream analyses, please ensure that you uncheck the
alioutput format.After inputting files and setting parameters, clicking the
Startbutton runs the program. You can view the running log through theShow logbutton. The parameter settings and the citation forHmmCleanerwill be saved in thesummary.txtfile.5.5.1. Brief example
When you are in the PhyloSuite root folder, go to ‘example\trimAl_HmmCleaner’ folder (if you don’t have the newest example folder, please download it from here ),
For a comprehensive manual of HmmCleaner, please visit https://metacpan.org/pod/distribution/Bio-MUST-Apps-HmmCleaner/bin/HmmCleaner.pl .
5.6. Gblocks
For the installation of Gblocks, please see Plugins Installation section. For inputting files into Gblocks, please see Input Files section. Note that the input files should be in FASTA or NBRF/PIR formats. For the results of Gblocks, please see Output Files section.
PhyloSuite enables Gblocks to run multiple files in batches using the same set of parameters, which means you can input multiple files into Gblocks simultaneously.
The two options,Minimum Number Of Sequences For A Conserved PositionandMinimum Number Of Sequences For A Flank Positionwill be enabled after inputting files. As the former variable has to be > half the number of sequences, whereas the latter variable has to be ≥ the value of former variable. The available values of these two variables will change according to this rule. Because of this, when running batch analyses on multiple files, the number of sequences in each file must be the same.As the default output file extension ‘_gb’ is recognized by downstream functions, it cannot be changed.
After inputting files and setting parameters, clicking the
Startbutton runs the program. You can view the running log through theShow logbutton. The parameter settings and the citation forGblockswill be saved in thesummary.txtfile.5.6.1. Brief example
When you are in the PhyloSuite root folder, go to ‘example\Gblocks\mtDNA_36_genes\CDS_NUC’ folder (if you don’t have the newest example folder, please download it from here ),
For a comprehensive manual of Gblocks, please visit http://molevol.cmima.csic.es/castresana/Gblocks/Gblocks_documentation.html .
5.7. Concatenate Sequences
For inputting files, please see Input Files section. FASTA, PHYLIP, AXT, PAML and NEXUS formats are allowed. For the results, please see Output Files section. Note that the name of the output file can be changed.
Alignments can be concatenated into a single alignment using this function. First, PhyloSuite will scan each of the alignments and collect all of the sequence names, then it will concatenate these alignments by searching the names in each alignment. If a name can’t be found in the alignment, it will be recorded in the ‘missing_genes.txt’ file.
A number of common formats can be chosen for the output file, such as PHYLIP, NEXUS, AXT, PAML and FASTA. Additionally, the function can record the index of each gene during the concatenation and generate a partition file, which can be used in
PartitionFinder,ModelFinder,IQ-TREEandMrBayes. User can also select to remove any codon sites (such as third codon site) in this analysis.You can change the order in which alignments are concatenated by dragging the files to reorder them.
5.7.1. Brief example
When you are in the PhyloSuite root folder, go to ‘example\Concatenation\mtDNA_36_genes\36_genes_NUC’ folder (if you don’t have the newest example folder, please download it from here ),
For comprehensive demos, please see multi-gene tutorial and single-gene tutorial .
5.8. Convert format
For inputting files, please see Input Files section. For the results, please see Output Files section.
PHYLIP, NEXUS, AXT, PAML and FASTA formats are supported (both for input and output files). This function also supports batch format conversion , which means that you can input multiple files simultaneously.
5.8.1. Brief example
When you are in the PhyloSuite root folder, go to ‘example\Convert_format’ folder (if you don’t have the newest example folder, please download it from here ),
5.9. ModelFinder
For the installation of ModelFinder (IQ-TREE), please see Plugins Installation section, for input alignment files see Input Files section (FASTA, PHYLIP, NEXUS and CLUSTAL formats are allowed), and for the result files see Output Files section.
You may choose to provide two more optional files: a tree file ( newick format ) and a partition file. Please see http://www.iqtree.org/doc/Advanced-Tutorial for the format of the partition file. The most convenient option is to directly use the results of
Concatenate Sequence( concatenate_results ) as input files for ModelFinder. The concatenated alignments and the partition file will load to ModelFinder automatically (see brief example below).PhyloSuite provides an additional parameter for ModelFinder settings:
Options Corresponding arguments in ModelFinder MrBayes -m TESTONLY -mset mrbayes RaxML -m TESTONLY -mset raxml PhyML -m TESTONLY -mset phyml IQ-TREE -m TESTNEWONLY BEAST1 -mset JC69,TrN,TrNef,K80,K2P,F81,HKY,SYM,TIM,TVM,TVMef,GTR -mrate E,G BEAST2 -mset JC69,TrN,TrNef,K80,K2P,F81,HKY,SYM,TIM,TVM,TVMef,GTR -mrate E,GModel for. This parameter allows you to select a set of models you wish to test, suited for different phylogenetic programs (see table below). This is very useful, as different algorithms often use different model types.After inputting files and setting the parameters, you may click
Startbutton and run the program. The running log can be viewed throughShow logbutton. Once the program is finished, the parameter settings and the citation forIQ-TREEwill be saved in thesummary.txtfile.5.9.1. Brief example
For comprehensive demos, please see multi-gene tutorial and single-gene tutorial . For a comprehensive manual of ModelFinder, please visit http://www.iqtree.org/doc/ and http://iqtree.cibiv.univie.ac.at/ .
5.10. PartitionFinder
For installation of PartitionFinder2, please see Plugins Installation section, for inputting the alignment file ( PHYLIP format ) see Input Files section, for the results see Output Files section. You may provide a tree file as well ( optional, newick format ).
The most convenient way to use PartitionFinder2 is to use the results of
Concatenate Sequence( concatenate_results ) as input files. The concatenated alignments and the partition file will load into the PartitionFinder2 automatically.PartitionFinder2 requires a data block to run, the default format of which is (see
DATA BLOCKSwindow):Gene1_codon1 = 1-999\3;
Gene1_codon2 = 2-999\3;
Gene1_codon3 = 3-999\3;
Gene2 = 1000-1665;
intron = 1666-2000;PhyloSuite provides a partition editor function, in which you can add/delete/modify partitions and convert/cancel the selected data block to the codon format. For how to use this function, please see below .
Note that among the
Command line options,--all-statesand--min-subset-sizecan only be used whenkmeansis selected in thesearchmenu. The optionshcluster,rclusterfandrclusterinsearchmenu as well as--rcluster-maxand--weightsin theCommand line optionswill be enabled only when--raxmlis checked in theCommand line options. Theunlinkedoption in thebranchlengthsmenu should be used with caution, as it may hinder convergence when using the partition results to conduct an analysis in MrBayes (because ofunlink brlens=(all);).After inputting files and setting the parameters, you can start the program (
Startbutton), and view the run log through theShow logbutton. Once the program is finished, the parameter settings and the citation forPartitionFinder2will be saved in thesummary.txtfile.5.10.1. Brief example
For a comprehensive demo, please see multi-gene tutorial . For a comprehensive manual of PartitionFinder2, please visit http://www.robertlanfear.com/partitionfinder/assets/Manual_v2.1.x.pdf .
5.10.2. Brief tutorial for partition editor
5.11. IQ-TREE
For the installation of IQ-TREE, please see Plugins Installation section, for the results see Output Files section, for input files see Input Files section. FASTA, PHYLIP, NEXUS and CLUSTAL formats are allowed.
Optionally, you may input a partition file (check the box). Please see http://www.iqtree.org/doc/Advanced-Tutorial for detailed format requirements for the partition file. The most convenient option is to use the results of
Concatenate Sequence( concatenate_results ) as input files for IQ-TREE: the concatenated alignments and the partition file will load to IQ-TREE automatically. Similarly, when using the results ofPartitionFinder2orModelFinderas input files of IQ-TREE, the alignment file, the partition and the best-fit model selection will also load into the IQ-TREE automatically.Alternatively, IQ-TREE can select the best-fit model and immediately continue with the tree reconstruction (using the inferred model) by setting
ModelstoAutoand either check ‘FreeRate heterogeneity [+R]’ (-m TESTNEW) or not (-m TEST). We also enabled IQ-TREE to reconstruct phylogenetic trees in batches, which can be used to infer supertrees.After inputting files and setting the parameters, you may start the program (
Startbutton), and view the run log through theShow logbutton. Once the program is finished, the parameter settings and the citation for theIQ-TREEwill be saved in thesummary.txtfile.5.11.1. Brief example
When you are in the PhyloSuite root folder, go to ‘example\IQ-TREE\mtDNA_36_genes\36_genes_NUC\normal’ folder (if you don’t have the newest example folder, please download it from here ),
IQ-TREE can directly use the outputs of ModelFinder and/or PartitionFinder2, please see multi-gene tutorial and single-gene tutorial . For a comprehensive manual of IQ-TREE, please visit http://www.iqtree.org/doc/ and http://iqtree.cibiv.univie.ac.at/ .
5.12. MrBayes
For the installation of MrBayes, please see Plugins Installtion section, for result files see Output Files section, for Input Files see Input Files section. Note that only the NEXUS format is allowed; if autodetect function is used, the alignment will be converted to the NEXUS format automatically. When using the results of
PartitionFinder2orModelFinderas input files for MrBayes, the alignment file and the best-fit model calculated will load into MrBayes automatically.If the loaded alignment file contains a command block, you can select to run with this command block directly. The
Outgroup(s)andModelsparameters are enabled only after the alignment is loaded.PhyloSuite provides a window to edit the partition file (activated by clicking
Partition Models), in which you can input the name of the subset, the start and stop positions, and the best model for the subset. After editing, you can click theGenerate Command Blockbutton to generate the corresponding command block for the edited partition.Sometimes, after finishing an analysis, you may decide that the results haven’t fully converged and that you would prefer to continue the analysis; for such circumstances, PhyloSuite provides the
Continue Previous Analysisfunction, which allows you to continue any of your analyses (finished and unfinished) after setting the number of additional generations.There are two ways to discard MCMC samples (not generations) when summary statistics are calculated: you can either set the specific number of samples (
Burnin box) or the proportion (Burnin Fraction box) of all samples.The
Conformatparameter controls the format of the consensus tree, whereSimplesetting results in a simple consensus tree written in a format read by a variety of programs (TreeView, iTOL etc.); whereasFigtreesetting results in a consensus tree formatted for the program FigTree, with rich summary statistics.The
Show MrBayes Data Blockbutton allows you to add the parameters that are not included in the GUI or export the configured file and run in servers (such as CIPRES, see Brief example).After inputting files and setting the parameters, you can either export the alignment and the corresponding command block to execute MrBayes separately (through
Show MrBayes Data Block) or clickStartbutton to run the program within the PhyloSuite. The run log can be viewed through theShow logbutton. Once the program is finished, the parameter settings and the citation forMrBayeswill be saved in thesummary.txtfile.5.12.1. Brief example
When you are in the PhyloSuite root folder, go to ‘example\MrBayes\mtDNA_36_genes\36_genes_NUC\normal’ folder (if you don’t have the newest example folder, please download it from here ),
MrBayes can directly use the outputs of ModelFinder and/or PartitionFinder2, please see multi-gene tutorial and single-gene tutorial . For a comprehensive manual of MrBayes, please visit http://mrbayes.sourceforge.net/manual.php .
5.13. Flowchart
There are several things you should keep in mind when using this function:
5.13.1. Brief example
Tip: if you changed the workflow settings, remember to save it using the
addbutton, otherwise, it will not be remembered. For comprehensive demos, please see multi-gene tutorial and single-gene tutorial .5.14. Mitogenome
5.14.1. Parse annotations
This function can parse the annotations recorded in a Microsoft Word document (only *.docx extension is supported). When annotating the tRNAs, you should add the anti-codon of each tRNA gene to the end of the gene name (in brackets), for example: tRNA-Cys(GCA) (also see an example in the image below). Regarding the names of genes, PhyloSuite allows you to replace the name with other names by setting the
Name from Wordtable accessed through theConfigure name replacingbutton. Additionally, you can define the name ofproductqualifiers for each protein coding gene and the abbreviation of tRNA genes used for the organization table.Example of mitogenome annotation in a Word document:
The GenBank Submission Template file including the information of authors and affiliations can be generated here . Several datasets from PhyloSuite can be used to generate the annotation section, including
Organism,Strain,Lineage, etc. TheRelease Dateparameter defines the release date of your sequence. Note that you should have office suite installed on your computer.5.14.1.1. Brief example
When you are in the PhyloSuite root folder, go to ‘example\Parse_Word_annotations’ folder (if you don’t have the newest example folder, please download it from here ),
5.14.2. Compare tables
This function can compare and gather tables in the
speciesStatsubfolder under theextract_resultsfolder. For organization tables, pairwise similarity calculation is allowed, in which MAFFT is invoked to make alignment and DistanceCalculator package in Biopython is used to calculate the identity of the sequence. The header of a table can be omitted from the comparison by selecting the number of rows you wish to exclude (from the top). For table examples, please see Table 1 in https://bmcevolbiol.biomedcentral.com/articles/10.1186/s12862-018-1249-3 and Table 2 in https://parasitesandvectors.biomedcentral.com/articles/10.1186/s13071-018-2910-9 .5.14.2.1. Brief example
This function can directly use the results of ‘extract’ function:
5.14.3. Draw RSCU figure
For the installation of Rscript, please see Plugins Installation section, and for the results please see Output Files section.
This function can draw an RSCU figure based on the tables in the “RSCU” subfolder under the
extract_results/StatFiles/RSCUfolder. You can drag to reorder the input files and the amino acids on the x-axis. For a figure example, please see Fig. 3 in https://parasitesandvectors.biomedcentral.com/articles/10.1186/s13071-017-2404-1 .5.14.3.1. Brief example
This function can directly use the results of ‘extract’ function:
5.15. Molecular dating analysis
See https://dongzhang0725.github.io/PhyloSuite-demo/Molecular-dating-analysis/ or http://phylosuite.jushengwu.com/dongzhang0725.github.io/PhyloSuite-demo/Molecular-dating-analysis/
6. Citations and codes
If you use data generated by PhyloSuite in a scientific paper, please use the following citation:
Zhang, D., F. Gao, I. Jakovlić, H. Zou, J. Zhang, W.X. Li, and G.T. Wang, PhyloSuite: An integrated and scalable desktop platform for streamlined molecular sequence data management and evolutionary phylogenetics studies. Molecular Ecology Resources, 2020. 20(1): p. 348–355. DOI: 10.1111/1755-0998.13096.
Please also note that PhyloSuite is a plug-in program, and that you should also cite any (and every) plug-in program not designed and compiled by us that you use in your analyses. This applies to the following plug-ins:
MAFFT
Katoh, K., and Standley, D.M. (2013). MAFFT multiple sequence alignment software version 7: improvements in performance and usability. Mol Biol Evol 30, 772-780.
MACSE
Ranwez V, Douzery EJP, Cambon C, Chantret N, Delsuc F. 2018. MACSE v2: Toolkit for the alignment of coding sequences accounting for frameshifts and stop codons. Mol Biol Evol. 35: 2582-2584. doi: 10.1093/molbev/msy159.
Gblocks
Talavera, G., and Castresana, J. (2007). Improvement of phylogenies after removing divergent and ambiguously aligned blocks from protein sequence alignments. Syst Biol 56, 564-577.
trimAl
Capella-Gutierrez S, Silla-Martinez JM, Gabaldon T. 2009. trimAl: a tool for automated alignment trimming in large-scale phylogenetic analyses. Bioinformatics. 25: 1972-1973. doi: 10.1093/bioinformatics/btp348.
HmmCleaner
Di Franco A, Poujol R, Baurain D, Philippe H. 2019. Evaluating the usefulness of alignment filtering methods to reduce the impact of errors on evolutionary inferences. BMC Evol Biol. 19: 21. doi: 10.1186/s12862-019-1350-2.
IQ-TREE
Nguyen, L.T., Schmidt, H.A., von Haeseler, A., and Minh, B.Q. (2015). IQ-TREE: a fast and effective stochastic algorithm for estimating maximum-likelihood phylogenies. Mol Biol Evol 32, 268-274.
PartitionFinder2
Lanfear, R., Frandsen, P.B., Wright, A.M., Senfeld, T., and Calcott, B. (2017). PartitionFinder 2: new methods for selecting partitioned models of evolution for molecular and morphological phylogenetic analyses. Mol Biol Evol 34, 772-773.
MrBayes
Ronquist, F., Teslenko, M., van der Mark, P., Ayres, D.L., Darling, A., Höhna, S., Larget, B., Liu, L., Suchard, M.A., and Huelsenbeck, J.P. (2012). MrBayes 3.2: efficient Bayesian phylogenetic inference and model choice across a large model space. Syst Biol 61, 539-542.
For the remaining functions, we mostly used our own Python codes, written in Python 3.6.7 and PyQT5. Biopython package was used for some functions, such as feature extraction from GenBank files, which is conducted using SeqIO module.
Cock, P.J., Antao, T., Chang, J.T., Chapman, B.A., Cox, C.J., Dalke, A., Friedberg, I., Hamelryck, T., Kauff, F., Wilczynski, B., et al. (2009). Biopython: freely available Python tools for computational molecular biology and bioinformatics. Bioinformatics 25, 1422-1423.
7. Troubleshooting
7.1. Update failed: how to revert to previous settings and plugins
please try the following steps:
7.6. Cannot run PhyloSuite on MAC
For macOS users , if you encounter Security & Privacy restrictions or an alert such as “Apple cannot verify “xxx file” , you can try resolving the issue with the following command:
1
sudo xattr -rd [PhyloSuite_installation_path]/PhyloSuite
8. Acknowledgements
主页: https://dongzhang0725.github.io 示例与测试运行: https://dongzhang0725.github.io/dongzhang0725.github.io/example/ 演示教程: https://dongzhang0725.github.io/dongzhang0725.github.io/archives/ 张东, 高芳銮, Ivan Jakovlić, 邹红, 张金, 李文祥, 王桂堂 版本 2 || 2022年11月26日 1. 简介
1.1. 背景
1.2. 功能
PhyloSuite 是一个用户友好的、独立的、基于 GUI 的软件,使用 Python 3.6.7 和 PyQT5 编写。其功能包括:
2. 许可与免责声明
2.1. 许可
PhyloSuite 是一个自由软件,欢迎您在特定条件下重新分发它。它根据 GNU 通用公共许可证第 3 版发布。参见 http://www.gnu.org/licenses/gpl-3.0.en.html 。
2.2. 免责声明
本程序不附带任何担保。对于本软件的功能性或所获结果的准确性,不作任何明示或暗示的保证。请仔细检查您的结果。
3. 操作系统与安装
3.1. 安装已编译的 PhyloSuite
所有平台的安装程序都可以从 https://github.com/dongzhang0725/PhyloSuite/releases 下载。
3.1.1. Windows
3.1.2. Mac OSX 和 Linux
1
2
cd path/to/PhyloSuite
./PhyloSuite如果遇到 “permission denied” 错误,请尝试使用以下命令:
1
chmod -R 755 path/to/PhyloSuite(文件夹)
请注意,支持 64 位和 32 位 Windows(Windows 7 及以上版本),而在 Linux(Ubuntu 14.04.1 及以上版本)和 Mac OSX(macOS Sierra 版本 10.12.3 及以上版本)中仅测试了 64 位。
3.2. 使用 pip 安装
首先,应在您的计算机上安装 Python(版本 3.6)并将其添加到环境变量中。然后打开终端并输入:
1
pip install PhyloSuite
安装需要一些时间。如果安装成功,PhyloSuite 将自动添加到环境变量中。然后再次打开终端并输入:
1
PhyloSuite
如果上述
pip命令安装 PhyloSuite 失败,您可以使用已编译的 PhyloSuite(见第 1 节)或在此处查找并下载源代码( https://pypi.org/project/PhyloSuite/#files 或 https://github.com/dongzhang0725/PhyloSuite),然后手动安装。4. 管理
4.1. 界面操作
PhyloSuite 使用工作区进行数据管理(尽管您不一定非要使用它),该工作区在您首次使用程序时设置。之后您可以通过
工作区菜单更改它。每个工作区中有两种根文件夹: GenBank_File 和 Other_File 。 GenBank_File 文件夹用于管理 GenBank 文件并存放相关分析的结果。 Other_File 文件夹用于管理其他类型的序列文件和 Word 注释文件(核苷酸和氨基酸序列),以及存放相关结果。在根文件夹下方(下一级),您会找到工作文件夹,其中包含关联的结果文件夹(再下一级)。在每个根文件夹中,PhyloSuite 会默认添加files和flowchart工作文件夹。您可以通过将鼠标悬停在根文件夹(GenBank_File 和 Other_File)上,然后点击右侧的绿色“加号”图标或通过上下文(右键)菜单来创建一个新的工作文件夹来存放您的新工作(推荐)。您可以通过所选文件夹的上下文菜单或按键盘上的Delete按钮来移除工作文件夹。被删除的文件夹存储在根文件夹的recycled文件夹中,并可以从中恢复。一旦文件夹从回收站中删除,将无法恢复。但是,建议从您的本地文件系统中删除文件夹/文件,因为这样您可以使用操作系统内置的文件恢复功能来恢复它们。 请注意,几乎所有选定的设置,例如窗口大小、位置、参数设置等,在您关闭窗口时都会被自动记住(即,在关闭窗口之前无需保存设置)。您可以通过相应功能窗口中的
问号按钮访问每个功能的简要示例演示。4.1.1. 简要示例
4.2. 插件安装
可执行文件 MAFFT v7.313 mafft.bat 氨基酸或核苷酸序列的多重比对 IQ-TREE v. 1.6.8 iqtree.exe 用于系统发育组学推断的高效软件 MrBayes 3.2.6 mrbayes_x64.exe 或
mrbayes_x86.exe 系统发育的贝叶斯推断 PartitionFinder2 partitionfinder 文件夹 为系统发育分析选择最佳拟合的分区方案和分子进化模型 Gblocks 0.91b Gblocks.exe 从多重比对中选择保守块用于系统发育分析 Rscript 3.4.4 Rscript.exe 绘制 RSCU 图所需 Python 2.7 python.exe PartitionFinder2 所需 tbl2asn tbl2asn.exe 自动化创建用于提交至 GenBank 的序列记录(仅限 Windows) MPICH2 mpirun 或 mpiexec 消息传递接口(MPI)标准的高性能且广泛便携的实现,支持多线程 MrBayes 操作(仅限 Linux) MACSE macse_v2.03.jar 考虑移码和终止密码子的编码序列多重比对。 Java (JRE > 1.5) java.exe MACSE 所需 trimAl trimal.exe 用于自动修剪比对的工具 HmmCleaner HmmCleaner.pl 从您的 MSA 中移除低相似性片段 Perl 5 perl.exe HmmCleaner 所需这些插件可以在
设置-->插件中安装。
可以通过三种方式完成:请注意,这些插件程序的路径不应包含特殊字符(^, {, @ 等)。
4.2.1. 简要示例
4.3. 导入文件
关于如何将序列导入 PhyloSuite 的演示教程,请参阅 五种将数据导入 PhyloSuite 的方法 。
4.3.1. GenBank 文件
PhyloSuite 提供了三种方式将 GenBank 文件导入到 GenBank_File 根文件夹的工作文件夹中:
4.3.1.1. 简要 示例
导入 GenBank 文件后,有许多选项可以使用,可通过上下文(右键)菜单访问(除非另有说明):
4.3.2. 其他类型的文件
与 GenBank 文件类似,PhyloSuite 提供了两种方式将比对文件或 Microsoft Word 文档文件导入到 Other_File 根文件夹下的工作文件夹中:
导入文件后,同样有许多选项可以使用:
请注意,FASTA 格式文件也可以导入到 GenBank_File 根文件夹下的任何工作文件夹中,在这种情况下,文件将自动转换为 GenBank 文件格式(详见 五种将数据导入 PhyloSuite 的方法 )。
4.3.3. 在 NCBI 中搜索
您可以通过
文件 --> 在 NCBI 中搜索功能从 NCBI 的核苷酸和蛋白质数据库中搜索序列。4.3.3.1. 简要示例
4.4. GenBank 文件设置
GenBank 文件的格式如下所示(有关详细的 GenBank 格式,请访问 https://www.ncbi.nlm.nih.gov/Sitemap/samplerecord.html ):
FEATURES Location/Qualifiers source[ Feature ] 1..5028 /organism[ Qualifier ] ="Saccharomyces cerevisiae[ Value or Name ]" /db_xref[ Qualifier ] ="taxon:4932[ Value or Name ]" /chromosome[ Qualifier ]="IX[ Value or Name ]" /map[ Qualifier ] ="9[ Value or Name ]" CDS[ Feature ] 1..206 /product[ Qualifier ] ="TCP1-beta[ Value or Name ]"4.4.1. 谱系识别
这 可以在
设置-->设置-->分类识别中设置。
您可以定义每个 分类层级 的标识符。它支持 通配符*,例如,大多数科名以 “dae” 结尾,因此您可以将科分类层级定义为*dae。然而,在某些分类群中,层级名称不一定遵循相同的规则,例如在 Malacostraca 中,Hoplocarida 和 Peracarida 都以 “carida” 结尾,但它们分别是亚纲和总目。在这种情况下,最好使用全名作为标识符。此外,当您使用通配符时,可以排除某些术语;例如,如果您使用*oda来识别甲壳动物的目,则必须通过在新的 order 列中添加-Arthropoda来排除 Arthropoda,因为它是一个门。可以添加或删除分类层级。例如,您可以通过
添加列按钮添加一个亚目,或者通过选择任意分类层级并点击删除列按钮来删除它。请确保分类层级从左到右按从高到低的级别排列。您可以通过拖拽来更改分类层级的顺序。每当您更改设置时,可以通过在显示区域的右键菜单中选择刷新表格来更新表格。请注意, 显示区域 (GenBank_File 工作区)中列出的每个 ID/物种 的分类谱系是从 GenBank 文件中自动识别的。如果您愿意,可以通过所选 ID/物种 的上下文(右键)菜单将其替换为来自 NCBI 分类数据库( https://www.ncbi.nlm.nih.gov/taxonomy )或 WoRMS 数据库( http://www.marinespecies.org/index.php )的分类数据。
4.4.2. 信息显示与修改
GenBank 文件中有大量数据可以显示,因此 PhyloSuite 将它们分为四个部分:注释、谱系、参考文献和来源(来自 source 特征的 限定符 )。
specimen_voucher collection_date pubmed ID isolation_source country collected_by organelle mol_type strain Accessions db_xref请注意,
谱系和来源的信息是可变的。谱系可以配置(参见 谱系识别 )。所有 ID 的 GenBank 文件的source特征 中的所有限定符将作为可用选项呈现。这样,来源的可用选项取决于此工作文件夹中的 GenBank 文件。此外,某些信息可以通过双击相应的单元格进行修改。例如,谱系名称可能存在一些错误,您可以在 显示区域 中更正。新名称随后将用于 GenBank 文件提取器 和其他功能。无法修改的字段是 “ID”、”长度”、”AT%”、”状态”、”日期”、”最后修改日期”、”作者”、”标题”、”期刊”、”pubmed ID”、”评论”、”关键词”、”分子类型”、”拓扑结构”、”Accessions”、”序列版本”、”来源”、”状态”。
4.4.3. 特征提取
这是 一个灵活的功能,详细信息可以在
设置-->GenBank 文件提取中设置。
主要有三个步骤:默认情况下,PhyloSuite 为六种数据类型(基因座)提供了设置:线粒体基因组、叶绿体基因组、通用、cox1、16S 和 18S。您可以根据需要添加更多数据类型,并通过
当前版本按钮(左下角)在它们之间切换。允许您为每种数据类型关联不同的设置。线粒体基因组数据类型的三个特征(CDS、tRNA 和 rRNA)是固定的,因此无法删除,但可以添加新特征。如果您不确定使用哪种数据类型,可以选择通用,然后根据您的需要调整设置。4.4.3.1. 简要示例
请参阅 https://dongzhang0725.github.io/dongzhang0725.github.io/PhyloSuite-demo/customize_extraction/ 。
4.5. 文件操作
4.5.1. 输入文件
对于 PhyloSuite 中实现的功能的输入文件,您可以让软件从工作区__自动检测__它们,或者您可以自己__指定输入文件__。
4.5.1.1. 自动检测输入文件
输入文件和功能之间的关系总结如下:
IQ-TREE concatenate_results, PartFind_results, ModelFinder_results 和比对文件 MrBayes PartFind_results, ModelFinder_results 和比对文件 ModelFinder concatenate_results 和比对文件 PartitionFinder2 concatenate_results MAFFT extract_results 和比对文件 MACSE mafft_results, extract_results 和比对文件 Gblocks MACSE_results, mafft_results, concatenate_results 和比对文件 trimAl MACSE_results, mafft_results, concatenate_results 和比对文件 HmmCleaner MACSE_results, mafft_results, concatenate_results 和比对文件 MACSE_results, mafft_results, Gblocks_results, trimAl_results, HmmCleaner_results 和比对文件 MACSE_results, mafft_results, Gblocks_results, trimAl_results, HmmCleaner_results 和比对文件这里的比对文件指的是列在 Other_File 根文件夹中的比对文件。
结果文件夹名称请参考 输出文件4.5.1.2. 指定输入文件
4.5.2. 输出文件
功能和默认结果文件夹:
结果文件夹 IQ-TREE IQtree_results MrBayes MrBayes_results ModelFinder ModelFinder_results PartitionFinder2 PartFind_results MAFFT mafft_results MACSE MACSE_results Gblocks Gblocks_results trimAl trimAl_results HmmCleaner HmmCleaner_results convertFmt_results concatenate_results 绘制 RSCU 图 RSCUfig_results comp_tbl_results Flowchart_reports4.5.2.1. 简要示例
5. 数据分析
5.1. 提取 GenBank 文件
此 功能的输入文件只能通过选择 GenBank_File 根文件夹 下的工作文件夹的 显示区域 中的 ID 来加载。关于结果,请参阅 输出文件 部分。
有两种提取模式,
单基因座模式将提取整个序列但忽略注释和其他特征,适用于单基因座,如 18S、cox1 和 28S 等;自定义模式允许您选择或编辑希望提取的序列类型和特征(参见 GenBank 文件提取设置 )。它能做什么:
-
Generates an extraction overview file (
4.2. Plugins installation
PhyloSuite integrates eight plugin programs:
Programs Executable File Description MAFFT v7.313 mafft.bat Multiple alignment of amino acid or nucleotide sequences IQ-TREE v. 1.6.8 iqtree.exe Efficient software for phylogenomic inference MrBayes 3.2.6 mrbayes_x64.exe ormrbayes_x86.exe Bayesian inference of phylogeny PartitionFinder2 partitionfinder folder Selection of best-fit partitioning schemes and models of molecular evolution for phylogenetic analyses Gblocks 0.91b Gblocks.exe Selection of conserved blocks from multiple alignments for use in phylogenetic analysis Rscript 3.4.4 Rscript.exe Required for drawing RSCU figure Python 2.7 python.exe Required by PartitionFinder2 tbl2asn tbl2asn.exe Automates the creation of sequence records for submission to GenBank (Windows only) MPICH2 mpirun or mpiexec A high-performance and widely portable implementation of the Message Passing Interface (MPI) standard that enables a multi-thread MrBayes operation (Linux only) MACSE macse_v2.03.jar Multiple Alignment of Coding Sequences Accounting for Frameshifts and Stop Codons. Java (JRE > 1.5) java.exe Required by MACSE trimAl trimal.exe A tool for automated alignment trimming HmmCleaner HmmCleaner.pl Removing low similarity segments from your MSA Perl 5 perl.exe Required by HmmCleaner
These plugins can be installed in
Settings-->Plugins
.
This can be done in three ways:
Note that the paths of these plugin programs should not contain special characters (^, {, @, etc.).
4.2.1. Brief example
See How to configure plugins .
4.3. Import Files
PhyloSuite accepts numerous file formats and extensions:
For the demo tutorial of how to import sequences to PhyloSuite, please see five ways to import data into PhyloSuite .
4.3.1. GenBank file
TIP: GenBank file should be in the standard format (see
detail
).
PhyloSuite provides three ways to import GenBank files into the work folder of the GenBank_File root folder:
4.3.1.1. Brief example
After importing GenBank files, there are options to play with, accessible via the context (right-click) menu, if not specified otherwise:
4.3.2. Other types of files
After importing files, again there are many options to play with:
Note that FASTA format files can also be imported into any work folder under the GenBank_File root folder, in which case the file will be automatically converted to the GenBank file format (see five ways to import data into PhyloSuite for details).
4.3.3. Search in the NCBI
4.3.3.1. Brief example
4.4. GenBank file settings
The format of GenBank file is show below (for detailed GenBank format please visit https://www.ncbi.nlm.nih.gov/Sitemap/samplerecord.html ):
FEATURES Location/Qualifiers source[ Feature ] 1..5028 /organism[ Qualifier ] ="Saccharomyces cerevisiae[ Value or Name ]" /db_xref[ Qualifier ] ="taxon:4932[ Value or Name ]" /chromosome[ Qualifier ]="IX[ Value or Name ]" /map[ Qualifier ] ="9[ Value or Name ]" CDS[ Feature ] 1..206 /product[ Qualifier ] ="TCP1-beta[ Value or Name ]"4.4.1. Lineage recognition
This
can be set in
Settings-->Settings-->Taxonomy Recognition
.
You can define the identifier of each
taxonomic rank
. It supports the
wildcard character
*
, for example, most of the family names end with “dae”, thus you can define the family taxonomic rank as
*dae
. However, in some taxonomic groups, rank names don’t necessarily follow the same rule, as for example in the Malacostraca, Hoplocarida and Peracarida both end with “carida”, but they are a subclass and a superorder respectively. In this case, you’d better use the full name as the identifier. Additionally, you can exclude terms when you use the wildcard character; for example, if you use
*oda
to recognize the orders in crustaceans, you will have to exclude Arthropoda by adding
-Arthropoda
in a new row of the order column, because it is a phylum.
Taxonomic ranks can be added or deleted. For example, you can add a
Suborder
through the
Add Column
button, or delete any taxonomic rank by selecting it and clicking the
Delete Column
button. Please ensure that taxonomic ranks are arranged (left to right) from high to low level. You can change the order of taxonomic ranks by dragging them. Whenever you change the settings, you can update the table through the
Refresh table
option accessed via the right-click menu in the display area.
Note that taxonomic lineages of each ID/species listed in the display area (GenBank_File workspace) are automatically recognized from GenBank files. If you wish, you may replace them with taxonomic data from the NCBI’s Taxonomy database ( https://www.ncbi.nlm.nih.gov/taxonomy ) or WoRMS database ( http://www.marinespecies.org/index.php ) via the context (right-click) menu of the selected ID/species.
4.4.2. Information display and modification
There are numerous data in GenBank files that can be displayed, so PhyloSuite classifies them into four sections: Annotations, Lineages, Reference and Sources ( qualifiers from source feature).
Annotations Lineages Reference Sources Class author(s) Length Order title(s) specimen_voucher Superfamily journal(s) collection_date Family pubmed ID(s) isolation_source Organism Subfamily comment(s) country Definition Genus collected_by organelle Keywords Molecule type mol_type Topology strain Accessions db_xref Sequence version Source
Note that the information for
Lineages
and
Sources
is variable.
Lineages
can be configured (see
Lineage Recognition
). All of the qualifiers in the
source
feature
of GenBank files from all IDs in the
work folder
will be presented as available options. In this way, the available options for
Source
are dependent on the GenBank files in this work folder.
Additionally, some of the information can be modified by double-clicking the corresponding cell. For example, there may be some errors in the lineage names, which you can correct in the display area . The new name will then be used in GenBank File Extracter and other functions. Fields that cannot be modified are “ID”, “Length”, “AT%”, “State”, “Date”, “Latest modified”, “author(s)”, “title(s)”, “journal(s)”, “pubmed ID(s)”, “comment(s)”, “Keywords”, “Molecule type”, “Topology”, “Accessions”, “Sequence version”, “Source”, “State”.
4.4.3. Features extraction
By default, PhyloSuite provides settings for six data types (loci): Mitogenome, chloroplast genome, general, cox1, 16S and 18S. You may add more data types as desired and switch between them via the
Current version
button (bottom/left). You are allowed to associate different settings with each data type. The three features (CDS, tRNA and rRNA) of the Mitogenome data type are fixed, so they cannot be deleted, but new features can be added. If you are not sure which data type to use, you can select
general
and then adjust the settings according to your needs.
4.4.3.1. Brief example
Please see https://dongzhang0725.github.io/dongzhang0725.github.io/PhyloSuite-demo/customize_extraction/ .
4.5. File operation
4.5.1. Input files
4.5.1.1. Autodetect input files
The relationships of input files and functions are summarized below:
Function Input Files IQ-TREE concatenate_results, PartFind_results, ModelFinder_results and alignment file MrBayes PartFind_results, ModelFinder_results and alignment file ModelFinder concatenate_results and alignment file PartitionFinder2 concatenate_results MAFFT extract_results and alignment file MACSE mafft_results, extract_results and alignment file Gblocks MACSE_results, mafft_results, concatenate_results and alignment file trimAl MACSE_results, mafft_results, concatenate_results and alignment file HmmCleaner MACSE_results, mafft_results, concatenate_results and alignment file Convert Format MACSE_results, mafft_results, Gblocks_results, trimAl_results, HmmCleaner_results and alignment file Concatenate Sequence MACSE_results, mafft_results, Gblocks_results, trimAl_results, HmmCleaner_results and alignment file
Alignment file here refers to the alignment files listed in the
Other_File
root folder.
For results folder names refer to
Output Files
4.5.1.2. Specify input files
4.5.2. Output files
Functions and default results folders:
Function Results folder IQ-TREE IQtree_results MrBayes MrBayes_results ModelFinder ModelFinder_results PartitionFinder2 PartFind_results MAFFT mafft_results MACSE MACSE_results Gblocks Gblocks_results trimAl trimAl_results HmmCleaner HmmCleaner_results Convert Format convertFmt_results Concatenate Sequence concatenate_results Draw RSCU figure RSCUfig_results Compare Table comp_tbl_results Flowchart Flowchart_reports4.5.2.1. Brief example
5. Data analysis
5.1. Extract GenBank file
The input file for this function can be loaded only by selecting IDs in the display area of the work folder under the GenBank_File root folder . For the results, please see the Output Files section.
There are two modes for extraction,
Single loc.
mode will extract the entire sequence but ignore annotation and other features, which is suitable for single locus, such as 18S, cox1 and 28S etc.;
Custom
mode allows you to select or edit the type of sequence and features that you wish to extract (see
GenBank File Extracting settings
).
What it can do:
推荐文章