SpringBoot配置文件初见
在实际的开发中,使用配置文件的方式可以解决硬编码的问题,更加方便我们项目的部署和后续修改。
在SpringBoot中,使用全局配置文件能够对一些默认配置值进行修改及自定义配置。
Spring Boot使用一个application.properties或者application.yaml的文件作为全局配置文件
从官方文档可以看出, SpringBoot加载配置文件时会从以下四个位置进行加载 :
需要注意的是,在上列中越高的位置优先级越高。如果有相同的配置,优先级高的配置文件会覆盖优先级低的配置文件。
如果上图不方便理解 比较抽象的话,下图给出了实际的项目案例,来表示配置文件可以存放的位置:
上图中的标号即对应了官网给出的加载配置文件的四个位置。
配置文件位置的优先级
答案是按照优先级进行生效,也就是按照官网给出的顺序,顺序越靠上,优先级越高。
答案是能生效。SpringBoot会对上面四个位置的配置文件都进行加载,会形成一个互补设置。
properties与yaml的优先级对比
如果相同目录下,同时存在properties文件和yaml文件,那么以谁为准呢?
如果在同一个目录下,有application.yml也有application.properties,以谁为准需要参考版本:
在SpringBoot2.4.0以前,优先级properties > yaml
在SpringBoot2.4.0以后,优先级yaml > properties
如果同一个配置属性,在多个配置文件都配置了,默认使用第1哥读取到的,后面读取的不覆盖前面读取到的。
不过在创建SpringBoot项目时,一般的配置文件都是放置在"项目的resources目录下",SpringBoot会默认在resources目录下创建一个application.properties的文件。
另外,如果配置文件名字不叫application.properties或者application.yml,可以通过以下参数来指定 配置文件的名字,myproject是配置文件名
$ java -jar myproject.jar --spring.config.name=myproject
SpringBoot配置文件的加载原理源码分析
加载ApplicationListener实现类监听器
在了解了SpringBoot使用的全局配置文件后,我们来思考一个问题,就是该配置文件是如何生效的呢?也就是当我们在配置文件里配置了一些属性,比如配置了server.port = 8088,那么SpringBoot是如何加载该配置文件使得SpringBoot的启动监听端口为8088的呢?
这里初步做一个介绍,更细致的加载过程可以参考下文的源码解析来学习。
SpringBoot对于配置文件的加载是利用ConfigFileApplicationListener监听器来完成的。
对于每一个SpringBoot项目,都会有一个项目主程序启动类,在该类的main方法中调用SpringApplication.run();方法来启动SpringBoot程序,在启动过程中,便会有SpringBoot的一系列内部加载和初始化过程,因此该类对于我们的分析尤为重要。
点击进入到SpringApplication的主类中,观察其构造函数:
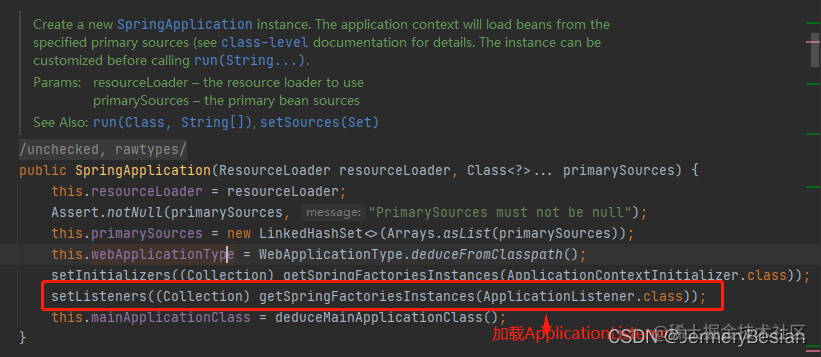 可以看到在构造器中对监听器进行了设置。其中
getSpringFactoriesInstances方法用于从spring.factories文件中加载ApplicationListener实现类。该方法的加载原理如下所示,一直深入调用过程找到该方法,可以看到该方法主要就是去META-INF/spring.factories路径下加载spring.factories文件,并对文件进行解析。对该文件下的每一个接口及其实现类,以接口名为Key,包含的实现类名为value进行保存,形成一个Map<String, List>的数据结构进行返回。
然后对调用过程回推,在对spring.factories文件加载完,并保存了文件下每个接口及其实现类的全限定类名后,getSpringFactoriesInstances方法会根据传递的参数Class<T> type来从上面得到的Map结构中拿出该接口名对应的所有实现类的集合。并对集合中的所有实现类,利用反射生成对应的实例进行保存: 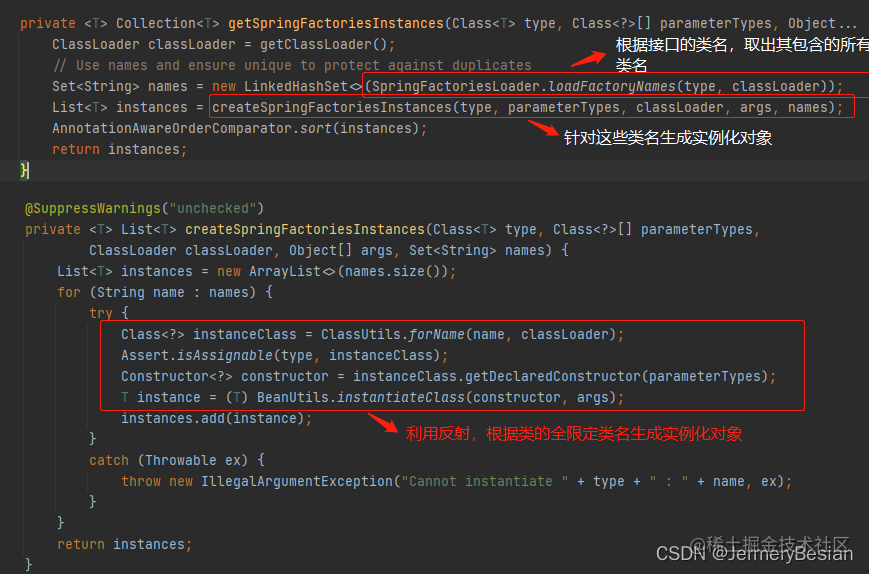 到这里我们可以理清构造函数中
setListeners((Collection) getSpringFactoriesInstances(ApplicationListener.class));方法的过程和作用,即在SpringBoot启动初始化时,通过读取META-INF/spring.factories文件,并对其进行解析,生成示例化对象,然后从中取出ApplicationListener接口对应的所有实现类的实例对象,注入监听器中。
ConfigFileApplicationListener监听器监听ApplicationEnvironmentPreparedEvent事件
经过上面的分析我们可以看到,SpringBoot在启动时会初始化一系列监听器,而这些监听器都是在ApplicationListener接口下的,因此我们取到META-INF/spring.factories看一下有哪些实现类: ![[外链图片转存失败,源站可能有防盗链机制,建议将图片保存下来直接上传(img-pTfWJZt4-1648785486571)(D:\备忘录\图片\SpringBoot配置文件加载原理\spring.factories.png)]](https://p3-juejin.byteimg.com/tos-cn-i-k3u1fbpfcp/0fbad895b25143ec8bb4198b5741d489~tplv-k3u1fbpfcp-zoom-in-crop-mark:3024:0:0:0.image) 这里最关键的实现类就是
这里最关键的实现类就是ConfigFileApplicationListener,该监听器会监听ApplicationEnvironmentPreparedEvent事件,当监听到该事件后,会调用load方法,去上面说的四个默认路径检索配置文件,如果检索到了,则进行加载封装供上层方法调用。
这是它的一个大致的整体流程,接下来我们深入源码中,按步骤对其进行分析
发送事件与监听器的触发
ApplicationStartingEvent事件
首先进入到run方法中:  该方法中首先调用
getRunListeners方法,同样是从spring.factories文件中加载SpringApplicationRunListeners接口下的实现类org.springframework.boot.context.event.EventPublishingRunListener,接下来调用该监听器的starting()方法  该
该starting()方法内,会创建一个ApplicationStartingEvent的事件,并利用multicastEvent方法进行广播该事件给应用中包含的所有监听器,这里的应用就是参数this.application,也就是现在的SpringApplication,它所包含的监听器也就是上文中最初加载的ApplicationListener下的11个监听器。可以看到,每个event对象下都包含一个source源,这个源表示了事件最初在其上发生的对象,这里的source源就是SpringApplication。  接下来,会进入到
SimpleApplicationEventMulticaster类下的multicastEvent方法,这里比较重要的一个方法就是getApplicationListeners方法,该方法内部会根据该事件的类型,以及事件所包含的源里的监听器,筛选出对该事件感兴趣的监听器集合  节选出来
节选出来getApplicationListeners方法内的重要方法: retrieveApplicationListeners方法,该方法就是实际检索给定事件和源类型的应用程序侦听器,返回的listeners对象即包含了监听该事件的应用程序监听器集合。  这里的
这里的listeners即包含了最初ApplicationListeners接口下的11个监听器。 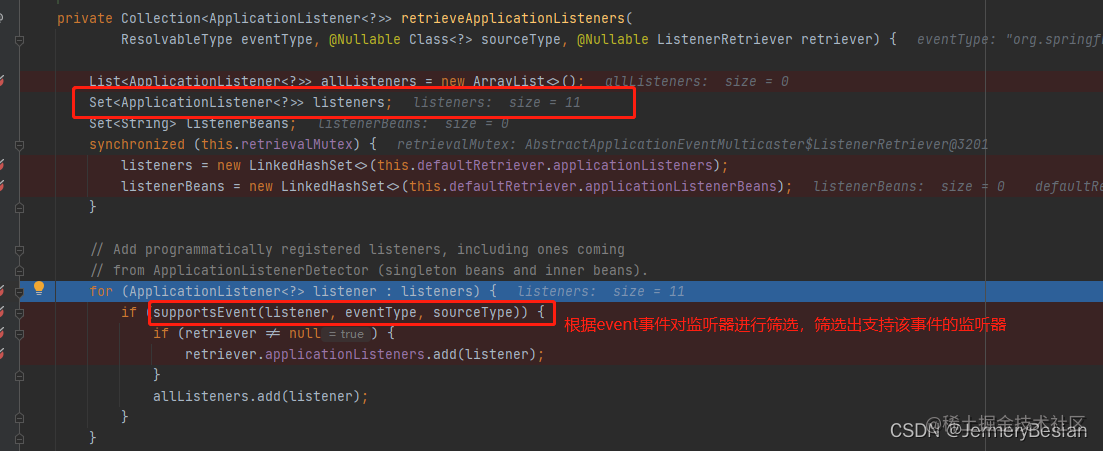 方法中的
方法中的supportsEvent方法即判断给定监听器是否支持给定事件(或者说是否监听该事件)。由于目前这里的eventType表示的是ApplicationStartingEvent,该事件触发的监听器包括11个中的:
BackgroundPreinitializerorg.springframework.boot.context.logging.LoggingApplicationListenerorg.springframework.boot.context.config.DelegatingApplicationListenerorg.springframework.boot.liquibase.LiquibaseServiceLocatorApplicationListener这里该事件还不触发org.springframework.boot.context.config.ConfigFileApplicationListener
最终当getApplicationListeners方法拿到监听器对象集合后,遍历得到每个监听器,然后调用invokeListener(listener, event);方法,再利用listener.onApplicationEvent(event)方法,通过调用相应监听器的onApplicationEvent(event)方法来唤醒监听器对象,执行相应的触发操作。 
ApplicationEnvironmentPreparedEvent事件
执行完相应监听器的操作后,会继续回到run方法中执行prepareEnvironment方法,该方法同样是利用监听器和事件的机制,来触发监听完成环境准备的工作。  这里的
这里的listeners仍然是EventPublishingRunListener,因此这里的prepareEnvironment相当于是调用了该监听器的不同方法,来产生不同的事件类型,可以看到,这一次创建的事件类型为ApplicationEnvironmentPreparedEvent,也就是我们最开始说的加载配置文件的监听器所监听的事件类型,因此到这里我们就离探究配置文件加载原理又近了一步。创建该事件类型后,同样是利用multicastEvent将该事件广播给该应用程序下的所有监听器,其实它的流程就跟上面是一样的了,只是产生的事件不同。  因此,这里不在赘述该事件的触发流程,同样的是在
retrieveApplicationListeners方法里的supportEvent方法中,筛选出支持ApplicationEnvironmentPreparedEvent事件的监听器集合并返回,而这次触发的监听器就包括了org.springframework.boot.context.config.ConfigFileApplicationListener监听器。由于监听器的真正执行是通过调用listener.onApplicationEvent(event)方法来执行的,因此我们从该方法开始分析: 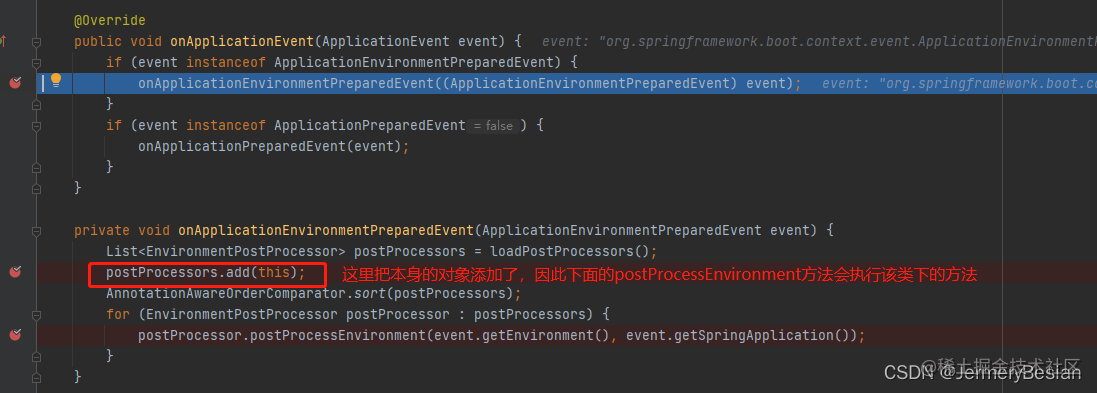 这里
这里loadPostProcessors方法就是从spring.factories中加载EnvironmentPostProcessor接口对应的实现类,并把当前对象也添加进去(因为ConfigFileApplicationListener也实现了EnvironmentPostProcessor接口,所以可以添加)。因此在下方遍历时,会访问该类下的postProcessEnvironment方法。
接下来进入到postProcessEnvironment方法  接下来就是要分析最重要的
Loader方法 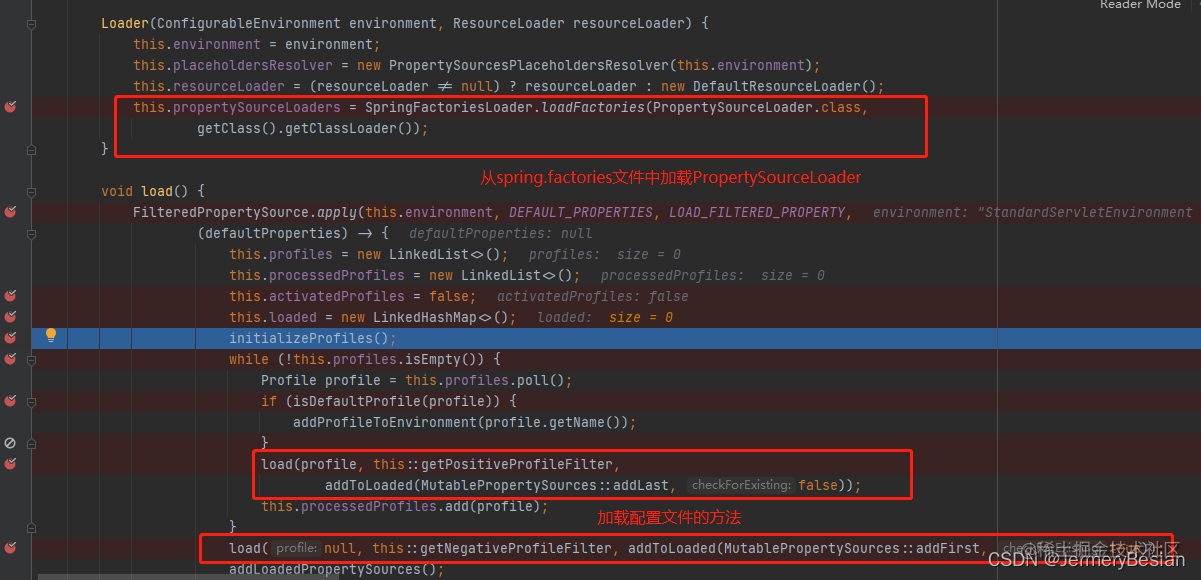 该方法中,首先
SpringFactoriesLoader.loadFactories从spring.factories中加载PropertySourceLoader接口对应的实现类,也就是  这两个实现类分别用于加载文件名后缀为properties和yaml的文件。
接下来最核心的方法就是红框中的load方法,这里会最终加载我们的配置文件,因此我们进行深入探究:
private void load(Profile profile, DocumentFilterFactory filterFactory, DocumentConsumer consumer) {
getSearchLocations().forEach((location) -> {
boolean isFolder = location.endsWith("/");
Set<String> names = isFolder ? getSearchNames() : NO_SEARCH_NAMES;
names.forEach((name) -> load(location, name, profile, filterFactory, consumer));
首先调用了getSearchLocations方法
//获得加载配置文件的路径
//可以通过spring.config.location配置设置路径,如果没有配置,则使用默认
//默认路径由DEFAULT_SEARCH_LOCATIONS指定:
// CONFIG_ADDITIONAL_LOCATION_PROPERTY = "spring.config.additional-location"
// CONFIG_LOCATION_PROPERTY = "spring.config.location";
// DEFAULT_SEARCH_LOCATIONS = "classpath:/,classpath:/config/,file:./,file:./config/"
private Set<String> getSearchLocations() {
Set<String> locations = getSearchLocations(CONFIG_ADDITIONAL_LOCATION_PROPERTY);
if (this.environment.containsProperty(CONFIG_LOCATION_PROPERTY)) {
locations.addAll(getSearchLocations(CONFIG_LOCATION_PROPERTY));
else {
locations.addAll(
asResolvedSet(ConfigFileApplicationListener.this.searchLocations, DEFAULT_SEARCH_LOCATIONS));
return locations;
该方法用于获取配置文件的路径,如果利用spring.config.location指定了配置文件路径,则根据该路径进行加载。否则则根据默认路径加载,而默认路径就是我们最初提到的那四个路径。接下来,再深入asResolvedSet方法内部分析一下
private Set<String> asResolvedSet(String value, String fallback) {
List<String> list = Arrays.asList(StringUtils.trimArrayElements(StringUtils.commaDelimitedListToStringArray(
(value != null) ? this.environment.resolvePlaceholders(value) : fallback)));
Collections.reverse(list);
return new LinkedHashSet<>(list);
这里的value表示ConfigFileApplicationListener初始化时设置的搜索路径,而fallback就是DEFAULT_SEARCH_LOCATIONS默认搜索路径。StringUtils.trimArrayElements(StringUtils.commaDelimitedListToStringArray())方法就是以逗号作为分隔符对"classpath:/,classpath:/config/,file:./,file:./config/"进行切割,并返回一个字符数组。而这里的Collections.reverse(list);之后,就是体现优先级的时候了,先被扫描到的配置文件会优先生效。
这里我们拿到搜索路径之后,load方法里对每个搜索路径进行遍历,首先调用了getSearchNames()方法
// 返回所有要检索的配置文件前缀
// CONFIG_NAME_PROPERTY = "spring.config.name"
// DEFAULT_NAMES = "application"
private Set<String> getSearchNames() {
if (this.environment.containsProperty(CONFIG_NAME_PROPERTY)) {
String property = this.environment.getProperty(CONFIG_NAME_PROPERTY);
return asResolvedSet(property, null);
return asResolvedSet(ConfigFileApplicationListener.this.names, DEFAULT_NAMES);
该方法中如果我们通过spring.config.name设置了要检索的配置文件前缀,会按设置进行加载,否则加载默认的配置文件前缀即application。
拿到所有需要加载的配置文件前缀后,则遍历每个需要加载的配置文件,进行搜索加载,加载过程如下:
private void load(String location, String name, Profile profile, DocumentFilterFactory filterFactory,
DocumentConsumer consumer) {
//下面的if分支默认是不走的,除非我们设置spring.config.name为空或者null
//或者是spring.config.location指定了配置文件的完整路径,也就是入参location的值
if (!StringUtils.hasText(name)) {
for (PropertySourceLoader loader : this.propertySourceLoaders) {
//检查配置文件名的后缀是否符合要求,
//文件名后缀要求是properties、xml、yml或者yaml
if (canLoadFileExtension(loader, location)) {
load(loader, location, profile, filterFactory.getDocumentFilter(profile), consumer);
return;
throw new IllegalStateException("File extension of config file location '" + location
+ "' is not known to any PropertySourceLoader. If the location is meant to reference "
+ "a directory, it must end in '/'");
Set<String> processed = new HashSet<>();
//propertySourceLoaders属性是在Load类的构造方法中设置的,可以加载文件后缀为properties、xml、yml或者yaml的文件
for (PropertySourceLoader loader : this.propertySourceLoaders) {
for (String fileExtension : loader.getFileExtensions()) {
if (processed.add(fileExtension)) {
loadForFileExtension(loader, location + name, "." + fileExtension, profile, filterFactory,
consumer);
关注下面的两个for循环,this.propertySourceLoaders既包含了上面提到的两个PropertiesPropertySourceLoader和YamlPropertySourceLoader,PropertiesPropertySourceLoader可以加载文件扩展名为properties和xml的文件,YamlPropertySourceLoader可以加载文件扩展名为yml和yaml的文件。获取到搜索路径、文件名和扩展名后,就可以到对应的路径下去检索配置文件并加载了。
private
void loadForFileExtension(PropertySourceLoader loader, String prefix, String fileExtension,
Profile profile, DocumentFilterFactory filterFactory, DocumentConsumer consumer) {
DocumentFilter defaultFilter = filterFactory.getDocumentFilter(null);
DocumentFilter profileFilter = filterFactory.getDocumentFilter(profile);
if (profile != null) {
// Try profile-specific file & profile section in profile file (gh-340)
//在文件名上加上profile值,之后调用load方法加载配置文件,入参带有过滤器,可以防止重复加载
String profileSpecificFile = prefix + "-" + profile + fileExtension;
load(loader, profileSpecificFile, profile, defaultFilter, consumer);
load(loader, profileSpecificFile, profile, profileFilter, consumer);
// Try profile specific sections in files we've already processed
for (Profile processedProfile : this.processedProfiles) {
if (processedProfile != null) {
String previouslyLoaded = prefix + "-" + processedProfile + fileExtension;
load(loader, previouslyLoaded, profile, profileFilter, consumer);
// Also try the profile-specific section (if any) of the normal file
//加载不带profile的配置文件
load(loader, prefix + fileExtension, profile, profileFilter, consumer);
// 加载配置文件
private void load(PropertySourceLoader loader, String location, Profile profile, DocumentFilter filter,
DocumentConsumer consumer) {
try {
//调用Resource类到指定路径加载配置文件
// location比如file:./config/application.properties
Resource resource = this.resourceLoader.getResource(location);
if (resource == null || !resource.exists()) {
if (this.logger.isTraceEnabled()) {
StringBuilder description = getDescription("Skipped missing config ", location, resource,
profile);
this.logger.trace(description);
return;
if (!StringUtils.hasText(StringUtils.getFilenameExtension(resource.getFilename()))) {
if (this.logger.isTraceEnabled()) {
StringBuilder description = getDescription("Skipped empty config extension ", location,
resource, profile);
this.logger.trace(description);
return;
String name = "applicationConfig: [" + location + "]";
//读取配置文件内容,将其封装到Document类中,解析文件内容主要是找到
//配置spring.profiles.active和spring.profiles.include的值
List<Document> documents = loadDocuments(loader, name, resource);
//如果文件没有配置数据,则跳过
if (CollectionUtils.isEmpty(documents)) {
if (this.logger.isTraceEnabled()) {
StringBuilder description = getDescription("Skipped unloaded config ", location, resource,
profile);
this.logger.trace(description);
return;
List<Document> loaded = new ArrayList<>();
//遍历配置文件,处理里面配置的profile
for (Document document : documents) {
if (filter.match(document)) {
//将配置文件中配置的spring.profiles.active和
//spring.profiles.include的值写入集合profiles中,
//上层调用方法会读取profiles集合中的值,并读取对应的配置文件
//addActiveProfiles方法只在第一次调用时会起作用,里面有判断
addActiveProfiles(document.getActiveProfiles());
addIncludedProfiles(document.getIncludeProfiles());
loaded.add(document);
Collections.reverse(loaded);
if (!loaded.isEmpty()) {
loaded.forEach((document) -> consumer.accept(profile, document));
if (this.logger.isDebugEnabled()) {
StringBuilder description = getDescription("Loaded config file ", location, resource, profile);
this.logger.debug(description);
catch (Exception ex) {
throw new IllegalStateException("Failed to load property source from location '" + location + "'", ex);
该方法首先调用this.resourceLoader.getResource(location);用来判断location路径下的文件是否存在,如果存在,会调用loadDocuments方法对配置文件进行加载:
private List<Document> loadDocuments(PropertySourceLoader loader, String name, Resource resource)
throws IOException {
DocumentsCacheKey cacheKey = new DocumentsCacheKey(loader, resource);
List<Document> documents = this.loadDocumentsCache.get(cacheKey);
if (documents == null) {
List<PropertySource<?>> loaded = loader.load(name, resource);
documents = asDocuments(loaded);
this.loadDocumentsCache.put(cacheKey, documents);
return documents;
再内部根据不同的PropertySourceLoader调用相应的load方法和loadProperties(resource)方法
public List<PropertySource<?>> load(String name, Resource resource) throws IOException {
Map<String, ?> properties = loadProperties(resource);
if (properties.isEmpty()) {
return Collections.emptyList();
return Collections
.singletonList(new OriginTrackedMapPropertySource(name, Collections.unmodifiableMap(properties), true));
@SuppressWarnings({ "unchecked", "rawtypes" })
private Map<String, ?> loadProperties(Resource resource) throws IOException {
String filename = resource.getFilename();
if (filename != null && filename.endsWith(XML_FILE_EXTENSION)) {
return (Map) PropertiesLoaderUtils.loadProperties(resource);
return new OriginTrackedPropertiesLoader(resource).load();
由于我们目前的配置文件只有application.properties,也就是文件结尾不是以xml作为扩展名。因此loadProperties方法会进入到new OriginTrackedPropertiesLoader。因此再进入到new OriginTrackedPropertiesLoader(resource).load();。(不要急 就快到了)
Map<String, OriginTrackedValue> load(boolean expandLists) throws IOException {
try (CharacterReader reader = new CharacterReader(this.resource)) {
Map<String, OriginTrackedValue> result = new LinkedHashMap<>();
StringBuilder buffer = new StringBuilder();
while (reader.read()) {
String key = loadKey(buffer, reader).trim();
if (expandLists && key.endsWith("[]")) {
key = key.substring(0, key.length() - 2);
int index = 0;
OriginTrackedValue value = loadValue(buffer, reader, true);
put(result, key + "[" + (index++) + "]", value);
if (!reader.isEndOfLine()) {
reader.read();
while (!reader.isEndOfLine());
else {
OriginTrackedValue value = loadValue(buffer, reader, false);
put(result, key, value);
return result;
CharacterReader(Resource resource) throws IOException {
this.reader = new LineNumberReader(
new InputStreamReader(resource.getInputStream(), StandardCharsets.ISO_8859_1));
private String loadKey(StringBuilder buffer, CharacterReader reader) throws IOException {
buffer.setLength(0);
boolean previousWhitespace = false;
while (!reader.isEndOfLine()) {
// 判断读取到的字节是否为'=' 或者为 ':',如果是则直接返回读取都的buffer内容
if (reader.isPropertyDelimiter()) {
reader.read();
return buffer.toString();
if (!reader.isWhiteSpace() && previousWhitespace) {
return buffer.toString();
previousWhitespace = reader.isWhiteSpace();
buffer.append(reader.getCharacter());
reader.read();
return buffer.toString();
private OriginTrackedValue loadValue(StringBuilder buffer, CharacterReader reader, boolean splitLists)
throws IOException {
buffer.setLength(0);
while (reader.isWhiteSpace() && !reader.isEndOfLine()) {
reader.read();
Location location = reader.getLocation();
while (!reader.isEndOfLine() && !(splitLists && reader.isListDelimiter())) {
buffer.append(reader.getCharacter());
reader.read();
Origin origin = new TextResourceOrigin(this.resource, location);
return OriginTrackedValue.of(buffer.toString(), origin);
终于,我们看见了曙光。在这个方法里,首先CharacterReader方法将我们的resource也就是配置文件转为了输入流,然后利用reader.read()进行读取,在loadKey方法中我们看到,这里判断读取到的是否为'=' 或者为 ':',也就是我们在配置文件中以'='或者':'分割的key-value。因此看到这里,我们可以直观的感受到这里应该是读取配置文件,并切分key和value的地方。
最终,对配置文件读取完成后,会将其以key-value的形式封装到一个Map集合中进行返回,然后封装到OriginTrackedMapPropertySource中作为一个MapPropertySource对象。再层层往上回退发现会最终封装成一个asDocuments(loaded);Document对象。最后回到最上层的load方法中,loadDocuments(loader, name, resource);方法即返回我们加载好的配置文件Document对象集合。并对集合中的每一个配置文件document对象进行遍历,调用loaded.forEach((document) -> consumer.accept(profile, document));
整理和总结
经过我们上面比较长篇大论的分析,我们已经知道配置文件是如何被检索以及如何被加载的了,接下来,我们对上面的流程进行一下总结和分析:
SpringBoot在启动加载时,会利用事件-监听器模式,就像发布-订阅模式,在不同的阶段利用不同的事件唤醒相应的监听器执行对应的操作。对于配置文件加载关键的监听器是ConfigFileApplicationListener,该监听器会监听ApplicationEnvironmentPreparedEvent事件。
每个事件event都会包含一个source源来表示该事件最先发生在其上的对象,ApplicationEnvironmentPreparedEvent事件包含的source源是SpringApplication,包含了一组listeners监听器。SpringBoot会根据事件对监听器进行筛选,只筛选出那些支持该事件的监听器,并调用方法唤醒这些监听器执行相应逻辑。
当ApplicationEnvironmentPreparedEvent事件发生时,会唤醒ConfigFileApplicationListener监听器执行相应逻辑。最主要的加载方法load中,首先会获取到配置文件的搜索路径。如果设置了spring.config.location则会去指定目录下搜索,否则就去默认的搜索目录下classpath:/,classpath:/config/,file:./,file:./config/。
拿到所有待搜索目录后,遍历每个目录获取需要加载的配置文件。如果指定了spring.config.name,则加载指定名称的配置文件。否则使用默认的application作为配置文件的前缀名。然后,会利用PropertiesPropertySourceLoader和YamlPropertySourceLoader加载后缀名为properties、xml、yml或者yaml的文件。
拿到文件目录和文件名后,就可以去对应的路径下加载配置文件了。核心的过程是利用输入流读取配置文件,并根据读到的分隔符进行判断来切分配置文件的key和value。并将内容以key-value键值对的形式封装成一个OriginTrackedMapPropertySource,最后再将一个个配置文件封装成Document。最后遍历这些Documents,调用consumer.accept(profile, document));供上层调用访问。
下面用流程图梳理一下整个加载过程中的关键步骤: 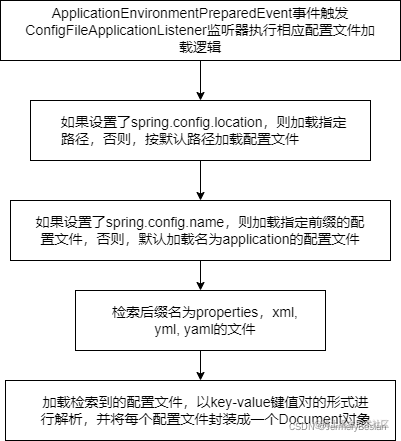
上面是自己关于这个问题阅读源码过程中的一些观点和想法,还是会有不够细致的地方,也可能有理解不够深刻或者错误的地方,还希望各位指正,一起通过阅读源码提升自己的代码水平!
\