常用:dto(data transfer object数据传输对象) + class-validator,自定义提示内容,还能集成swagger
其他:@hapi/joi,不常用,提示不友好
这里主要使用dto的方式
class-validator的验证项装饰器
更多请查阅官网,
github官网地址
@IsOptional() //可选的
@IsNotEmpty({ message: ‘不能为空’ })
@MinLength(6, {message: ‘密码长度不能小于6位’})
@MaxLength(20, {message: ‘密码长度不能超过20位’})
@IsEmail({}, { message: ‘邮箱格式错误’ }) //邮箱
@IsMobilePhone(‘zh-CN’, {}, { message: ‘手机号码格式错误’ }) //手机号码
@IsEnum([0, 1], {message: ‘只能传入数字0或1’}) //枚举
@ValidateIf(o => o.username === ‘admin’) //条件判断,条件满足才验证,如:这里是传入的username是admin才验证
第一步
:安装
yarn add class-validator class-transformer
第二步
:全局使用内置管道ValidationPipe ,不然会报错,无法起作用
import { NestFactory } from '@nestjs/core';
import { Logger, ValidationPipe } from '@nestjs/common';
import { AppModule } from './app.module';
async function bootstrap() {
const app = await NestFactory.create(AppModule);
app.useGlobalPipes(new ValidationPipe());
await app.listen(3000);
bootstrap();
第三步:编写dto,使用class-validator的校验项验证
创建DTO:只需要用户名,密码即可,两种都不能为空
import { IsNotEmpty, MinLength, MaxLength } from 'class-validator';
export class CreateUserDto {
@IsNotEmpty({ message: '用户名不能为空' })
username: string;
@IsNotEmpty({ message: '密码不能为空' })
@MinLength(6, {
message: '密码长度不能小于6位',
@MaxLength(20, {
message: '密码长度不能超过20位',
password: string;
修改DTO:用户名,密码,手机号码,邮箱,性别,状态,都是可选的
import {
IsEnum,
MinLength,
MaxLength,
IsOptional,
IsEmail,
IsMobilePhone,
} from 'class-validator';
import { Type } from 'class-transformer';
export class UpdateUserDto {
@IsOptional()
username: string;
@IsOptional()
@MinLength(6, {
message: '密码长度不能小于6位',
@MaxLength(20, {
message: '密码长度不能超过20位',
password: string;
@IsOptional()
@IsEmail({}, { message: '邮箱格式错误' })
email: string;
@IsOptional()
@IsMobilePhone('zh-CN', {}, { message: '手机号码格式错误' })
mobile: string;
@IsOptional()
@IsEnum(['male', 'female'], {
message: 'gender只能传入字符串male或female',
gender: string;
@IsOptional()
@IsEnum({ 禁用: 0, 可用: 1 },{
message: 'status只能传入数字0或1',
@Type(() => Number)
status: number;
第四步:controller和service一起使用
controller
user.controller.ts
import {
Controller,
Post,
Body,
HttpCode,
HttpStatus,
} from '@nestjs/common';
import { UserService } from './user.service';
import { CreateUserDto } from './dto/create-user.dto';
@Controller('user')
export class UserController {
constructor(private readonly userService: UserService) { }
@Post()
@HttpCode(HttpStatus.OK)
async create(@Body() user: CreateUserDto) {
return await this.userService.create(user);
@Patch(':id')
async update(@Param('id') id: string, @Body() user: UpdateUserDto) {
return await this.userService.update(id, user);
service
user.service.ts
import { Injectable } from '@nestjs/common';
import { Repository } from 'typeorm';
import { InjectRepository } from '@nestjs/typeorm';
import { UsersEntity } from './entities/user.entity';
import { ToolsService } from '../../utils/tools.service';
import { CreateUserDto } from './dto/create-user.dto';
@Injectable()
export class UserService {
constructor(
@InjectRepository(UsersEntity)
private readonly usersRepository: Repository<UsersEntity>,
) { }
async create(user: CreateUserDto) {
do some thing....
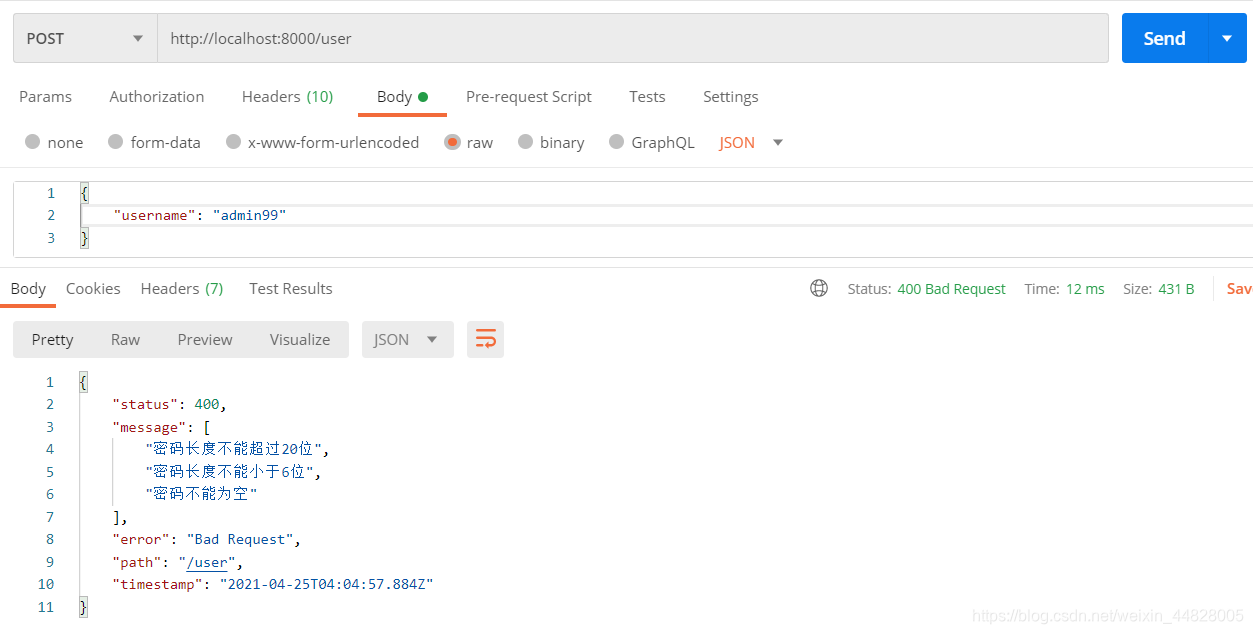
postman测试
post

update

nest学习导图
文章问题导向如何 限制 和 验证 前端传递过来的数据?如果你都有了答案,可以忽略本文章,或去nest学习导图寻找更多答案验证方式常用:dto(data transfer object数据传输对象) + class-validator,自定义提示内容,还能集成swagger其他:@hapi/joi,不常用,提示不友好这里主要使用dto的方式第一步:安装yarn add class-validator class-transformer第二步:全局使用内置管道Validatio
与NestJS模块系统和依赖项注入器集成时,允许使用TypeGraphQL功能。
首先,您需要安装typegraphql-nestjs模块以及@nestjs/graphql :
npm i typegraphql-nestjs @nestjs/graphql
如果尚未安装,则该将type-graphql添加到项目中了:
npm i type-graphql
如何使用?
typegraphql-nestjs软件包导出TypeGraphQLModule动态模块,该模块基于官方的NestJS GraphQLModule 。 它公开了三种静态方法:
.forRoot()
第一个是TypeGraphQLModule.forRoot() ,您应该在根模块上调用它,就像使用官方的GraphQLModule 。
唯一的区别是,除了
custom pipes
import { PipeTransform, Injectable, ArgumentMetadata } from "@nestjs/common"
// ArgumentMetadata类型定义
export interface ArgumentMetadata {
type: 'body' | 'query' | 'param' | 'custom';
metatype?: Type<unknown>;
data?: string;
管道的主要作用
对客户端传递的数据进行转换,依赖包class-transformer(需要自己安装)
对客户端传递的数据进行校验,依赖包class-validator(需要自己安装)
Nestjs官方提供的几个内置管道(官网说的开箱即用)
ValidationPipe
ParseIntPipe
ParseBoolPipe
ParseArrayPipe
ParseUUIDPipe
PASS src/admin/controllers/zeng-Try.controller.spec.ts
Test Suites: 1 skipped, 14 passed, 14 of 15 total
Tests: 7 skipped, 57 passed, 64 tot...
网上好像没有class-validator验证修饰器的中文翻译,也好像没有官网,只有npm插件介绍里有,但是是英文的。这里我就做回搬运工,并翻译下,好用请点赞
至于使用方法nestjs官网直接cv,不多介绍。
验证修饰器
通用验证装饰器
# id :integer not null, primary key
# user_id :integer not null
# provider
一、在main.ts
import { NestFactory } from '@nestjs/core';
import { SwaggerModule, DocumentBuilder } from '@nestjs/swagger';
import { AppModule } from './app.module';
import { ValidationPipe } from '@nestjs/common';//新加
// 导入mongoose
import * as mongoose from
npm install --save @nestjs/passport passport passport-local bcrypt
npm install --save-dev @types/passport-local
2. 创建用户模型
在 `src/auth` 目录下创建 `user.entity.ts` 文件,并定义用户模型,例如:
```typescript
import { BaseEntity, Entity, PrimaryGeneratedColumn, Column, Unique } from 'typeorm';
@Entity()
@Unique(['username'])
export class User extends BaseEntity {
@PrimaryGeneratedColumn()
id: number;
@Column()
username: string;
@Column()
password: string;
3. 创建用户注册 DTO
在 `src/auth/dto` 目录下创建 `auth.dto.ts` 文件,并定义用户注册 DTO,例如:
```typescript
export class AuthDto {
username: string;
password: string;
4. 创建用户认证服务
在 `src/auth` 目录下创建 `auth.service.ts` 文件,并定义用户认证服务,例如:
```typescript
import { Injectable, UnauthorizedException } from '@nestjs/common';
import { InjectRepository } from '@nestjs/typeorm';
import { Repository } from 'typeorm';
import { User } from './user.entity';
import { AuthDto } from './dto/auth.dto';
import * as bcrypt from 'bcrypt';
@Injectable()
export class AuthService {
constructor(
@InjectRepository(User)
private userRepository: Repository<User>,
async signUp(authDto: AuthDto): Promise<void> {
const { username, password } = authDto;
const user = new User();
user.username = username;
user.password = await bcrypt.hash(password, 10);
await user.save();
async validateUser(username: string, password: string): Promise<User> {
const user = await this.userRepository.findOne({ where: { username } });
if (!user || !(await bcrypt.compare(password, user.password))) {
throw new UnauthorizedException('Invalid username or password');
return user;
5. 创建本地策略
在 `src/auth` 目录下创建 `local.strategy.ts` 文件,并定义本地策略,例如:
```typescript
import { Injectable } from '@nestjs/common';
import { PassportStrategy } from '@nestjs/passport';
import { Strategy } from 'passport-local';
import { AuthService } from './auth.service';
@Injectable()
export class LocalStrategy extends PassportStrategy(Strategy) {
constructor(private authService: AuthService) {
super();
async validate(username: string, password: string): Promise<any> {
const user = await this.authService.validateUser(username, password);
return user;
6. 创建认证模块
在 `src/auth` 目录下创建 `auth.module.ts` 文件,并定义认证模块,例如:
```typescript
import { Module } from '@nestjs/common';
import { PassportModule } from '@nestjs/passport';
import { TypeOrmModule } from '@nestjs/typeorm';
import { AuthService } from './auth.service';
import { LocalStrategy } from './local.strategy';
import { UserController } from './user.controller';
import { User } from './user.entity';
@Module({
imports: [TypeOrmModule.forFeature([User]), PassportModule],
providers: [AuthService, LocalStrategy],
controllers: [UserController],
export class AuthModule {}
7. 创建用户控制器
在 `src/auth` 目录下创建 `user.controller.ts` 文件,并定义用户控制器,例如:
```typescript
import { Body, Controller, Post } from '@nestjs/common';
import { AuthService } from './auth.service';
import { AuthDto } from './dto/auth.dto';
@Controller('users')
export class UserController {
constructor(private authService: AuthService) {}
@Post('signup')
async signUp(@Body() authDto: AuthDto): Promise<void> {
await this.authService.signUp(authDto);
8. 配置认证路由
在 `src/app.module.ts` 文件中配置认证路由,例如:
```typescript
import { Module } from '@nestjs/common';
import { TypeOrmModule } from '@nestjs/typeorm';
import { AuthModule } from './auth/auth.module';
import { User } from './auth/user.entity';
@Module({
imports: [
TypeOrmModule.forRoot({
type: 'sqlite',
database: 'database.sqlite',
entities: [User],
synchronize: true,
AuthModule,
export class AppModule {}
9. 配置认证守卫
在需要进行认证的路由上配置认证守卫,例如:
```typescript
import { Controller, Get, UseGuards } from '@nestjs/common';
import { AuthGuard } from '@nestjs/passport';
@Controller('cats')
export class CatsController {
@Get()
@UseGuards(AuthGuard('local'))
findAll() {
// 仅经过认证的用户才能访问该路由
以上就是 NestJS 实现用户注册、验证和登录功能的步骤。希望对你有所帮助!

