


PyQt5系列教程(50):QTabWidget的使用


上期我们用了几章一起学习了QTableWidget类。注意涉及到以下几个知识点:
1、豆瓣API的使用
2、pickle的使用
3、QTableWidget类的使用
今天我们一起来学习下QTabWidget类,即选项卡。
总体介绍
QTabWidget类提供了一堆标签式小部件。
选项卡小部件提供一个选项卡栏(请参阅QTabBar)和一个用于显示与每个选项卡相关的页面的“页面区域”。默认情况下,标签栏显示在页面区域上方,但有不同的配置可用(请参见TabPosition)。每个选项卡都与一个不同的小部件(称为页面)相关联。只有当前页面显示在页面区域中 ;所有其他页面都隐藏起来。用户可以通过单击其选项卡或按Alt +字母快捷键(如果有)来显示不同的页面。
使用QTabWidget的正常方法是执行以下操作:
1、创建一个QTabWidget。
2、为选项卡对话框中的每个页面创建一个QWidget,但不要为它们指定父窗口小部件。
3、将子窗口小部件插入到页面窗口小部件中,使用布局为其定位。
4、调用addTab()或insertTab()将页面小部件放入选项卡小部件,为每个选项卡提供一个带有可选键盘快捷键的合适标签。
选项卡的位置由tabPosition定义,它们的形状由tabShape定义。
信号currentChanged()是在用户选择页面时发出的。
当前页面索引可使用currentIndex()获得,当前页面小部件可使用currentWidget()获得。您可以使用widget()检索指向给定索引的页面小部件,并可以使用indexOf()来查找小部件的索引位置。使用setCurrentWidget()或setCurrentIndex()来显示特定的页面。
您可以使用setTabText()或setTabIcon()更改选项卡的文本和图标。可以使用removeTab()删除选项卡及其关联的页面。
每个选项卡可以在任何时间启用或禁用(请参阅setTabEnabled())。如果启用选项卡,标签文本将正常绘制,用户可以选择该选项卡。如果它被禁用,则选项卡以不同的方式绘制,并且用户不能选择该选项卡。
选项卡小部件可以是分离复杂对话框的一种非常好的方法。另一种方法是使用QStackedWidget,为其提供一些页面之间的导航方式,例如QToolBar或QListWidget。
QTabWidget中的大部分功能都由QTabBar(位于顶部,提供选项卡)和QStackedWidget(大部分区域,组织各个页面)提供。
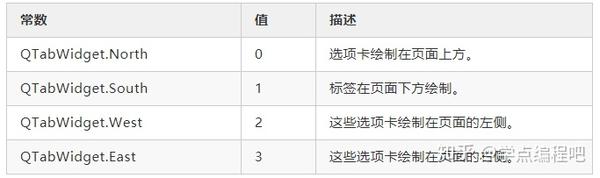
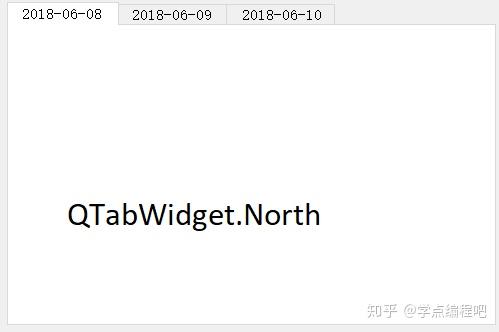
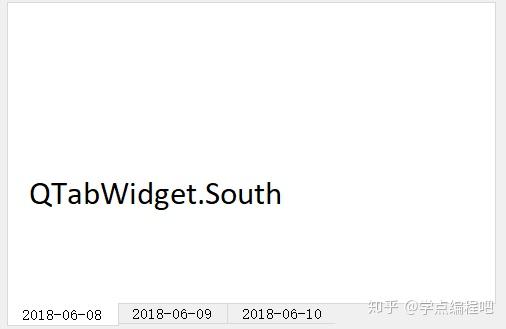
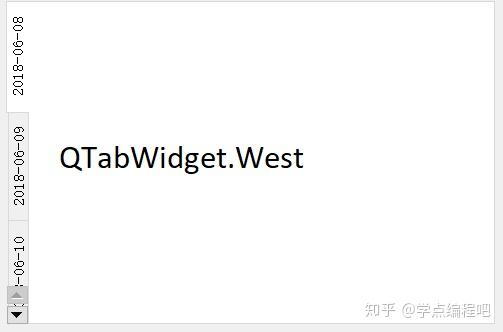
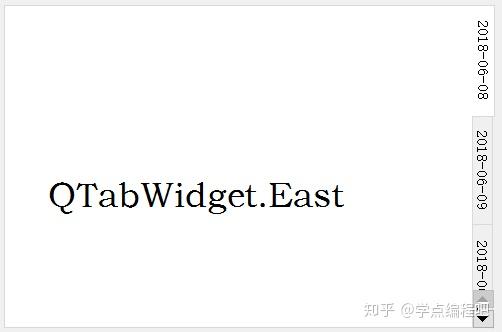
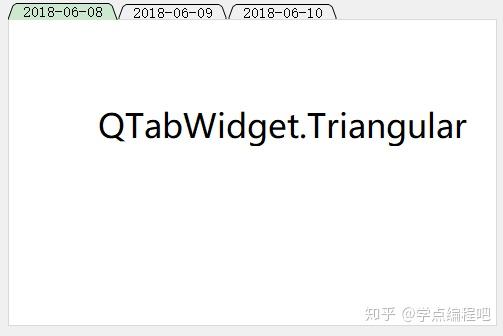
QTabWidget.TabPosition举例
定义了QTabWidget在哪里绘制标签行


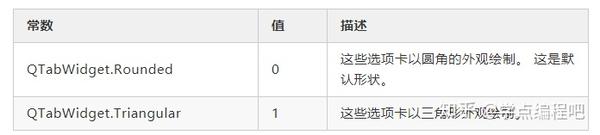
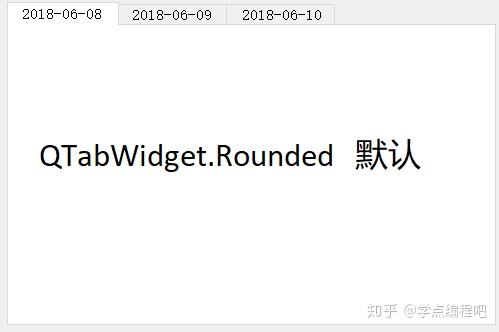
QTabWidget.TabShape举例
定义了选项卡的形状:


类归属
PyQt5->QtWidgets->QTabWidget
继承关系
PyQt5->QObject and QPaintDevice->QWidget->QTabWidget
更多详细的介绍,请参见官网:
小例子
下面就是我们小例子,在这个例子当中我们实现的小功能是查询天气:
1、查询北、上、广地区实时天气
2、查询北、上、广近三天天气
天气信息的来源是 心知天气 API(介绍可以百度),当然你有其他的API也能用,无所谓的。免费版的API功能是有限的,查询的城市大约也有300多个,演示的话足够了。
当然如果你付费的话,可以查到更多时间和更详细的天气信息,有兴趣可以自行查看。
不知道大家注意到没有,实时天气查询的时候,最新的更新时间是早上6:00,我写这篇文章的时候是早上6:30,也就是说它的更新时间也是固定的。这点大家知晓下就行了。

部分核心代码
设计思路
QTabWidget的使用相对简单,涉及到知识点不多,下面先谈谈设计思路:
1、利用API我们可以获取城市的实时天气和近三天天气,返回值是类似字典的字符串。
2、我们提前设计好两个QWidget,一个适用于展示实时天气的,一个适用于近三天天气的。近三天天气的内容会多些。
3、根据我们查询的选项,展示在QTabWidget中。
4、为获取天气信息的功能单独封装一个类。
注意:我们两个QWidget子类都是通过Qt设计师来实现的。为什么?因为更简单,所见即所得啊!
获取天气信息
这里API的详细使用方法请见官网。
class GetWeatherInfo:
    def __init__(self, flag, city):
        self.flag = flag
        if city == "北京":
            self.city = "beijing"
        elif city == "上海":
            self.city = "shanghai"
        else:
            self.city = "guangzhou"
        self.real_time = "https://api.seniverse.com/v3/weather/now.json?key=******&location=" + self.city + "&language=zh-Hans&unit=c"
        self.nearly_3_days = "https://api.seniverse.com/v3/weather/daily.json?key=******&location=" + self.city + "&language=zh-Hans&unit=c&start=0&days=5"
    def getweather(self):
        if self.flag == 0:
            widc = self.internet(self.real_time)
            if widc:
                weather = widc["results"][0]["now"]["text"]
                weather_code = widc["results"][0]["now"]["code"]
                weather_temperature = widc["results"][0]["now"]["temperature"]
                last_update =  widc["results"][0]["last_update"]
                return weather, weather_code, weather_temperature, last_update
        if self.flag == 1:
            widc = self.internet(self.nearly_3_days)
            weather0 =widc["results"][0]["daily"][0]
            weather1 =widc["results"][0]["daily"][1]
            weather2 =widc["results"][0]["daily"][2]
            return weather0, weather1, weather2
    def internet(self, url):
        r = requests.get(url)
        weatherinfo = r.text
        weatherinfo_dic = eval(weatherinfo)
        if "status_code" in weatherinfo_dic:
            return 0
        else:
            return weatherinfo_dic
以上就是返回具体天气信息的类了。其中涉及到API使用Key我隐藏了,请大家替换成自己的。
class GetWeatherInfo:
    def __init__(self, flag, city):
        self.flag = flag
        if city == "北京":
            self.city = "beijing"
        elif city == "上海":
            self.city = "shanghai"
        else:
            self.city = "guangzhou"
        self.real_time = "https://api.seniverse.com/v3/weather/now.json?key=******&location=" + self.city + "&language=zh-Hans&unit=c"
        self.nearly_3_days = "https://api.seniverse.com/v3/weather/daily.json?key=******&location=" + self.city + "&language=zh-Hans&unit=c&start=0&days=5"
city表示的是我们查询的城市,flag表示的是查询天气的类型:实时天气还是近三天天气
self.real_time、self.nearly_3_days 表示调用查询天气API的UIL了。
def internet(self, url):
    r = requests.get(url)
    weatherinfo = r.text
    weatherinfo_dic = eval(weatherinfo)
    if "status_code" in weatherinfo_dic:
        return 0
    else:
        return weatherinfo_dic
使用requests库访问API,它的返回值类型是str,是这样的:
{"results":[{"location"
:{"id":"WX4FBXXFKE4F","name":"北京","country":"CN","path":"北京,北京,中国","timezone":"Asia/Shanghai","timezone_offset":"+08:00"},"now":{"text":"阴","code":"9","temperature":"26"},"last_update":"2018-06-08T09:05:00+08:00"}]}一般就是熟悉的字典格式。所以,我们使用
weatherinfo_dic = eval(weatherinfo)将其直接转换成字典类型,超级方便。eval是什么呢?eval() 函数用来执行一个字符串表达式,并返回表达式的值。如下面这个例子:
>>> x = 8
>>> eval("5 * x")
>>> eval("5 + x")
>>> eval("5 - x")
>>> eval("5 / x")
0.625
if "status_code" in weatherinfo_dic:
    return 0
else:
    return weatherinfo_dic
要是返回结果中有status_code,说明结果出错了。否则返回相应的值。
def getweather(self):
    if self.flag == 0:
        widc = self.internet(self.real_time)
        if widc:
            weather = widc["results"][0]["now"]["text"]
            weather_code = widc["results"][0]["now"]["code"]
            weather_temperature = widc["results"][0]["now"]["temperature"]
            last_update =  widc["results"][0]["last_update"]
            return weather, weather_code, weather_temperature, last_update
    if self.flag == 1:
        widc = self.internet(self.nearly_3_days)
        weather0 =widc["results"][0]["daily"][0]
        weather1 =widc["results"][0]["daily"][1]
        weather2 =widc["results"][0]["daily"][2]
        return weather0, weather1, weather2
这个函数就是我们根据API的返回值,以及究竟是实时天气还是近三天天气,返回给调用该函数变量。
天气展示
class Weather(QWidget, Ui_Form):
def __init__(self, parent=None):
super(Weather, self).__init__(parent)
self.setupUi(self)
self.initUi()
self.flag = 0
def initUi(self):
cities = ["北京", "上海", "广州"]
self.comboBox.addItems(cities)
self.showrealweather()
@pyqtSlot(bool)
def on_radioButton_toggled(self, checked):
self.flag = 0
@pyqtSlot(bool)
def on_radioButton_2_toggled(self, checked):
self.flag = 1
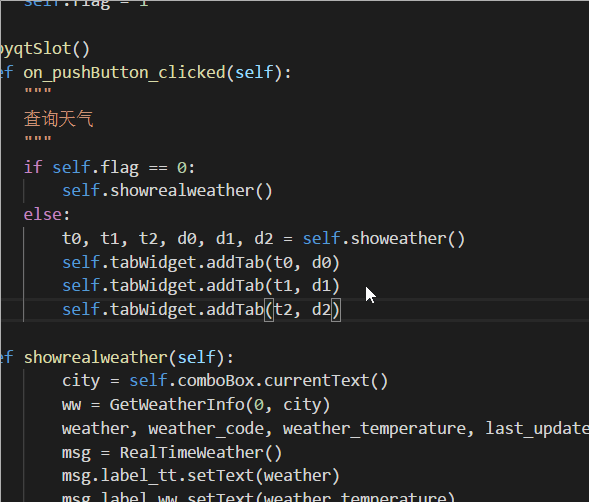
@pyqtSlot()
def on_pushButton_clicked(self):
if self.flag == 0:
self.showrealweather()
else:
t0, t1, t2, d0, d1, d2 = self.showeather()
self.tabWidget.addTab(t0, d0)
self.tabWidget.addTab(t1, d1)
self.tabWidget.addTab(t2, d2)
def showrealweather(self):
city = self.comboBox.currentText()
ww = GetWeatherInfo(0, city)
weather, weather_code, weather_temperature, last_update = ww.getweather()
msg = RealTimeWeather()
msg.label_tt.setText(weather)
msg.label_ww.setText(weather_temperature)
msg.label_icon.setPixmap(QPixmap("./res/" + weather_code + ".png"))
update = "天气最新更新时间--" + last_update[11:16]
self.tabWidget.clear()
self.tabWidget.addTab(msg, update)
def showeather(self):
city = self.comboBox.currentText()
ww = GetWeatherInfo(1, city)
self.tabWidget.clear()
weather0, weather1, weather2 = ww.getweather()
tabwidget0 = showTab()
tabwidget0.label_wb.setText(weather0["text_day"])
tabwidget0.label_tb.setPixmap(QPixmap("./res/" + weather0["code_day"] + ".png"))
tabwidget0.label_wn.setText(weather0["text_night"])
tabwidget0.label_tw.setPixmap(QPixmap("./res/" + weather0["code_night"] + ".png"))
tabwidget0.label_tg.setText(weather0["high"])
tabwidget0.label_tl.setText(weather0["low"])
tabwidget0.label_fx.setText(weather0["wind_direction"])
tabwidget0.label_fl.setText(weather0["wind_scale"])
tabwidget1 = showTab()
tabwidget1.label_wb.setText(weather1["text_day"])
tabwidget1.label_tb.setPixmap(QPixmap("./res/" + weather1["code_day"] + ".png"))
tabwidget1.label_wn.setText(weather1["text_night"])
tabwidget1.label_tw.setPixmap(QPixmap("./res/" + weather1["code_night"] + ".png"))
tabwidget1.label_tg.setText(weather1["high"])
tabwidget1.label_tl.setText(weather1["low"])
tabwidget1.label_fx.setText(weather1["wind_direction"])
tabwidget1.label_fl.setText(weather1["wind_scale"])
tabwidget2 = showTab()
tabwidget2.label_wb.setText(weather2["text_day"])
tabwidget2.label_tb.setPixmap(QPixmap("./res/" + weather2["code_day"] + ".png"))
tabwidget2.label_wn.setText(weather2["text_night"])
tabwidget2.label_tw.setPixmap(QPixmap("./res/" + weather2["code_night"] + ".png"))
tabwidget2.label_tg.setText(weather2["high"])
tabwidget2.label_tl.setText(weather2["low"])
tabwidget2.label_fx.setText(weather2["wind_direction"])
tabwidget2.label_fl.setText(weather2["wind_scale"])
return tabwidget0, tabwidget1, tabwidget2, weather0["date"], weather1["date"], weather2["date"]这个就是实现查询天气的主要代码了。当然还有一些天气信息展示的QWidget,这里就不做演示了,大家自己去看源码吧。都是Qt设计师弄完后,直接编译和生成对话框代码的。
self.flag = 0flag为0,表示默认是查询实时天气。
cities = ["北京", "上海", "广州"]
self.comboBox.addItems(cities)
为选择城市的下拉框填充城市数据,北京、上海、广州。相关知识点,请参考
def showrealweather(self):
    city = self.comboBox.currentText()
    ww = GetWeatherInfo(0, city)
    weather, weather_code, weather_temperature, last_update = ww.getweather()
    msg = RealTimeWeather()
    msg.label_tt.setText(weather)
    msg.label_ww.setText(weather_temperature)
    msg.label_icon.setPixmap(QPixmap("./res/" + weather_code + ".png"))
    update = "天气最新更新时间--" + last_update[11:16]
    self.tabWidget.clear()
    self.tabWidget.addTab(msg, update)
这个是显示实时天气的。
ww = GetWeatherInfo(0, city)
weather, weather_code, weather_temperature, last_update = ww.getweather()
取得该城市的天气信息:天气状况、天气状况代码、当前温度、最新的更新时间。
msg = RealTimeWeather()
msg.label_tt.setText(weather)
msg.label_ww.setText(weather_temperature)
msg.label_icon.setPixmap(QPixmap("./res/" + weather_code + ".png"))
update = "天气最新更新时间--" + last_update[11:16]
RealTimeWeather是展示实时天气的QWidget子类,我们设置一下天气状况、当前温度、最新的更新时间,以及根据天气状况代码选择相应的天气图片。
last_update[11:16]表明我们只取更新时间的具体时间(几点几分),否则还有某年某月等内容。
self.tabWidget.clear()
self.tabWidget.addTab(msg, update)
之前有选项卡的清空。然后新增一个选项卡,选项卡的内容就是之前展示实时天气的QWidget子类,名称就是最新更新时间。
showeather()函数的功能和showrealweather()函数功能大体一致,不同的地方是返回值多一些。这里不再重复讲解了。
@pyqtSlot(bool)
def on_radioButton_toggled(self, checked):
    self.flag = 0
@pyqtSlot(bool)
def on_radioButton_2_toggled(self, checked):
    self.flag = 1
这里我们设置了不同单选按钮被点击时,flag的值会发生变化的。0表示实时天气,1表示近三天天气。
有关单选按钮的知识点,请参考:
@pyqtSlot()
def on_pushButton_clicked(self):
    if self.flag == 0: