Android原生控件之--TextInputLayout、TextInputEditText
TextInputLayout 是22.2.0新添加的控件, 要和 EditText (或 EditText 的子类)结合使用,并且只能包含一个 EditText (或 EditText 的子类)。
TextInputLayout 继承关系如下:
java.lang.Object
   ↳    android.view.View
       ↳    android.view.ViewGroup
           ↳    android.widget.LinearLayout
               ↳    android.support.design.widget.TextInputLayout
TextInputLayout基本用法
- 首先要引入design和appcompat-v7兼容包:
compile 'com.android.support:design:25.2.0'
compile 'com.android.support:appcompat-v7:25.2.0'- 在布局文件添加如下代码
<android.support.design.widget.TextInputLayout
    android:id="@+id/til_account"
    android:layout_width="match_parent"
    android:layout_height="wrap_content"
    android:layout_margin="@dimen/pd_10">
    <EditText
        android:id="@+id/et_account"
        android:layout_width="match_parent"
        android:layout_height="wrap_content"
        android:hint="@string/form_username"/>
</android.support.design.widget.TextInputLayout>
<android.support.design.widget.TextInputLayout
    android:id="@+id/til_password"
    android:layout_width="match_parent"
    android:layout_height="wrap_content"
    android:layout_margin="@dimen/pd_10">
    <android.support.design.widget.TextInputEditText
        android:id="@+id/tiet_password"
        android:layout_width="match_parent"
        android:layout_height="wrap_content"
        android:hint="@string/form_password"
        android:inputType="textPassword"/>
</android.support.design.widget.TextInputLayout>
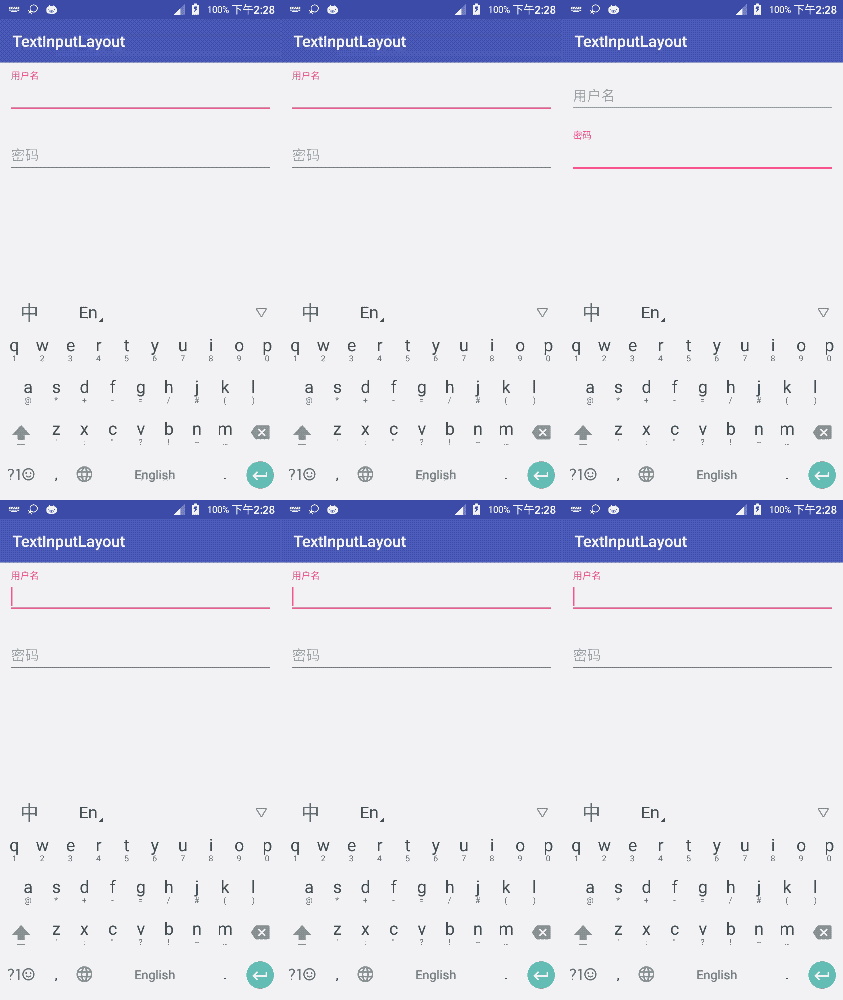
一般情况下, EditText 获得光标的时候hint会自动隐藏,这样不是很友好。这时候 TextInputLayout 就派上用场了, TextInputLayout 是 LinearLayout 的子类,用于辅助显示提示信息。当 EditText 获取得光标的时候, EditText 的hint会自己显示在上方,并且有动画过渡。
TextInputLayout错误提示
TextInputLayout 还可以处理错误并给出相应提示,比如在上面的其他上我们添加一个登录按钮,点击登录按钮的时候要验证密码长度为6-18个字符。
- 首先在布局上添加一个登录按钮:
<Button
        android:id="@+id/btn_login"
        android:layout_width="match_parent"
        android:layout_height="wrap_content"
        android:layout_marginLeft="@dimen/pd_10"
        android:layout_margin="@dimen/pd_10"
android:text="@string/login"/>- 添加一个显示错误提示并获取焦点的方法:
/**
     * 显示错误提示,并获取焦点
     * @param textInputLayout
     * @param error
    private void showError(TextInputLayout textInputLayout,String error){
        textInputLayout.setError(error);
        textInputLayout.getEditText().setFocusable(true);
        textInputLayout.getEditText().setFocusableInTouchMode(true);
        textInputLayout.getEditText().requestFocus();
}- 添加验证用户名和密码方法:
/**
     * 验证用户名
     * @param account
     * @return
    private boolean validateAccount(String account){
        if(StringUtils.isEmpty(account)){
            showError(til_account,"用户名不能为空");
            return false;
        return true;
     * 验证密码
     * @param password
     * @return
    private boolean validatePassword(String password) {
        if (StringUtils.isEmpty(password)) {
            showError(til_password,"密码不能为空");
            return false;
        if (password.length() < 6 || password.length() > 18) {
            showError(til_password,"密码长度为6-18位");
            return false;
        return true;
}- 给登录按钮设置点击事件,在触发点击事件的时候获取用户名和密码,并验证用户名和密码格式:
private Button btn_login;
private TextInputLayout til_account;
private TextInputLayout til_password;
btn_login = (Button) findViewById(R.id.btn_login);
btn_login.setOnClickListener(new View.OnClickListener() {
    @Override
    public void onClick(View v) {
        String account = til_account.getEditText().getText().toString();
        String password = til_password.getEditText().getText().toString();
        til_account.setErrorEnabled(false);
        til_password.setErrorEnabled(false);
        //验证用户名和密码
        if(validateAccount(account)&&validatePassword(password)){
            Toast.makeText(TextInputLayoutActivity.this,"登录成功",Toast.LENGTH_LONG).show();
});
这个示例简单判断了用户名非空和密码非空和长度判断,并给出相应提示。
TextInputEditText
TextInputEditText 继承关系如下:
java.lang.Object
   ↳    android.view.View
       ↳    android.widget.TextView
           ↳    android.widget.EditText
               ↳    android.support.v7.widget.AppCompatEditText
                   ↳    android.support.design.widget.TextInputEditText
由继承关系可以看出 TextInputEditText 是 EditText 的一个子类。上面的例子中,你会看到用户输入控件使用的是的 EditText ,而密码输入控件则使用了 TextInputEditText ,这里是为了对比一下两者的区别。
官方文档是这样描述的:
A special sub-class of EditText designed for use as a child of TextInputLayout. Using this class allows us to display a hint in the IME when in 'extract' mode.
大概意思为: TextInputEditText 作为 EditText 的子类,为 TextInputLayout 设计的一个子容器。输入法在'extract'模式的时候,使用 TextInputEditText 类允许显示提示。
还是上面的例子,我们把手机设置为横向,再看一下效果:
可以看到输入的时候都变成了全屏模式,用户名使用 EidtText 的时候hint就隐藏了,而密码使用 TextInputEditText 的时候hint可以正常显示。
由此可见 TextInputEditText 的设计就是修复了这个缺陷,所以 TextInputLayout 和 TextInputEditText 配合使用的效果最好!
示例托管在: GitHub TextInputLayout 是22.2.0新添加的控件, 要和 EditText (或 EditText 的子类)结合使用,并且只能包含一个 EditText (或 EditText 的子类)。
TextInputLayout 继承关系如下:
java.lang.Object
   ↳    android.view.View
       ↳    android.view.ViewGroup
           ↳    android.widget.LinearLayout
               ↳    android.support.design.widget.TextInputLayout
TextInputLayout基本用法
- 首先要引入design和appcompat-v7兼容包:
compile 'com.android.support:design:25.2.0'
compile 'com.android.support:appcompat-v7:25.2.0'- 在布局文件添加如下代码
<android.support.design.widget.TextInputLayout
    android:id="@+id/til_account"
    android:layout_width="match_parent"
    android:layout_height="wrap_content"
    android:layout_margin="@dimen/pd_10">
    <EditText
        android:id="@+id/et_account"
        android:layout_width="match_parent"
        android:layout_height="wrap_content"
        android:hint="@string/form_username"/>
</android.support.design.widget.TextInputLayout>
<android.support.design.widget.TextInputLayout
    android:id="@+id/til_password"
    android:layout_width="match_parent"
    android:layout_height="wrap_content"
    android:layout_margin="@dimen/pd_10">
    <android.support.design.widget.TextInputEditText
        android:id="@+id/tiet_password"
        android:layout_width="match_parent"
        android:layout_height="wrap_content"
        android:hint="@string/form_password"
        android:inputType="textPassword"/>
</android.support.design.widget.TextInputLayout>
一般情况下, EditText 获得光标的时候hint会自动隐藏,这样不是很友好。这时候 TextInputLayout 就派上用场了, TextInputLayout 是 LinearLayout 的子类,用于辅助显示提示信息。当 EditText 获取得光标的时候, EditText 的hint会自己显示在上方,并且有动画过渡。

TextInputLayout错误提示
TextInputLayout 还可以处理错误并给出相应提示,比如在上面的其他上我们添加一个登录按钮,点击登录按钮的时候要验证密码长度为6-18个字符。
- 首先在布局上添加一个登录按钮:
<Button
        android:id="@+id/btn_login"
        android:layout_width="match_parent"
        android:layout_height="wrap_content"
        android:layout_marginLeft="@dimen/pd_10"
        android:layout_margin="@dimen/pd_10"
android:text="@string/login"/>- 添加一个显示错误提示并获取焦点的方法:
/**
     * 显示错误提示,并获取焦点
     * @param textInputLayout
     * @param error
    private void showError(TextInputLayout textInputLayout,String error){
        textInputLayout.setError(error);
        textInputLayout.getEditText().setFocusable(true);
        textInputLayout.getEditText().setFocusableInTouchMode(true);
        textInputLayout.getEditText().requestFocus();
}- 添加验证用户名和密码方法:
/**
     * 验证用户名
     * @param account
     * @return
    private boolean validateAccount(String account){
        if(StringUtils.isEmpty(account)){
            showError(til_account,"用户名不能为空");
            return false;
        return true;
     * 验证密码
     * @param password
     * @return
    private boolean validatePassword(String password) {
        if (StringUtils.isEmpty(password)) {
            showError(til_password,"密码不能为空");
            return false;
        if (password.length() < 6 || password.length() > 18) {
            showError(til_password,"密码长度为6-18位");
            return false;
        return true;
}- 给登录按钮设置点击事件,在触发点击事件的时候获取用户名和密码,并验证用户名和密码格式:
private Button btn_login;
private TextInputLayout til_account;
private TextInputLayout til_password;
btn_login = (Button) findViewById(R.id.btn_login);
btn_login.setOnClickListener(new View.OnClickListener() {
    @Override
    public void onClick(View v) {
        String account = til_account.getEditText().getText().toString();
        String password = til_password.getEditText().getText().toString();
        til_account.setErrorEnabled(false);
        til_password.setErrorEnabled(false);
        //验证用户名和密码
        if(validateAccount(account)&&validatePassword(password)){
            Toast.makeText(TextInputLayoutActivity.this,"登录成功",Toast.LENGTH_LONG).show();
