

API接口文档管理利器-swagger

随着前后端分离的开发模式越来越流行,前端与后端分别交给不同的人员开发,能很大程度的提高开发效率,但是项目开发中的沟通成本也随之升高,这部分沟通成本主要在于前端开发人员与后端开发人员对API接口的沟通。
在我这几年的开发经历中,最早和前端沟通API接口是通过word文档来完成的,这种方式及其低效,由于API接口不可能一开始就能设计得很完善,每次改动都要重新通知并发送word文档给相关关系人,及其麻烦。其次,也没法提供mock数据给到前端。
后面我接触到别的新项目,API接口沟通使用了rap2,rap2是阿里妈妈前端团队开发的API管理平台,能给我们提供方便的接口文档管理、Mock、导出等功能,极大方便了API接口的沟通,同时,其提供的mock功能,能让前端直接调用得到mock数据,从而避免了前端需要自己造数据的问题,提高了前端的开发效率。这个工具我认为其唯一的缺点就是文档和代码是分开维护的,当后端需要开发接口时,每次先在rap2上定义好,再编写代码,同时要保持二者的一致性,接口少还好,接口多的话这个过程及其繁琐,我是深有体会。其次,在后期版本快速迭代的过程中,修改接口实现的时候都必须同步修改rap2接口文档,而文档与代码又处于两个不同的媒介,除非有严格的管理机制,不然很容易导致写出的代码与接口文档不一致现象。
最后,为了避免上述问题,我们开始采用一个新的API管理工具,那就是swagger,swagger 给我们提供了一个全新的维护 API 文档的方式,下面我们就来了解一下它的优点:
- swagger 可以根据代码自动生成 API 文档,很好的保证了文档的时效性,做到了代码变,文档变;
- swagger UI 呈现出来的是一份可交互式的 API 文档,我们可以直接在文档页面尝试 API 的调用,省去了准备复杂的调用参数的过程;
- 可以将swagger文档规范导入相关的工具(例如 Postman、AgileTC), 这些工具将会为我们自动地创建自动化测试。
以SpringBoot项目为例,为了引入swagger,需要加入如下依赖,鉴于swagger官方的UI界面操作不够友好,这里引入的是另一个UI界面:
        <dependency>
            <groupId>io.springfox</groupId>
            <artifactId>springfox-swagger2</artifactId>
            <version>3.0.0</version>
        </dependency>
        <dependency>
            <groupId>com.github.xiaoymin</groupId>
            <artifactId>swagger-bootstrap-ui</artifactId>
            <version>1.9.6</version>
        </dependency>
新建一个swagger配置类:
/**
 * @author yudong
 * @date 2022/1/4
@EnableSwagger2
@Configuration
public class SwaggerConfig {
    @Bean
    public Docket docket() {
        List<RequestParameter> params = new ArrayList<>();
        RequestParameter param = new RequestParameterBuilder()
                // 全局header参数
                .name("Authorization")
                .description("访问授权码头字段")
                .required(true)
                .in(ParameterType.HEADER)
                .build();
        params.add(param);
        return new Docket(DocumentationType.SWAGGER_2)
                // 启用swagger
                .enable(true)
                .select()
                // Controller类需要有Api注解才能生成接口文档
                .apis(RequestHandlerSelectors.withClassAnnotation(Api.class))
                // Controller方法需要有ApiOperation注解才能生成接口文档
                .apis(RequestHandlerSelectors.withMethodAnnotation(ApiOperation.class))
                // 路径使用any风格
                .paths(PathSelectors.any())
                .build()
                .globalRequestParameters(params)
                .consumes(Sets.newHashSet(MediaType.APPLICATION_JSON_VALUE))
                .produces(Sets.newHashSet(MediaType.APPLICATION_JSON_VALUE))
                // 接口文档的基本信息
                .apiInfo(apiInfo());
    @SneakyThrows
    private ApiInfo apiInfo() {
        return new ApiInfoBuilder()
                .title("业务中台")
                .description("这是项目描述")
                .contact(new Contact("liangyudong", "https://www.zhihu.com/people/liang-yu-dong-44/posts",
                        "375709770@qq.com"))
                .version("1.0.0")
                .build();
}
swagger 注解使用说明
@Api :Controller类的说明 ,说明类的作用;
@ApiOperation:Controller类方法的说明,说明方法的作用;
@ApiModel:用于JavaBean上,提供额外信息;
@ApiModelProperty:用于JavaBean的字段上,提供字段说明;
@ApiParam:用在方法参数上显式提供参数说明;
还有更多注解不一一赘述
以一个实际例子说明用法:
/**
* @author yudong
* @date 2022/1/4
@Slf4j
@Api(tags = "用户相关")
@RestController
@RequestMapping
("/user")
public class UserController {
@Autowired
private LoginService loginService;
@ApiOperation("01-登录")
@PostMapping("/login")
public Result<User> login(@RequestBody @Validated UserReqVo userReqVo) {
return Result.success(loginService.login(userReqVo));
@ApiOperation("02-批量删除用户")
@PostMapping("/batchDeleteUser")
public Result<List<Integer>> batchDeleteUser(@RequestBody @Size(min = 1)
@ApiParam(required = true, allowMultiple = true,
examples = @Example(@ExampleProperty(mediaType = "userIdList", value = "[1,2]")))
List<Integer> userIdList) {
return Result.success(userIdList);
* @author yudong
* @date 2022/1/4
@Data
@ApiModel
public class UserReqVo {
@NotBlank
@ApiModelProperty(value = "用户名", example = "admin", required = true)
private String username;
@NotBlank
@ApiModelProperty(value = "密码", example = "admin", required = true)
private String password;
}本地启动项目后访问文档地址 http:// localhost:8964/doc.html# / ,生成的文档是这样的:

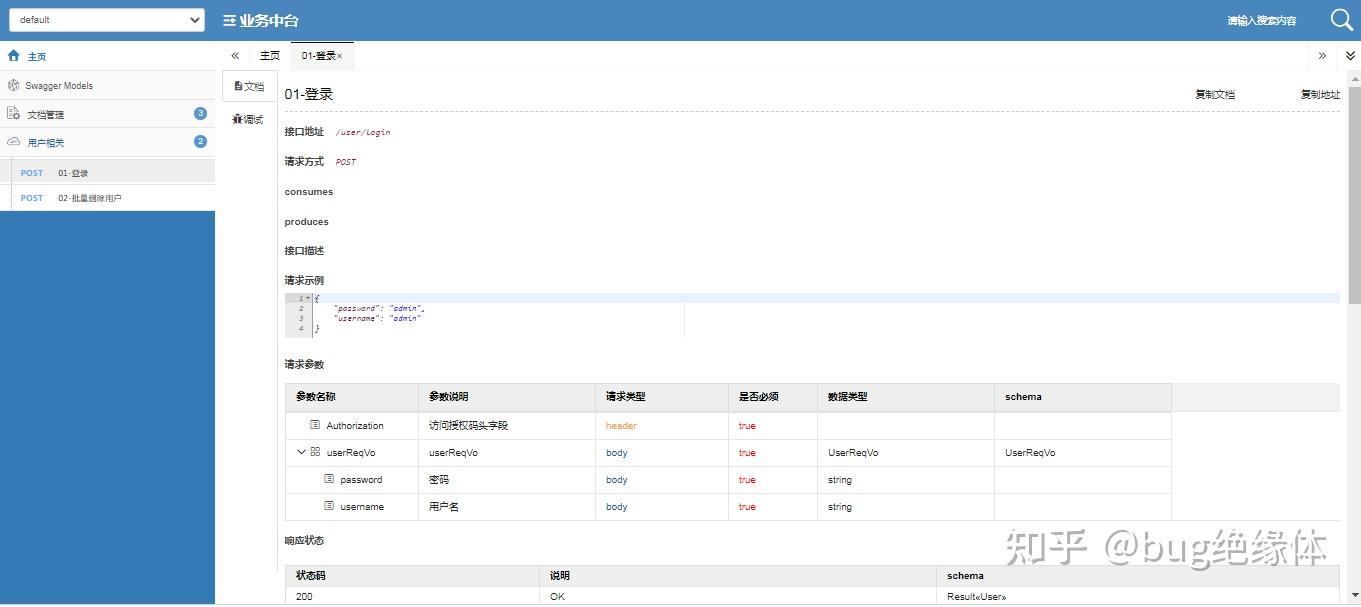
这里可以直接调试接口:
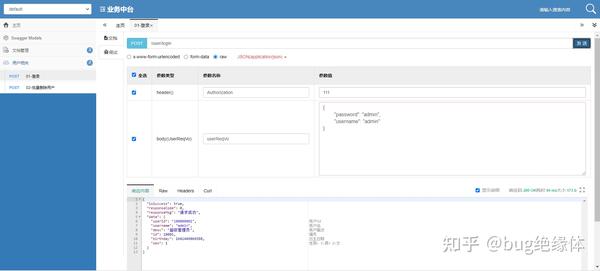

这就是swagger的基本用法。
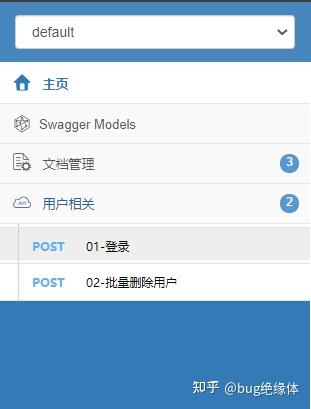
下面我们来探究一些深入用法,目前swagger并不支持对方法的展示顺序进行排序,但很多时候对于Controller里的大量方法我们会希望按照特定的顺序展示,例如按照序号,为此,我们可以替换掉swagger的ServiceModelToSwagger2MapperImpl的实现:
/**
 * 按ApiOperation注解的value值进行排序
 * @author yudong
 * @date 2022/1/4
@Component
@Primary
@SuppressWarnings("all")
public class ServiceModelToSwagger2MapperExtImpl extends ServiceModelToSwagger2MapperImpl {
    @Override
    protected Map<String, Path> mapApiListings(Map<String, List<ApiListing>> apiListings) {
        Map<String, Path> paths = new LinkedHashMap<>();
        apiListings.values().stream()
                .flatMap(Collection::stream)
                .forEachOrdered(each -> {
                    List<ApiDescription> apis = each.getApis();
                    apis.sort((a1, a2) -> {
                        return a1.getOperations().get(0).getSummary().compareTo(a2.getOperations().get(0).getSummary());
                    for (ApiDescription api : apis) {
                        paths.put(
                                api.getPath(),
                                mapOperations(api, ofNullable(paths.get(api.getPath())), each.getModelNamesRegistry())
        return paths;
    private Path mapOperations(
            ApiDescription api,
            Optional<Path> existingPath,
            ModelNamesRegistry modelNamesRegistry) {
        Path path = existingPath.orElse(new Path());
        for (springfox.documentation.service.Operation each : nullToEmptyList(api.getOperations())) {
            Operation operation = mapOperation(each, modelNamesRegistry);
            path.set(each.getMethod().toString().toLowerCase(), operation);
        return path;
}
加入这个类后,就实现了排序效果:
另外,对于一些特殊类型的字段,我们需要定制swagger的展示类型,例如Date类型,swagger默认显示成


但是,Date类型我们通常会序列为long返回,所以我们有两种方案解决这个问题:
一是在@ApiModelProperty注解显式指明dataType为java.lang.Long,如下:
    @ApiModelProperty(value = "出生日期", dataType = "java.lang.Long")
    private Date birthday;
这种方式的缺点是对于每一个Date类型的字段都要这样做,经常会被人遗忘。
第二种是实现ModelPropertyBuilderPlugin接口,介入到swagger中,实现全局修改类型,避免了方式一的缺点(swagger提供了很多的插件接口,用于修改方方面面的swagger数据,大家有兴趣可以去看swagger源码研究):
/**
 * 全局修改swagger,所有Date类型显示为long
 * @author yudong
 * @date 2022/1/4
@Component
public class CustomerSwaggerProperty implements ModelPropertyBuilderPlugin {
    @Override
    public void apply(ModelPropertyContext modelPropertyContext) {
        if (!modelPropertyContext.getBeanPropertyDefinition().isPresent()) {
            return;
        BeanPropertyDefinition beanPropertyDefinition = modelPropertyContext.getBeanPropertyDefinition().get();
        PropertySpecificationBuilder builder = modelPropertyContext.getSpecificationBuilder();
        if (beanPropertyDefinition.getRawPrimaryType() == Date.class) {
            builder.type(new ModelSpecificationBuilder().scalarModel(ScalarType.LONG).build());
    @Override
    public boolean supports(DocumentationType delimiter) {
        return delimiter == DocumentationType.SWAGGER_2;
}
所以,对于这样一个定义的JavaBean,在swagger中展示是这样的:
/**
 * @author yudong
 * @date 2022/1/4
@Data
@ApiModel
public class User {
    @ApiModelProperty(value = "用户id", example = "10000001")
    private String userId;
    @ApiModelProperty(value = "用户名", example = "admin")
    private String username;
    @ApiModelProperty(value = "用户描述", example = "超级管理员")
    private String desc;
    @ApiModelProperty(value = "编号", example = "10001")
    private Long id;