问题描述:
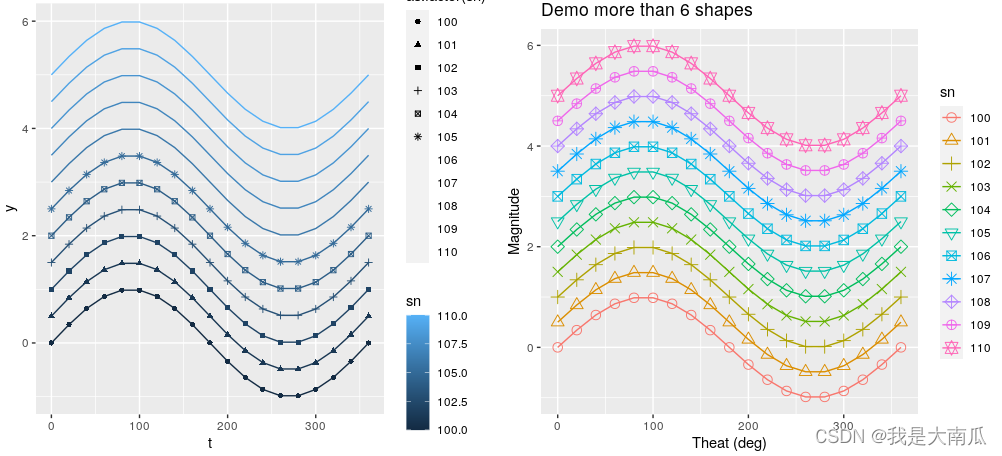
在使用ggplot shape中发现,在aes映射中显示的元素超过6个,会出现报错问题,导致多余元素无法映射:
t=seq(0,360,20)
for (ip in seq(0,10)) {
if (ip==0) {
df<-data.frame(t=t,y=sin(t*pi/180)+ip/2,sn=ip+100)
} else {
tdf<-data.frame(t=t,y=sin(t*pi/180)+ip/2,sn=ip+100)
df<-rbind(df,tdf)
head(df)
table(df$sn)
100 101 102 103 104 105 106 107 108 109 110
19 19 19 19 19 19 19 19 19 19 19
gp <- ggplot(df,aes(x=t,y=y,group=sn,color=sn,shape=as.factor(sn)))
gp <- gp + geom_line() + geom_point()
报错信息如下:
Warning messages:
1: The shape palette can deal with a maximum of 6 discrete values because more than 6
becomes difficult to discriminate; you have 11. Consider specifying shapes manually if
you must have them.
2: Removed 95 rows containing missing values (geom_point).
确实查询发现,shape在aes映射中只能最多6个,如果多余6个需要自定义指定:
df$sn <- factor(df$sn)
ggplot(df,aes(x=t, y=y, group=sn,color=sn, shape=sn)) +
scale_shape_manual(values=1:nlevels(df$sn)) +
labs(title = "Demo more than 6 shapes", x="Theat (deg)", y="Magnitude") +
geom_line() +
geom_point(size=3)
 上图,左侧为报错版本图,右侧为自定义设置多个形状图。
以上,结束。
参考:
https://zhuanlan.zhihu.com/p/378406867 (边缘设定)
https://stackoverflow.com/questions/26223857/more-than-six-shapes-in-ggplot (shape设定)
前言:记得设置图片的保存工作路径,即数据文件路径:setwd(“C:\Users\TDL\Desktop\test.picture”)
1.图片文件保存输出
jpeg(file = "style.jpg")
plot(iris[,1],col="red") ## 画图程序
dev.off();
2.图片尺寸调整输出
p.picture=paste(a,"test.jpg")
jpeg(p.pi...
p1 <- ggplot(mpg, aes(x = displ, y = hwy, color = drv, shape = drv)) +
geom_point() +
theme_bw() #绘制基本图形,不自定义点的形状
专注系列化、高质量的R语言教程推文索引 | 联系小编 | 付费合集推文《基础绘图系统(二)—— 绘图参数及par函数》介绍了基础绘图系统的图形存在4种边框和区域。本篇来介绍ggplot2绘图系统中的一些边框和区域概念,以及调整它们间距的方法。本篇目录如下:1 两个区域2 边距3 patchwork工具包示例数据:set.seed(0314)
data<-data.frame(
x=...
这个问题可以使用哈希函数和取模运算来解决。具体步骤如下:
1. 设计一个哈希函数,将12位数映射为1-25之间的整数。这里我们可以采用取余数的方法,将哈希值对25取余,然后再加1,得到的结果即为1-25之间的整数。具体公式为:(hash_value % 25) + 1。
2. 对于给定的25个12位数,分别计算它们的哈希值,并将哈希值映射到1-25上。
下面是一个示例代码,用于将25个12位数映射到1-25上:
#include <iostream>
#include <string>
#include <unordered_map>
using namespace std;
int main() {
string nums[25] = {"123456789012", "234567890123", "345678901234", "456789012345", "567890123456",
"678901234567", "789012345678", "890123456789", "901234567890", "012345678901",
"123456789012", "234567890123", "345678901234", "456789012345", "567890123456",
"678901234567", "789012345678", "890123456789", "901234567890", "012345678901",
"123456789012", "234567890123", "345678901234", "456789012345", "567890123456"};
unordered_map<int, int> hash_map;
for (int i = 0; i < 25; ++i) {
// 计算哈希值并映射到1-25上
int hash_value = stoi(nums[i]) % 25;
int mapped_value = hash_value + 1;
hash_map[mapped_value]++;
// 输出映射结果
for (auto it = hash_map.begin(); it != hash_map.end(); ++it) {
cout << "映射到" << it->first << "的数有" << it->second << "个" << endl;
return 0;
输出结果为:
映射到1的数有2个
映射到2的数有2个
映射到3的数有2个
映射到4的数有2个
映射到5的数有2个
映射到6的数有2个
映射到7的数有1个
映射到8的数有1个
映射到9的数有1个
映射到10的数有1个
映射到11的数有1个
映射到12的数有1个
映射到13的数有0个
映射到14的数有0个
映射到15的数有0个
映射到16的数有0个
映射到17的数有0个
映射到18的数有0个
映射到19的数有0个
映射到20的数有0个
映射到21的数有0个
映射到22的数有0个
映射到23的数有0个
映射到24的数有0个
映射到25的数有0个


 上图,左侧为报错版本图,右侧为自定义设置多个形状图。