|
|
狂野的松树 · 连接器发布阶段和时间线 - Azure ...· 1 月前 · |
|
|
俊秀的凳子 · R语言:删除字符串中的所有空格_r语言删除特 ...· 1 年前 · |
|
|
温暖的乒乓球 · 使用Python来编写HTTP服务器的超级指 ...· 1 年前 · |
|
|
风流倜傥的饭卡 · Thanos部署运行过程中,报错contex ...· 1 年前 · |
|
|
忐忑的眼镜 · 云开发数据库入门讲解 | 微信开放社区· 2 年前 · |
问
Fabric JS clipPath:裁剪后如何将图像安装到画布上?
EN
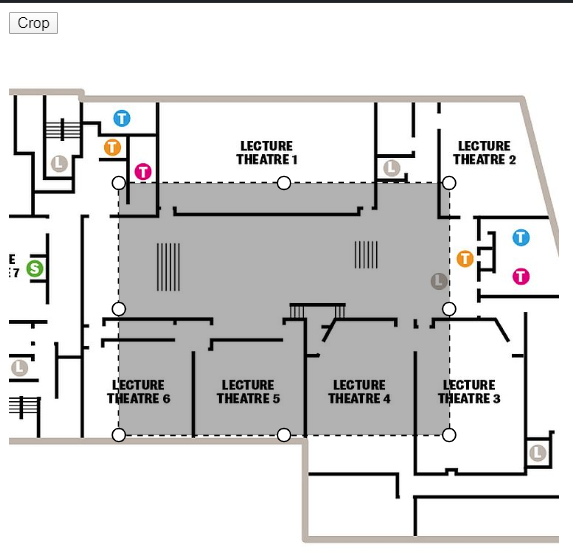
我使用FabricJS和clipPath属性实现了图像裁剪。
问题是如何使图像与剪裁后的画布相匹配?我想要裁剪的图像填充画布区域,但不知道是否可以使用面料js。
因此,我希望在用户单击“裁剪”按钮后,图像的选定部分符合画布大小:

关于代码:我在画布上画一个矩形,用户可以调整大小并移动它。之后,用户可以单击“裁剪”按钮并获得一个裁剪的图像。但是裁剪的部分保持原图上的大小,而我希望它能缩放和适应画布。
Note __:我尝试使用像scaleToWidth这样的方法。此外,对于选择矩形,我使用了absolutePositioned设置为true。我试着用这个属性设置为false来缩放图像,但是没有帮助。
请不要建议使用cropX和cropY属性来裁剪而不是clipPath,因为它们不适合旋转图像。
HTML:
<button>Crop</button>
<canvas id="canvas" width="500" height="500"></canvas>联署材料:
// crop button
var button = $("button");
// handle click
button.on("click", function(){
  let rect = new fabric.Rect({
    left: selectionRect.left,
    top: selectionRect.top,
    width: selectionRect.getScaledWidth(),
    height: selectionRect.getScaledHeight(),
    absolutePositioned: true
  currentImage.clipPath = rect;
  canvas.remove(selectionRect);
  canvas.renderAll();
var canvas = new fabric.Canvas('canvas');
canvas.preserveObjectStacking = true;
var selectionRect;
var currentImage;
fabric.Image.fromURL('https://www.sheffield.ac.uk/polopoly_fs/1.512509!/image/DiamondBasement.jpg', img => {
  img.scaleToHeight(500);
  img.selectable = true;
  canvas.add(img);
  canvas.centerObject(img);
  currentImage = img;
  canvas.backgroundColor = "#333";
  addSelectionRect();
  canvas.setActiveObject(selectionRect);
  canvas.renderAll();
function addSelectionRect() {
  selectionRect = new fabric.Rect({
    fill: 'rgba(0,0,0,0.3)',
    originX: 'left',
    originY: 'top',
    stroke: 'black',
    opacity: 1,
    width: currentImage.width,
    height: currentImage.height,
    hasRotatingPoint: false,
    transparentCorners: false,
    cornerColor: 'white',
    cornerStrokeColor: 'black',
    borderColor: 'black',
  selectionRect.scaleToWidth(300);
  canvas.centerObject(selectionRect);
  selectionRect.visible = true;
  canvas.add(selectionRect);
}这是我的小提琴: https://jsfiddle.net/04nvdeb1/23/
回答 3
Stack Overflow用户
发布于 2021-05-14 03:14:26
几天来,我也面临着同样的问题。但我没有找到任何解决办法,甚至我也找到了你的所以问题和github问题。我认为clipPath是最好的选择,使用一个很好的可调麝香剪裁图像。
在按钮回调函数中,您必须像这样实现
步骤1:第一步,您必须创建一个Image实例来保存已裁剪的图像
let cropped = new Image();步骤2:您必须使用Canvas.toDataURL()将画布元素导出到dataurl映像。这里wan只想导出选择矩形或掩模矩形,因此我们传递桅杆左、顶、宽和高。
cropped.src = canvas.toDataURL({
                    left: rect.left,
                    top: rect.top,
                    width: rect.width,
                    height: rect.height,
});第三步:最后一步,在图像加载后,我们清除画布。用裁剪后的图像创建新对象,并设置一些选项并重新绘制画布
cropped.onload = function () {
                    canvas.clear();
                    image = new fabric.Image(cropped);
                    image.left = rect.left;
                    image.top = rect.top;
                    image.setCoords();
                    canvas.add(image);
                    canvas.renderAll();
};实际上,我用你的问题来形容 使用FabricJs的作物功能 #soution2。
Stack Overflow用户
发布于 2021-04-22 06:50:44
实际上,您不必使用clipPath方法。你想要的实际上是将你需要的区域移动到角落,并改变画布的大小。
所以sodo代码如下:
fabricCanvas.setDimensions({
    width: cropRectObject.getScaledWidth(),
    height: cropRectObject.getScaledHeight()
imageObject.set({
    left: -cropRectObject.left,
    top: -cropRectObject.top
fabricCanvas.remove(cropRectObject);稍微调整一下你的小提琴,以展示这个想法: https://jsfiddle.net/tgy320w4/4/
希望这能帮上忙。
Stack Overflow用户
发布于 2022-05-01 02:24:21
const { width, height, left = 0, top = 0 } = rect;
if (width == null || height == null) return;
const zoom = canvas.getZoom();
// toExact is a prototype for precision
const nw = (width * zoom).toExact(1);
const nh = (height * zoom).toExact(1);
const nl = (left * zoom).toExact(1);
const nt = (top * zoom).toExact(1);
// Apply
canvas.clipPath = o;
|
|
风流倜傥的饭卡 · Thanos部署运行过程中,报错context deadline exceeded,具体解决办法_error: context deadline exceeded-CSDN博客 1 年前 |
|
|
忐忑的眼镜 · 云开发数据库入门讲解 | 微信开放社区 2 年前 |