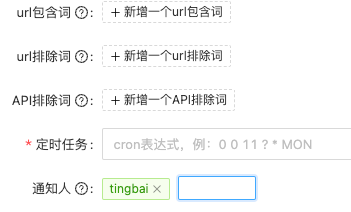
React动态添加标签组件
背景
在前端开发的过程中,一些表单的输入经常需要输入多个内容,如果采用一个输入框+逗号分隔的方式,展示起来不是很清晰,一般需要采用标签的方式
需求


- 可以指定空状态时的 标题
- 设置标签 颜色
- 每个标签的 最大长度 (字符数)
- 接口传递的时候的 分隔标记 (是用逗号,还是其他)
- 直接 处理表单 ,不需要二次处理
所以需要传入以下内容给该组件
- title:标题
- separator:分隔标记
- maxLength:最大长度
- color:颜色
- form,name:处理的表单和对应的字段
const { title = '新增一个', separator = ',', maxLength = 40, color = 'orange', form, name } = props;
TagInput.propTypes = {
  title: PropTypes.string, // 新增一个tag的标题
  separator: PropTypes.string, // 分隔符
  maxLength: PropTypes.number, // tag最大长度
  color: PropTypes.string, // tag颜色
  form: PropTypes.object, // form
  key: PropTypes.string, // form的key
代码编写
是否显示输入框
首先需要有一个虚线框的标签
<Tag style={{ background: '#fff', borderStyle: 'dashed' }}>
    <PlusOutlined /> {title}
点击后出现文本输入框
<Input type="text" size="small" style={{ width: 78 }} />
并且锚定这个输入框(出现输入光标)
所以需要有一个状态记录是否显示输入框
const [inputVisible, setInputVisible] = useState(false); // 是否显示输入框
所以上述代码变为:
const saveInputRef = useRef();
useEffect(() => {
  if (inputVisible) saveInputRef.current.focus();
}, [inputVisible]);
{inputVisible && (
  <Input ref={saveInputRef} type="text" size="small" style={{ width: 78 }} />
{!inputVisible && (
  <Tag onClick={() => setInputVisible(true)} style={{ background: '#fff', borderStyle: 'dashed' }}>
    <PlusOutlined /> {title}
useEffect监听输入框是否出现,如果出现,则锚定「saveInputRef.current.focus()」
添加一个标签
为了记录输入框的内容定义一个新的变量
const [inputValue, setInputValue] = useState(''); // 输入框的值
<Input ref={saveInputRef} type="text" size="small" style={{ width: 78 }} value={inputValue} onChange={(e) => setInputValue(e.target.value)} />
每次输入内容都会修改inputValue的值
因为有多个标签,先定义一个变量来记录我们已经添加的标签
const [tags, setTags] = useState([]); // 待分隔列表
当鼠标在输入框外部点击或者敲击回车的时候,都需要添加一个标签
所以需要给输入框添加onBlur和onPressEnter方法
<Input
  ref={saveInputRef}
  type="text"
  size="small"
  style={{ width: 78 }}
  value={inputValue}
  onChange={(e) => setInputValue(e.target.value)}
  onBlur={handleInputConfirm}
  onPressEnter={handleInputConfirm}
编写添加标签的方法:handleInputConfirm
- 拿到之前的标签+本次输入的,一起放到tags变量中
- 给表单设置一下这个值(用分隔标记拼接起来)
- 隐藏输入框
- 清空输入框
/*
 * 新增一个tag
const handleInputConfirm = () => {
  if (inputValue && tags.indexOf(inputValue) === -1) {
    const newTags = [...tags, inputValue];
    setTags(newTags);
    form.setFieldsValue({ [name]: newTags?.join(separator) });
  } else {
    message.error('请正确输入');
  setInputVisible(false);
  setInputValue('');
展示标签
在上述步骤之后,tags中已经添加了我们的标签了,将它展示出来
- 判断字符串长度,如果大于我们配置的最大长度则裁剪,没有则全部展示
- 超长的标签增加一个气泡提示,鼠标移动上去后可以看到全部内容
{tags.map((tag) => {
  const isLongTag = tag.length > maxLength;
  const tagElem = (
    <Tag key={tag} color={color}>
      {isLongTag ? `${tag.slice(0, maxLength)}...` : tag}
  return isLongTag ? (
    <Tooltip title={tag} key={tag}>
      {tagElem}
    </Tooltip>
  ) : (
    tagElem
删除标签
给Tag设置closable和onClose方法
const tagElem = (
  <Tag key={tag} closable onClose={() => handleClose(tag)} color={color}>
    {isLongTag ? `${tag.slice(0, 20)}...` : tag}
handleClose方法:
- 过滤tags中不需要的tag并更新
- 重新给表单对应的键值对赋值
/*
 * 删除某个tag
const handleClose = (removedTag) => {
  const updatedTags = tags.filter((tag) => tag !== removedTag);
  setTags(updatedTags);
  form.setFieldsValue({ [name]: updatedTags?.join(separator) });
编辑状态
当我们处于编辑状态的时候,打开表单后,它原本就有内容了
监听一下表单的内容,如果存在,则使用分隔标记分隔后塞入tags中
useEffect(() => {
    if (form.getFieldValue(name)) setTags(form.getFieldValue(name).split(separator));
  }, [form.getFieldValue(name)]);
Antd4.x完整代码
折叠源码
import React, { memo, useEffect, useRef, useState } from 'react';
import { Input, message, Tag, Tooltip } from 'antd';
import PropTypes from 'prop-types';
import { PlusOutlined } from '@ant-design/icons';
 * tag形式分隔
const TagInput = memo((props) => {
  const [tags, setTags] = useState([]); // 待分隔列表
  const [inputVisible, setInputVisible] = useState(false); // 是否显示输入框
  const [inputValue, setInputValue] = useState(''); // 输入框的值
  const { title = '新增一个', separator = ',', maxLength = 40, color = 'orange', form, name } = props;
  const saveInputRef = useRef();
  useEffect(() => {
    if (inputVisible) saveInputRef.current.focus();
  }, [inputVisible]);
  useEffect(() => {
    if (form.getFieldValue(name)) setTags(form.getFieldValue(name).split(separator));
  }, [form.getFieldValue(name)]);
   * 删除某个tag
  const handleClose = (removedTag) => {
    const updatedTags = tags.filter((tag) => tag !== removedTag);
    setTags(updatedTags);
    form.setFieldsValue({ [name]: updatedTags?.join(separator) });
   * 新增一个tag
  const handleInputConfirm = () => {
    if (inputValue && tags.indexOf(inputValue) === -1) {
      const newTags = [...tags, inputValue];
      setTags(newTags);
      form.setFieldsValue({ [name]: newTags?.join(separator) });
    } else {
      message.error('请正确输入');
    setInputVisible(false);
    setInputValue('');
  return (
      {tags.map((tag) => {
        const isLongTag = tag.length > maxLength;
        const tagElem = (
          <Tag key={tag} closable onClose={() => handleClose(tag)} color={color}>
            {isLongTag ? `${tag.slice(0, 20)}...` : tag}
        return isLongTag ? (
          <Tooltip title={tag} key={tag}>
            {tagElem}
          </Tooltip>
        ) : (
          tagElem
      {inputVisible && (
        <Input
          ref={saveInputRef}
          type="text"
          size="small"
          style={{ width: 78 }}
          value={inputValue}
          onChange={(e) => setInputValue(e.target.value)}
          onBlur={handleInputConfirm}
          onPressEnter={handleInputConfirm}
      {!inputVisible && (
        <Tag onClick={() => setInputVisible(true)} style={{ background: '#fff', borderStyle: 'dashed' }}>
          <PlusOutlined /> {title}
TagInput.propTypes = {
  title: PropTypes.string, // 新增一个tag的标题
  separator: PropTypes.string, // 分隔符
  maxLength: PropTypes.number, // tag最大长度
  color: PropTypes.string, // tag颜色
  form: PropTypes.object, // form
  key: PropTypes.string, // form的key
export default TagInput;
Antd3.x完整代码
antd3.x中部分组件的用法不一样,需要修改一下
折叠源码
import React, { useEffect, useRef, useState } from 'react';
import { Icon, Input, message, Tag, Tooltip } from 'antd';
import PropTypes from 'prop-types';
 * tag形式分隔
const TagInput = React.forwardRef((props, ref) => {
  const [tags, setTags] = useState([]); // 待分隔列表
  const [inputVisible, setInputVisible] = useState(false); // 是否显示输入框
  const [inputValue, setInputValue] = useState(''); // 输入框的值
  const {
    title = '新增一个',
    separator = ',',
    maxLength = 40,
    color = 'orange',
    form,
    name,
  } = props;
  const saveInputRef = useRef();
  useEffect(() => {
    if (inputVisible) saveInputRef.current.focus();
  }, [inputVisible]);
  useEffect(() => {
    if (form.getFieldValue(name)) {
      setTags(form.getFieldValue(name).split(separator));
  }, [form.getFieldValue(name)]);
   * 删除某个tag
  const handleClose = (removedTag) => {
    const updatedTags = tags.filter((tag) => tag !== removedTag);
    setTags(updatedTags);
    form.setFieldsValue({ [name]: updatedTags?.join(separator) });
   * 新增一个tag
  const handleInputConfirm = () => {
    if (inputValue && tags.indexOf(inputValue) === -1) {
      const newTags = [...tags, inputValue];
      setTags(newTags);
      form.setFieldsValue({ [name]: newTags?.join(separator) });
    } else {
      message.error('请正确输入');
    setInputVisible(false);
    setInputValue('');
  return (
      {tags.map((tag) => {
        const isLongTag = tag.length > maxLength;
        const tagElem = (
            key={tag}
            closable
            onClose={() => handleClose(tag)}
            color={color}
            {isLongTag ? `${tag.slice(0, 20)}...` : tag}
        return isLongTag ? (
          <Tooltip title={tag} key={tag}>
            {tagElem}
          </Tooltip>
        ) : (
          tagElem
      {inputVisible && (
        <Input
          ref={saveInputRef}
          type="text"
          size="small"
          style={{ width: 78 }}
          value={inputValue}
          onChange={(e) => setInputValue(e.target.value)}
          onBlur={handleInputConfirm}
          onPressEnter={handleInputConfirm}
      {!inputVisible && (
          onClick={() => setInputVisible(true)}
          style={{ background: '#fff', borderStyle: 'dashed' }}
          <Icon type="plus-circle" /> {title}
TagInput.propTypes = {
  title: PropTypes.string, // 新增一个tag的标题
  separator: PropTypes.string, // 分隔符
  maxLength: PropTypes.number, // tag最大长度