Table of Contents

What is ControlNet?

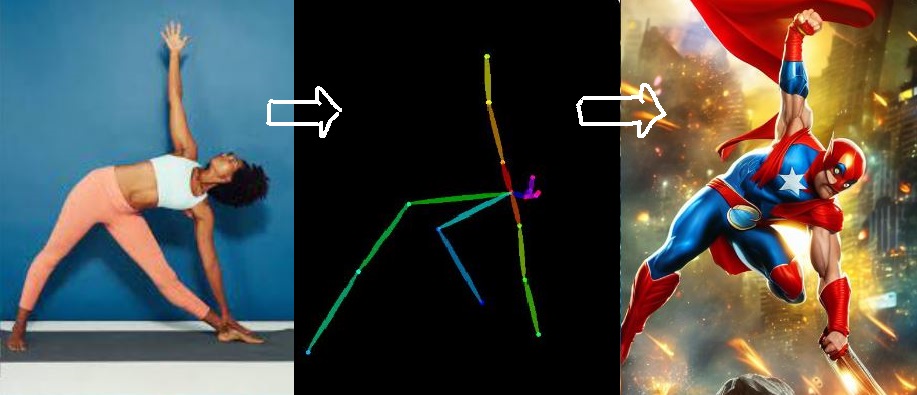
ControlNet is a deep learning model that helps in controlling the image generation of Stable Diffusion models. For example, with the help of ControlNet, we can use a pose of a person and use it generate different types of images with each image having someone in the same pose.

controlnet canny python
Source: huggingface.co/blog/controlnet

In addition to using pose, we can also use other properties of an image in ControlNet to control image generation, such as the depth of the objects, edges in the image, or segmenting the image into different objects.

In this tutorial, we will use ControlNet with Python, but you can also use ControlNet with the no-code tool Automatic1111 .

Major libraries used in the code

Apart from the usual libraries like numpy, os, PIL, and matplotlib, we will also use the following libraries:


controlnet = ControlNetModel.from_pretrained("lllyasviel/sd-controlnet-canny", torch_dtype=torch.float16) pipe = StableDiffusionControlNetPipeline.from_pretrained("dreamlike-art/dreamlike-photoreal-2.0", controlnet=controlnet, torch_dtype=torch.float16 #use GPU pipe.to("cuda")

Preprocess Image

Let’s load the logo image. This is the image that we will merge with the images generated by the dreamlike-photoreal-2.0 model.

sample_image = Image.open("step.png") sample_image def expand_image(img): #create a blck canvas of dimensions 512 x 512 background = np.zeros((512, 512), dtype=np.uint8) h, w = img.shape[:2] y, x = 100, 200 # dimensions of the logo-image #ensure the pasted image doesn't go beyond the bounds of the background y_end, x_end = min(y + h, background.shape[0]), min(x + w, background.shape[1]) background[y:y_end, x:x_end] = img[:y_end - y, :x_end - x] return background #expand the logo-image big_canny = expand_image(canny_image) #convert numpy array to PIL image big_canny = Image.fromarray(big_canny) #display expanded canny image big_canny prompt = "((top view from drone)), (an extremely detailed natural landscape), vegetation, plants, hdr, 4k, ((volumetric lights)), digital painting, beautiful, colorful, serene, intricate, slow shutter speed" negative_prompt = "monochrome, lowres, bad anatomy, worst quality, low quality" image = pipe( prompt, big_canny, negative_prompt=negative_prompt, guidance_scale=9, num_images_per_prompt=6, num_inference_steps=35).images

Let’s define a function to display the images in a grid format.

def image_grid(imgs, rows, cols): assert len(imgs) == rows * cols w, h = imgs[0].size grid = Image.new("RGB", size=(cols * w, rows * h)) grid_w, grid_h = grid.size for i, img in enumerate(imgs): grid.paste(img, box=(i % cols * w, i // cols * h)) return grid #display generated images in 3 x 2 grid image_grid(image,3,2)

Leave a Reply Cancel reply

Your email address will not be published. Required fields are marked *