最近看yolo3里面讲到了残差网络,对这个网络结构很感兴趣,于是了解到这个网络结构最初的使用是在ResNet网络里。

Residual net(残差网络):
将靠前若干层的某一层数据
输出直接
跳过多层
引入到
后面数据层的输入部分。
意味着
后面的特征层的内容会有一部分由其前面的某一层线性贡献。
其结构如下:
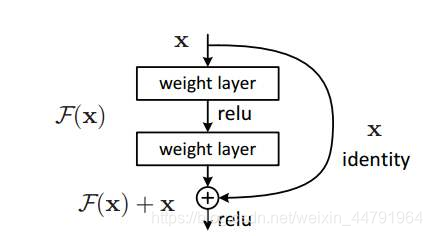
深度残差网络的设计是为了克服由于网络深度加深而产生的学习效率变低与准确率无法有效提升的问题。
ResNet50有两个基本的块,
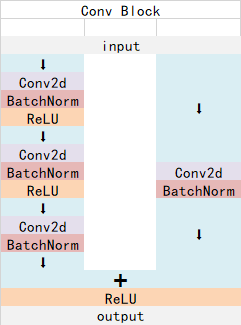
分别名为Conv Block和Identity Block,其中Conv Block输入和输出的维度是不一样的,所以不能连续串联,它的作用是改变网络的维度;Identity Block输入维度和输出维度相同,可以串联,用于加深网络的。
Conv Block的结构如下:
Identity Block的结构如下:
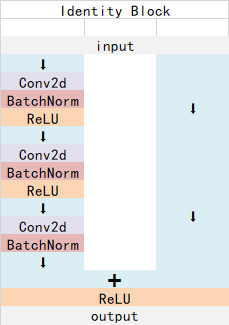
这两个都是残差网络结构。
总的网络结构如下:
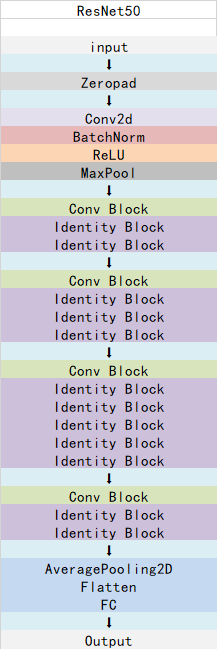
这样看起来可能比较抽象,
还有一副很好的我从网上找的图,可以拉到最后面去看哈,放前面太占位置了。
from __future__ import print_function
import numpy as np
from keras import layers
from keras.layers import Input
from keras.layers import Dense,Conv2D,MaxPooling2D,ZeroPadding2D,AveragePooling2D
from keras.layers import Activation,BatchNormalization,Flatten
from keras.models import Model
from keras.preprocessing import image
import keras.backend as K
from keras.utils.data_utils import get_file
from keras.applications.imagenet_utils import decode_predictions
from keras.applications.imagenet_utils import preprocess_input
def identity_block(input_tensor, kernel_size, filters, stage, block):
filters1, filters2, filters3 = filters
conv_name_base = 'res' + str(stage) + block + '_branch'
bn_name_base = 'bn' + str(stage) + block + '_branch'
x = Conv2D(filters1, (1, 1), name=conv_name_base + '2a')(input_tensor)
x = BatchNormalization(name=bn_name_base + '2a')(x)
x = Activation('relu')(x)
x = Conv2D(filters2, kernel_size,padding='same', name=conv_name_base + '2b')(x)
x = BatchNormalization(name=bn_name_base + '2b')(x)
x = Activation('relu')(x)
x = Conv2D(filters3, (1, 1), name=conv_name_base + '2c')(x)
x = BatchNormalization(name=bn_name_base + '2c')(x)
x = layers.add([x, input_tensor])
x = Activation('relu')(x)
return x
def conv_block(input_tensor, kernel_size, filters, stage, block, strides=(2, 2)):
filters1, filters2, filters3 = filters
conv_name_base = 'res' + str(stage) + block + '_branch'
bn_name_base = 'bn' + str(stage) + block + '_branch'
x = Conv2D(filters1, (1, 1), strides=strides,
name=conv_name_base + '2a')(input_tensor)
x = BatchNormalization(name=bn_name_base + '2a')(x)
x = Activation('relu')(x)
x = Conv2D(filters2, kernel_size, padding='same',
name=conv_name_base + '2b')(x)
x = BatchNormalization(name=bn_name_base + '2b')(x)
x = Activation('relu')(x)
x = Conv2D(filters3, (1, 1), name=conv_name_base + '2c')(x)
x = BatchNormalization(name=bn_name_base + '2c')(x)
shortcut = Conv2D(filters3, (1, 1), strides=strides,
name=conv_name_base + '1')(input_tensor)
shortcut = BatchNormalization(name=bn_name_base + '1')(shortcut)
x = layers.add([x, shortcut])
x = Activation('relu')(x)
return x
def ResNet50(input_shape=[224,224,3],classes=1000):
img_input = Input(shape=input_shape)
x = ZeroPadding2D((3, 3))(img_input)
x = Conv2D(64, (7, 7), strides=(2, 2), name='conv1')(x)
x = BatchNormalization(name='bn_conv1')
(x)
x = Activation('relu')(x)
x = MaxPooling2D((3, 3), strides=(2, 2))(x)
x = conv_block(x, 3, [64, 64, 256], stage=2, block='a', strides=(1, 1))
x = identity_block(x, 3, [64, 64, 256], stage=2, block='b')
x = identity_block(x, 3, [64, 64, 256], stage=2, block='c')
x = conv_block(x, 3, [128, 128, 512], stage=3, block='a')
x = identity_block(x, 3, [128, 128, 512], stage=3, block='b')
x = identity_block(x, 3, [128, 128, 512], stage=3, block='c')
x = identity_block(x, 3, [128, 128, 512], stage=3, block='d')
x = conv_block(x, 3, [256, 256, 1024], stage=4, block='a')
x = identity_block(x, 3, [256, 256, 1024], stage=4, block='b')
x = identity_block(x, 3, [256, 256, 1024], stage=4, block='c')
x = identity_block(x, 3, [256, 256, 1024], stage=4, block='d')
x = identity_block(x, 3, [256, 256, 1024], stage=4, block='e')
x = identity_block(x, 3, [256, 256, 1024], stage=4, block='f')
x = conv_block(x, 3, [512, 512, 2048], stage=5, block='a')
x = identity_block(x, 3, [512, 512, 2048], stage=5, block='b')
x = identity_block(x, 3, [512, 512, 2048], stage=5, block='c')
x = AveragePooling2D((7, 7), name='avg_pool')(x)
x = Flatten()(x)
x = Dense(classes, activation='softmax', name='fc1000')(x)
model = Model(img_input, x, name='resnet50')
model.load_weights("resnet50_weights_tf_dim_ordering_tf_kernels.h5")
return model
建立网络后,可以用以下的代码进行预测。
if __name__ == '__main__':
model = ResNet50()
model.summary()
img_path = 'elephant.jpg'
img = image.load_img(img_path, target_size=(224, 224))
x = image.img_to_array(img)
x = np.expand_dims(x, axis=0)
x = preprocess_input(x)
print('Input image shape:', x.shape)
preds = model.predict(x)
print('Predicted:', decode_predictions(preds))
预测所需的已经训练好的ResNet50模型可以在https://github.com/fchollet/deep-learning-models/releases下载。非常方便。
预测结果为:
Predicted: [[('n01871265', 'tusker', 0.41107917), ('n02504458', 'African_elephant', 0.39015812), ('n02504013', 'Indian_elephant', 0.12260196), ('n03000247', 'chain_mail', 0.023176488), ('n02437312', 'Arabian_camel', 0.020982226)]]
ResNet50模型的完整的结构图如下:

引入一个恒等快捷键(也称之为跳跃连接线),直接跳过一个或者多个层。
当有这条跳跃连接线时,网络层次很深导致梯度消失时,F(x)=0,y=g(0+x)=relu(x)=xF(x)=0,y=g(0+x)=relu(x)=xF(x)=0,y=g(0+x)=relu(x)=x
在网络上堆叠这样的结构,就算梯度消失,我什么也学不到,我至少把
建议大家可以实践下,代码都很详细,有不清楚的地方评论区见~1、前言ResNet(Residual Neural Network)由微软研究院的Kaiming He等四名华人提出,通过使用...
如何实现一个车辆识别系统,我们使用Python和TensorFlow构建了一个基于ResNet50的迁移学习模型,并在Stanford Cars Dataset上进行了训练和评估。
输入Input经过Resnet50到输出Output的5个阶段,共经过了50个层。其中Stage0较为简单,可以看作数据的预处理;后面的Stage1、Stage2、Stage3、Stage4都由Bottleneck组成,结构相似。
Stage0
Stage0较为简单,可以看作数据的预处理。(3,473,473)为输入的通道数(channel)、高(height)、宽(width),即(c,h,w)。先假设输入的高和宽相等,所以表示为(c,w,w)
该Stage中第1层包括3个先后操作:
1、CONV
接上一节内容:Pytorch搭建常见分类网络模型------VGG、Googlenet、 MobileNetV3、ResNet50(1)_一只小小的土拨鼠的博客-CSDN博客
前言:AlexNet、VGG等经典的神经网络框架,一个共同特点是:整个网络由不同神经模块的串联构建。神经网络深度不断加深会造成过拟合和模型参数巨大等问题。解决主要方法是引入稀疏特性、将全连接层换成稀疏连接。Googlenet串并联网络结构便是由此提出。
在串联网络中,每一层级的卷积核都是固定尺寸的,只能提取固定尺度的特征。基于这种
接上一节内容:Pytorch搭建常见分类网络模型------VGG、Googlenet、ResNet50 、MobileNetV2(2)_一只小小的土拨鼠的博客-CSDN博客
本文主要针对ResNet-50对深度残差网络进行一个理解和分析
ResNet已经被广泛运用于各种特征提取应用中,当深度学习网络层数越深时,理论上表达能力会更强,但是CNN网络达到一定的深度后,再加深,分类性能不会提高,而是会导致网络收敛更缓慢,准确率也随着降低,即使把数据集增大,解决过拟合的问题,分类性能和准确度也不会提高。Kaiming大神等人发现残差网络能够解决这一问题。这里首先放上一张Res...
ResNet50是一个经典的特征提取网络结构,虽然Pytorch已有官方实现,但为了加深对网络结构的理解,还是自己动手敲敲代码搭建一下。需要特别说明的是,笔者是以熟悉网络各层输出维度变化为目的的,只对建立后的网络赋予伪输入并测试各层输出,并没有用图像数据集训练过该网络(后续会用图像数据集测试并更新博客)。
1 预备理论
在动手搭建ResNet50以前,首先需要明确ResNet系列网络的基本结构,其次复习与卷积相关的几个知识点,以便更好地理解网络中间输出维度的
ResNet原理及结构
假设我们想要网络块学习到的映射为H(x),而直接学习H(x)是很难学习到的。若我们学习另一个残差函数F(x) = H(x) - x可以很容易学习,因为此时网络块的训练目标是将...
通俗易懂Resnet50网络结构分析Why(该网络要解决什么样的问题)How(如何解决该问题)功能快捷键合理的创建标题,有助于目录的生成如何改变文本的样式插入链接与图片如何插入一段漂亮的代码片生成一个适合你的列表创建一个表格设定内容居中、居左、居右SmartyPants创建一个自定义列表如何创建一个注脚注释也是必不可少的KaTeX数学公式新的甘特图功能,丰富你的文章UML 图表FLowchart流程图导出与导入导出导入
Why(该网络要解决什么样的问题)
理论上网络越来越深,获取的信息越多,而且特征也会越
这篇文章讲解的是使用Tensorflow实现残差网络resnet-50. 侧重点不在于理论部分,而是在于代码实现部分。在github上面已经有其他的开源实现,如果希望直接使用代码运行自己的数据,不建议使用本人的代码。但是如果希望学习resnet的代码实现思路,那么阅读本文将是一个不错的选择,因为本文的代码的思路是很清晰的。如果你刚刚阅读完resnet的那篇论文,非常建议你进一步学习如何使用代码实现resnet。本文包含源码的数据集。
resnet只是在CNN上面增加了shortcut,所以,resnet
在深度学习和计算机视觉领域取得了一系列突破。尤其是随着非常深的卷积神经网络的引入,这些模型有助于在图像识别和图像分类等问题上取得最先进的结果。因此,多年来,深度学习架构变得越来越深(添加更多层)以解决越来越复杂的任务,这也有助于提高分类和识别任务的性能并使其变得健壮。但是当我们继续向神经网络添加更多层时,训练变得非常困难,并且模型的准确性开始饱和,然后也会下降。ResNet将我们从这种情况中解救出来,并帮助解决了这个问题。·用跳跃连接填充零以增加其尺寸。·1×1卷积层被添加到输入以匹配维度。...