文章目录
一、RecyclerView.ItemDecoration 方法说明
三、getItemOffsets 设置要点
四、完整代码示例
五、RecyclerView 相关资料
一、RecyclerView.ItemDecoration 方法说明
RecyclerView.ItemDecoration 是抽象类 , 当前使用的 onDraw , onDrawOver , getItemOffsets 3 33 个方法 , 上一篇博客 【RecyclerView】 五、RecyclerView.ItemDecoration 条目装饰 ( 简介 | onDraw | onDrawOver | getItemOffsets ) 二、RecyclerView.ItemDecoration 源码注释解析 中已经分析了 RecyclerView.ItemDecoration 方法 , 并查看了其源码 , 这 3 33 个方法都是空方法 , 因此这里实现方法时 , 不必再使用 super 调用父类方法 ;
public class ItemDecoration extends RecyclerView.ItemDecoration {
@Override
public void onDraw(@NonNull Canvas c, @NonNull RecyclerView parent,
                       @NonNull RecyclerView.State state) {
    @Override
    public void onDrawOver(@NonNull Canvas c, @NonNull RecyclerView parent,
                           @NonNull RecyclerView.State state) {
    @Override
    public void getItemOffsets(@NonNull Rect outRect, @NonNull View view,
                               @NonNull RecyclerView parent,
                               @NonNull RecyclerView.State state) {
}
三、getItemOffsets 设置要点
使用 RecyclerView.ItemDecoration 给 RecyclerView 的 item 设置 " 上 , 下 , 左 , 右 " 4 44 个边距 , 通过调用 RecyclerView 的 getChildAdapterPosition 方法 , 可以给指定位置的 item 设置不同的边距 ;
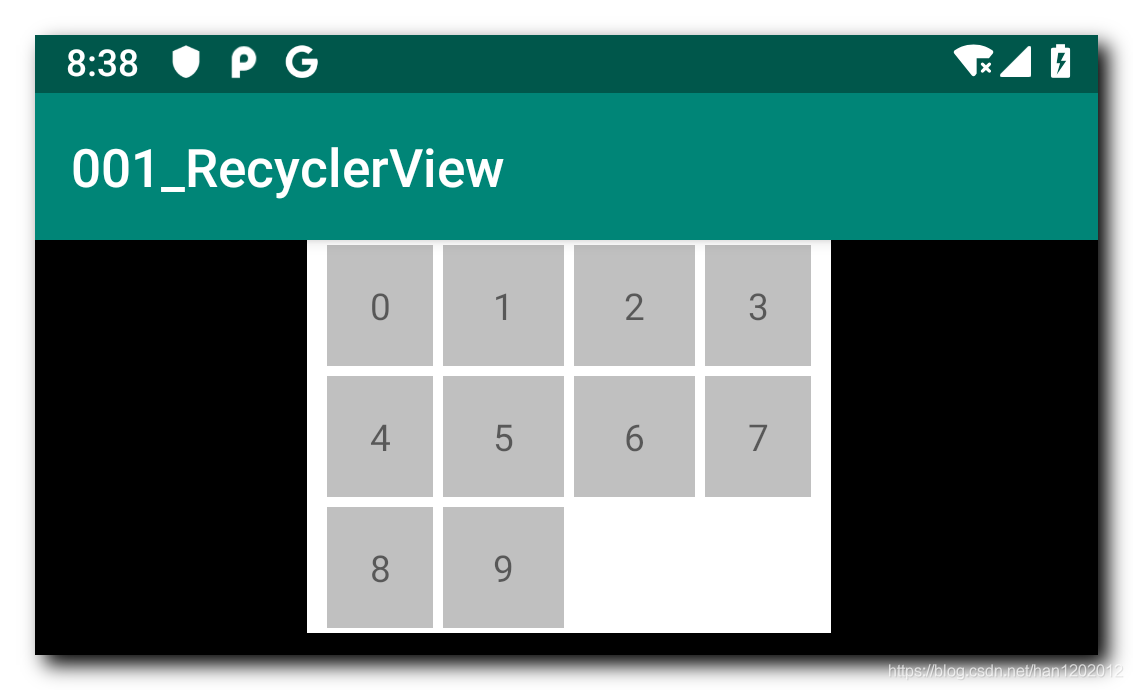
这里为 RecyclerView 网格布局设置边距 , 普通的 item 组件上下左右边距都是 5 55 像素 , 整个网格布局的左侧 , 右侧 边距是 20 2020 像素 , 网格布局每排 4 44 个元素 ;
为不同位置的 item 设置不同的边距 , 这里就需要对当前设置边距的位置进行查询与甄别 ;
调用 RecyclerView 对象的 getChildAdapterPosition 方法 , 传入 item 组件 View 参数 , 就可以获取当前的位置 ;
@Override
    public void getItemOffsets(@NonNull Rect outRect, @NonNull View view,
                               @NonNull RecyclerView parent,
                               @NonNull RecyclerView.State state) {
        // 1. 获取当前设置边距的位置
        int currentPosition = parent.getChildAdapterPosition(view);
}
获取到当前设置位置之后 , 根据不同的位置设置不同的偏移量 ;
表格布局中每行有 4 44 个元素 ,
所有的元素上下左右边距都设置 5 55 像素偏移量 , 每行中最左侧的元素距离左边界 20 2020 像素 , 每行中最右侧元素距离右边界 20 2020 像素 ;
使用 currentPosition % 4 == 0 可以筛选出每行最左侧的元素 , 使用 currentPosition %4 == 3 可以筛选出每行最右侧的元素 ;
public class ItemDecoration extends RecyclerView.ItemDecoration {
    @Override
    public void getItemOffsets(@NonNull Rect outRect, @NonNull View view,
                               @NonNull RecyclerView parent,
                               @NonNull RecyclerView.State state) {
        // 1. 获取当前设置边距的位置
        int currentPosition = parent.getChildAdapterPosition(view);
        // 2. 针对不同的位置设置不同的边距
        // 每排最左侧和最右侧的左右边距设置成 20 像素, 其余 4 个边距一律设置成 5
        if (currentPosition % 4 == 0){
            // 每排最左侧的边距
            outRect.left = 20;
            outRect.top = 5;
            outRect.right = 5;
            outRect.bottom = 5;
        }else if (currentPosition %4 == 3){
            // 每排最右侧的边距
            outRect.left = 5;
            outRect.top = 5;
            outRect.right = 20;
            outRect.bottom = 5;
        }else{
            // 普通元素的边距都是 5
            outRect.left = 5;
            outRect.top = 5;
            outRect.right = 5;
            outRect.bottom = 5;
}
运行效果 : 下面的 RecyclerView 中每行最左侧元素距离左边距 20 2020 像素 , 每行最右侧元素距离右边距 20 2020 像素 , 其余边距都是 5 55 像素 ;

四、完整代码示例
自定义 RecyclerView.ItemDecoration 代码示例 :
package kim.hsl.recyclerview;
import android.graphics.Canvas;
import android.graphics.Rect;
import android.view.View;
import androidx.annotation.NonNull;
import androidx.recyclerview.widget.RecyclerView;
public class ItemDecoration extends RecyclerView.ItemDecoration {
    @Override
    public void onDraw(@NonNull Canvas c, @NonNull RecyclerView parent,
                       @NonNull RecyclerView.State state) {
    @Override
    public void onDrawOver(@NonNull Canvas c, @NonNull RecyclerView parent,
                           @NonNull RecyclerView.State state) {
    @Override
    public void getItemOffsets(@NonNull Rect outRect, @NonNull View view,
                               @NonNull RecyclerView parent,
                               @NonNull RecyclerView.State state) {
        // 1. 获取当前设置边距的位置
        int currentPosition = parent.getChildAdapterPosition(view);
        // 2. 针对不同的位置设置不同的边距
        // 每排最左侧和最右侧的左右边距设置成 20 像素, 其余 4 个边距一律设置成 5
        if (currentPosition % 4 == 0){
            // 每排最左侧的边距
            outRect.left = 20;
            outRect.top = 5;
            outRect.right = 5;
            outRect.bottom = 5;
        }else if (currentPosition %4 == 3){
            // 每排最右侧的边距
            outRect.left = 5;
            outRect.top = 5;
            outRect.right = 20;
            outRect.bottom = 5;
        }else{
            // 普通元素的边距都是 5
            outRect.left = 5;
            outRect.top = 5;
            outRect.right = 5;
            outRect.bottom = 5;
}
Java 主界面代码 :
package kim.hsl.recyclerview;
import android.graphics.Color;
import android.os.Bundle;
import android.view.LayoutInflater;
import android.view.View;
import android.view.ViewGroup;
import android.widget.TextView;
import androidx.annotation.NonNull;
import androidx.appcompat.app.AppCompatActivity;
import androidx.recyclerview.widget.GridLayoutManager;
import androidx.recyclerview.widget.RecyclerView;
import androidx.recyclerview.widget.StaggeredGridLayoutManager;
public class MainActivity extends AppCompatActivity {
    @Override
    protected void onCreate(Bundle savedInstanceState) {
        super.onCreate(savedInstanceState);
        setContentView(R.layout.activity_main);
        //1 . 从布局中获取 RecyclerView
        RecyclerView recycler_view = findViewById(R.id.recycler_view);
        //2 . 创建并设置布局管理器
        //创建布局管理器
        StaggeredGridLayoutManager layoutManager = new StaggeredGridLayoutManager(
                RecyclerView.VERTICAL);
        //设置布局管理器
        recycler_view.setLayoutManager(layoutManager);
        // 设置边距
        recycler_view.addItemDecoration(new ItemDecoration());
        //3 . 创建并设置列表适配器
        Adapter adapter = new Adapter();
        recycler_view.setAdapter(adapter);
     * RecyclerView 适配器
    public class Adapter extends RecyclerView.Adapter<Adapter.ViewHolder> {
        @Override
        public ViewHolder onCreateViewHolder(@NonNull ViewGroup parent, int viewType) {
            View root_view = LayoutInflater.from(MainActivity.this)
                    .inflate(R.layout.item_recyclerview, parent, false);
            return new ViewHolder(root_view);
        @Override
        public void onBindViewHolder(@NonNull ViewHolder holder, int position) {
            holder.text.setText("" + position);
        @Override
        public int getItemCount() {
            return 10;
        public class ViewHolder extends RecyclerView.ViewHolder {
            TextView text;
            public ViewHolder(@NonNull View itemView) {
                super(itemView);
                text = itemView.findViewById(R.id.text);
}
运行效果 :

五、RecyclerView 相关资料
官方文档 :
使用 RecyclerView 创建动态列表 :
https://developer.android.google.cn/guide/topics/ui/layout/recyclerview
高级 RecyclerView 自定义 :
https://developer.android.google.cn/guide/topics/ui/layout/recyclerview-custom
代码示例 :
GitHub 源码地址 :
https://github.com/han1202012/001_RecyclerView
博客源码快照 :
https://download.csdn.net/download/han1202012/14951713
( 使用 Android Studio 打开 )

