

ActiveMQ

1.什么是 ActiveMQ
ActiveMQ 是 Apache 出品,最流行的,能力强劲的开源消息总线。ActiveMQ 是一个 完全支持 JMS1.1 和 J2EE 1.4 规范的 JMS Provider 实现,尽管 JMS 规范出台已经是很久 的事情了,但是 JMS 在当今的 J2EE 应用中间仍然扮演着特殊的地位。
2.什么是消息
“消息”是在两台计算机间传送的数据单位。消息可以非常简单,例如只包含文本字符串; 也可以更复杂,可能包含嵌入对象。
3.什么是队列
队列就是事物按照排好的顺序等待接受服务或者处理。
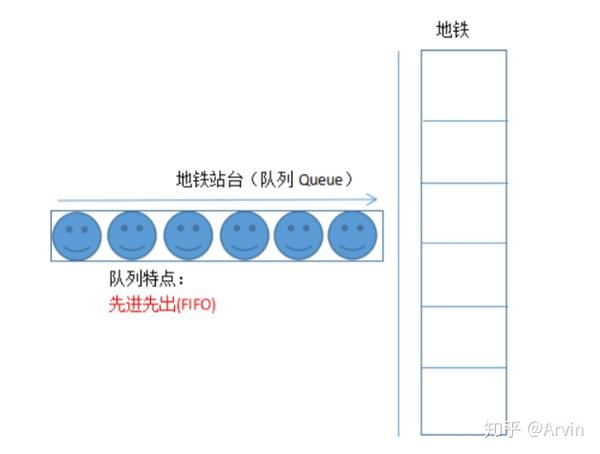

4.什么是消息队列
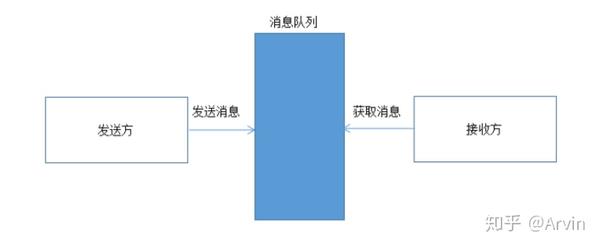
“消息队列”是在消息的传输过程中保存消息的容器。
5.常用消息服务应用
①ActiveMQ
ActiveMQ 是 Apache 出品,最流行的,能力强劲的开源消息总线。ActiveMQ 是一个完
全支持 JMS1.1 和 J2EE 1.4 规范的 JMS Provider 实现。
②RabbitMQ
RabbitMQ 是一个在 AMQP 基础上完成的,可复用的企业消息系统。他遵循 Mozilla Public
License 开源协议。开发语言为 Erlang。
③RocketMQ
由阿里巴巴定义开发的一套消息队列应用服务。
6.消息服务的应用场景
消息队列的主要特点是异步处理,主要目的是减少请求响应时间和解耦。所以主要的使 用场景就是将比较耗时而且不需要即时(同步)返回结果的操作作为消息放入消息队列。同 时由于使用了消息队列,只要保证消息格式不变,消息的发送方和接收方并不需要彼此联系, 也不需要受对方的影响,即解耦和。

例1用户注册:
1.注册处理以及写数据库
2.发送注册成功的手机短信
3.发送注册成功的邮件信息
如果用消息中间件:则可以创建两个线程来做这些事情,直接发送消息给消息中间件,
然后让邮件服务和短信服务自己去消息中间件里面去取消息,然后取到消息后再自己做对应
的业务操作。就是这么方便
例2订单处理:
1.在购物车中点击结算
2.完成支付
3.创建订单
4.调用库存系统
订单完成后,订单系统并不去直接调用库存系统,而是发送消息到消息中间件,写入一
个订单信息。库存系统自己去消息中间件上去获取,然后做发货处理,并更新库存,这样能
够实现互联网型应用追求的快这一个属性。而库存系统读取订单后库存应用这个操作也是非
常快的,所以有消息中间件对解耦来说也是一个不错的方向。
例3秒杀功能:
1.用户点击秒杀
2.发送请求到秒杀应用
3.在请求秒杀应用之前将请求放入到消息队列
4.秒杀应用从消息队列中获取请求并处理。
比如,系统举行秒杀活动,热门商品。流量蜂拥而至 100 件商品,10 万人挤进来怎么
办?10 万秒杀的操作,放入消息队列。秒杀应用处理消息队列中的 10 万个请求中的前 100
个,其他的打回,通知失败。流量峰值控制在消息队列处,秒杀应用不会瞬间被怼死.
7.什么是 JMS
JMS(Java Messaging Service)是 Java 平台上有关面向消息中间件的技术规范,它便于 消息系统中的 Java 应用程序进行消息交换,并且通过提供标准的产生、发送、接收消息的接 口,简化企业应用的开发。
JMS 模型 :
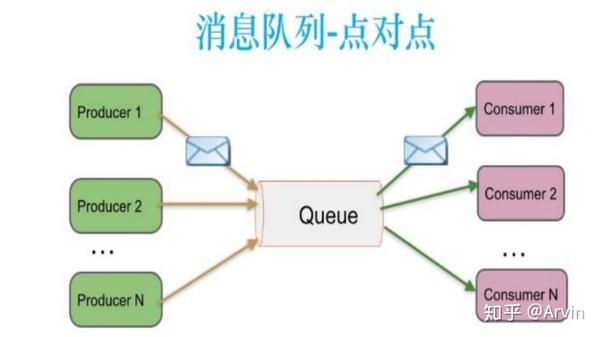
1.点对点模型(Point To Point):
生产者发送一条消息到 queue,只有一个消费者能收到。

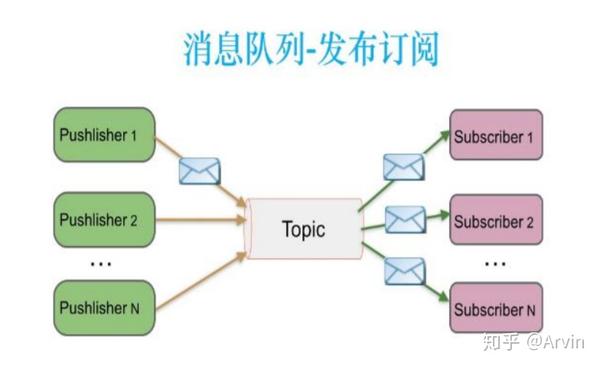
2.发布订阅模型(Publish/Subscribe)
发布者发送到 topic 的消息,只有订阅了 topic 的订阅者才会收到消息

8.ActiveMQ 安装
下载地址:ActiveMQ 官网: http://activemq.apache.org
版本说明:
ActiveMQ5.10.x 以上版本必须使用 JDK1.8 才能正常使用。
ActiveMQ5.9.x 及以下版本使用 JDK1.7 即可正常使用。
1.使用文件上传工具将ActiveMQ上传到linux服务器
2.使用tar -zxf 压缩包名 命令进行解压
目录介绍:
 bin 存放的是脚本文件
 conf 存放的是基本配置文件
 data 存放的是日志文件
 docs 存放的是说明文档
 examples 存放的是简单的实例
 lib 存放的是 activemq 所需 jar 包
 webapps 用于存放项目的目录
3.将解压后的文件拷贝/复制到/usr/local目录下
启动测试:
命令:/usr/local/activemq/bin/activemq start
浏览器访问: http:// ip:8161/admin/
用户名: admin
密码: admin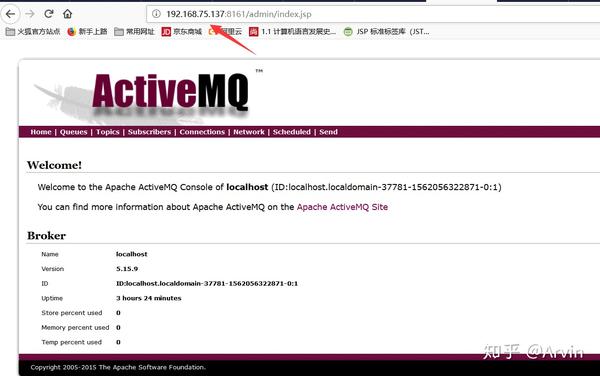

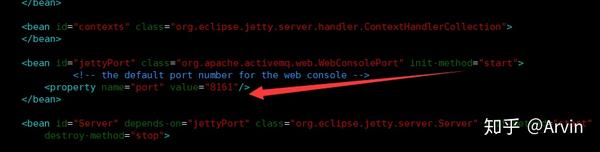
修改访问端口:
修改 ActiveMQ 配置文件: /usr/local/activemq/conf/jetty.xml

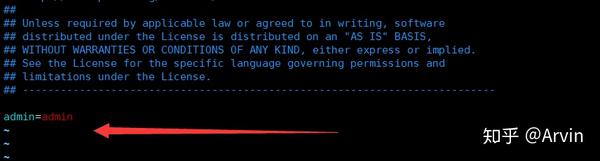
修改用户名和密码:
修改 conf/users.properties 配置文件.内容为: 用户名=密码

配置文件 /usr/local/activemq/conf/jactivemq.xml :
配置文件中,配置的是 ActiveMQ 的核心配置信息. 是提供服务时使用的配置. 可以修改
启动的访问端口. 即 java 编程中访问 ActiveMQ 的访问端口.
默认端口为 61616.
使用协议是: tcp 协议.
9.ActiveMQ 术语
Destination: 目的地,JMS Provider(消息中间件)负责维护,用于对 Message 进行管
理对象。MessageProducer 需要指定 Destination 才能发送消息,MessageReceiver 需要指定 Destination才能接收消息。
Producer:
消息生成者,负责发送 Message 到目的地。
Consumer | Receiver:
消息消费者,负责从目的地中消费【处理|监听|订阅】Message。
Message:
消息,消息封装一次通信的内容。
10.ActiveMQ 常用 API
ConnectionFactory
链接工厂, 用于创建链接的工厂类型.
Connection
链接. 用于建立访问 ActiveMQ 连接的类型, 由链接工厂创建.
Session
会话, 一次持久有效有状态的访问. 由链接创建.
Destination & Queue
目的地, 用于描述本次访问 ActiveMQ 的消息访问目的地. 即 ActiveMQ 服务中的具体队
列. 由会话创建.
interface Queue extends Destination
MessageProducer
消息生成者, 在一次有效会话中, 用于发送消息给 ActiveMQ 服务的工具. 由会话创建.
MessageConsumer
消息消费者【消息订阅者,消息处理者】, 在一次有效会话中, 用于从 ActiveMQ 服务中
获取消息的工具. 由会话创建.
Message
消息, 通过消息生成者向 ActiveMQ 服务发送消息时使用的数据载体对象或消息消费者
从 ActiveMQ 服务中获取消息时使用的数据载体对象. 是所有消息【文本消息,对象消息等】
具体类型的顶级接口. 可以通过会话创建或通过会话从 ActiveMQ 服务中获取.
11.ActiveMQ应用demo
1.处理文本消息demo
消息生产者producer:
public static void SendHelloWordActiveMQ(String msgText) {
		// 链接工厂
		ConnectionFactory connectionFactory = null;
		// 链接
		Connection connection = null;
		// 目的地
		Destination destination = null;
		// 会话
		Session session = null;
		// 消息生产者
		MessageProducer messageProducer = null;
		// 消息
		Message message = null;
		try {
			 * userName访问消息服务用户名,默认admin 在jetty-ream.xml文件中进行配置
			 * password访问消息服务密码,默认admin 在jetty-ream.xml文件中进行配置
			 * brokerURL访问消息服务的url, 协议+ip+端口
			// 创建链接工厂
			connectionFactory = new ActiveMQConnectionFactory("admin", "admin", "tcp://192.168.75.137:61616");
			// 创建链接
			connection = connectionFactory.createConnection();
			// 启动链接
			connection.start();
			 * transacted 是否使用事务 true时 配合事务提交批量把消息插入到消息队列中 acknowledgeMode必须取值
			 * Session.SESSION_TRANSACTED 表示把事务管理交给session来管理 false时
			 * 每次都会提交到消息队列中,不使用事务 acknowledgeMode取值: Session.AUTO_ACKNOWLEDGE
			 * 自动消息确认机制 消费者消费时自动向MQ中发送一条信息,MQ会将这条消息移除 Session.CLIENT_ACKNOWLEDGE
			 * 客户端确认机制 需要在客户端调用API来完成 Session.DUPS_OK_ACKNOWLEDGE 有副本的客户端确认机制
			 * 收到消息时不会在MQ中进行删除会一直缓存在MQ中 acknowledgeMode 事务确认机制
			session = connection.createSession(false, Session.AUTO_ACKNOWLEDGE);
			// 创建目的地,目的地的名称即队列的名称,消费者需要此名称访问对应的队列
			destination = session.createQueue("helloword-destination");
			// 创建消息生产者
			messageProducer = session.createProducer(destination);
			// 创建文本消息
			message = session.createTextMessage(msgText);
			// 发送消息
			messageProducer.send(message);
		} catch (Exception e) {
			e.printStackTrace();
		} finally {
			if (messageProducer != null) {
				try {
					messageProducer.close();
				} catch (JMSException e) {
					e.printStackTrace();
			if (session != null) {
				try {
					session.close();
				} catch (JMSException e) {
					// TODO Auto-generated catch block
					e.printStackTrace();
			if (connection != null) {
				try {
					connection.close();
				} catch (JMSException e) {
					// TODO Auto-generated catch block
					e.printStackTrace();
	}
消息消费者consumer:
public static void readHelloWordActiveMQ() {
// 链接工厂
ConnectionFactory connectionFactory = null;
// 链接
Connection connection = null;
// 目的地
Destination destination = null;
// 会话
Session session = null;
// 消息消费者
MessageConsumer messageConsumer = null;
// 消息
Message message = null;
try {
* userName访问消息服务用户名,默认admin 在jetty-ream.xml文件中进行配置
* password访问消息服务密码,默认admin 在jetty-ream.xml文件中进行配置
* brokerURL访问消息服务的url, 协议+ip+端口
// 创建链接工厂
connectionFactory = new ActiveMQConnectionFactory("admin", "admin", "tcp://192.168.75.137:61616");
// 创建链接
connection = connectionFactory.createConnection();
// 启动链接
connection.start();
* transacted 是否使用事务 true时 配合事务提交批量把消息插入到消息队列中 acknowledgeMode必须取值
* Session.SESSION_TRANSACTED 表示把事务管理交给session来管理 false时
* 每次都会提交到消息队列中,不使用事务 acknowledgeMode取值: Session.AUTO_ACKNOWLEDGE
* 自动消息确认机制 消费者消费时自动向MQ中发送一条信息,MQ会将这条消息移除 Session.CLIENT_ACKNOWLEDGE
* 客户端确认机制 需要在客户端调用API来完成 Session.DUPS_OK_ACKNOWLEDGE 有副本的客户端确认机制
* 收到消息时不会在MQ中进行删除会一直缓存在MQ中 acknowledgeMode 事务确认机制
session = connection.createSession(false, Session.AUTO_ACKNOWLEDGE);
// 创建目的地,目的地的名称即队列的名称,消费者需要此名称访问对应的队列
destination = session.createQueue("helloword-destination");
// 创建消息消费者
messageConsumer = session.createConsumer(destination);
// 接收消息
message = messageConsumer.receive();
String msg = ((TextMessage) message).getText();
System.out.println(msg);
} catch (Exception e) {
e.printStackTrace();
} finally {
if (messageConsumer != null) {
try
{
messageConsumer.close();
} catch (JMSException e) {
e.printStackTrace();
if (session != null) {
try {
session.close();
} catch (JMSException e) {
// TODO Auto-generated catch block
e.printStackTrace();
if (connection != null) {
try {
connection.close();
} catch (JMSException e) {
// TODO Auto-generated catch block
e.printStackTrace();
}2.处理对象消息demo
消息生产者producer:
public static void SendHelloWordActiveMQ(Users users) {
		// 链接工厂
		ConnectionFactory connectionFactory = null;
		// 链接
		Connection connection = null;
		// 目的地
		Destination destination = null;
		// 会话
		Session session = null;
		// 消息生产者
		MessageProducer messageProducer = null;
		// 消息
		Message message = null;
		try {
			 * userName访问消息服务用户名,默认admin 在jetty-ream.xml文件中进行配置
			 * password访问消息服务密码,默认admin 在jetty-ream.xml文件中进行配置
			 * brokerURL访问消息服务的url, 协议+ip+端口
			// 创建链接工厂
			connectionFactory = new ActiveMQConnectionFactory("admin", "admin", "tcp://192.168.75.137:61616");
			// 创建链接
			connection = connectionFactory.createConnection();
			// 启动链接
			connection.start();
			 * transacted 是否使用事务 true时 配合事务提交批量把消息插入到消息队列中 acknowledgeMode必须取值
			 * Session.SESSION_TRANSACTED 表示把事务管理交给session来管理 false时
			 * 每次都会提交到消息队列中,不使用事务 acknowledgeMode取值: Session.AUTO_ACKNOWLEDGE
			 * 自动消息确认机制 消费者消费时自动向MQ中发送一条信息,MQ会将这条消息移除 Session.CLIENT_ACKNOWLEDGE
			 * 客户端确认机制 需要在客户端调用API来完成 Session.DUPS_OK_ACKNOWLEDGE 有副本的客户端确认机制
			 * 收到消息时不会在MQ中进行删除会一直缓存在MQ中 acknowledgeMode 事务确认机制
			session = connection.createSession(false, Session.AUTO_ACKNOWLEDGE);
			// 创建目的地,目的地的名称即队列的名称,消费者需要此名称访问对应的队列
			destination = session.createQueue("users");
			// 创建消息生产者
			messageProducer = session.createProducer(destination);
			message = session.createObjectMessage(users);
			// 发送消息
			messageProducer.send(message);
		} catch (Exception e) {
			e.printStackTrace();
		} finally {
			if (messageProducer != null) {
				try {
					messageProducer.close();
				} catch (JMSException e) {
					e.printStackTrace();
			if (session != null) {
				try {
					session.close();
				} catch (JMSException e) {
					// TODO Auto-generated catch block
					e.printStackTrace();
			if (connection != null) {
				try {
					connection.close();
				} catch (JMSException e) {
					// TODO Auto-generated catch block
					e.printStackTrace();
	}
消息消费者consumer:
public static void readHelloWordActiveMQ() {
		// 链接工厂
		ConnectionFactory connectionFactory = null;
		// 链接
		Connection connection = null;
		// 目的地
		Destination destination = null;
		// 会话
		Session session = null;
		// 消息消费者
		MessageConsumer messageConsumer = null;
		// 消息
		Message message = null;
		try {
			 * userName访问消息服务用户名,默认admin 在jetty-ream.xml文件中进行配置
			 * password访问消息服务密码,默认admin 在jetty-ream.xml文件中进行配置
			 * brokerURL访问消息服务的url, 协议+ip+端口
			// 创建链接工厂
			connectionFactory = new ActiveMQConnectionFactory("admin", "admin", "tcp://192.168.75.137:61616");
			// 创建链接
			connection = connectionFactory.createConnection();
			// 启动链接
			connection.start();
			 * transacted 是否使用事务 true时 配合事务提交批量把消息插入到消息队列中 acknowledgeMode必须取值
			 * Session.SESSION_TRANSACTED 表示把事务管理交给session来管理 false时
			 * 每次都会提交到消息队列中,不使用事务 acknowledgeMode取值: Session.AUTO_ACKNOWLEDGE
			 * 自动消息确认机制 消费者消费时自动向MQ中发送一条信息,MQ会将这条消息移除 Session.CLIENT_ACKNOWLEDGE
			 * 客户端确认机制 需要在客户端调用API来完成 Session.DUPS_OK_ACKNOWLEDGE 有副本的客户端确认机制
			 * 收到消息时不会在MQ中进行删除会一直缓存在MQ中 acknowledgeMode 事务确认机制
			session = connection.createSession(false, Session.AUTO_ACKNOWLEDGE);
			// 创建目的地,目的地的名称即队列的名称,消费者需要此名称访问对应的队列
			destination = session.createQueue("users");
			// 创建消息消费者
			messageConsumer = session.createConsumer(destination);
			// 接收消息
			message = messageConsumer.receive();
			ObjectMessage obj = (ObjectMessage) message;
			Users users = (Users) obj.getObject();
			System.out.println(users);
		} catch (Exception e) {
			e.printStackTrace();
		} finally {
			if (messageConsumer != null) {
				try {
					messageConsumer.close();
				} catch (JMSException e) {
					e.printStackTrace();
			if (session != null) {
				try {
					session.close();
				} catch (JMSException e) {
					// TODO Auto-generated catch block
					e.printStackTrace();
			if (connection != null) {
				try {
					connection.close();
				} catch (JMSException e) {
					// TODO Auto-generated catch block
					e.printStackTrace();
	}
常见异常处理:
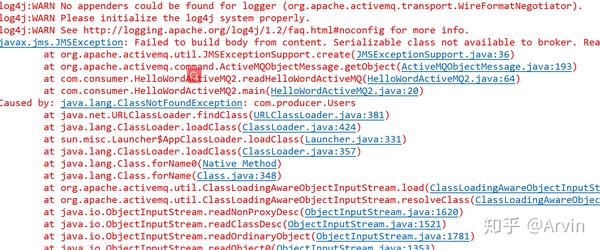

异常原因:
在接收消息时,获取到的对象无法进行强制类型转换成另外一个类
如果两个项目的包名一致,可以生成序列id进行解决
在消费者项目中的pom文件中加入对生产者pojo的依赖
3.队列服务监听消息
消息生产者producer:
public static void SendHelloWordActiveMQ(String msgText) {
		// 链接工厂
		ConnectionFactory connectionFactory = null;
		// 链接
		Connection connection = null;
		// 目的地
		Destination destination = null;
		// 会话
		Session session = null;
		// 消息生产者
		MessageProducer messageProducer = null;
		// 消息
		Message message = null;
		try {
			 * userName访问消息服务用户名,默认admin 在jetty-ream.xml文件中进行配置
			 * password访问消息服务密码,默认admin 在jetty-ream.xml文件中进行配置
			 * brokerURL访问消息服务的url, 协议+ip+端口
			// 创建链接工厂
			connectionFactory = new ActiveMQConnectionFactory("admin", "admin", "tcp://192.168.75.137:61616");
			// 创建链接
			connection = connectionFactory.createConnection();
			// 启动链接
			connection.start();
			 * transacted 是否使用事务 true时 配合事务提交批量把消息插入到消息队列中 acknowledgeMode必须取值
			 * Session.SESSION_TRANSACTED 表示把事务管理交给session来管理 false时
			 * 每次都会提交到消息队列中,不使用事务 acknowledgeMode取值: Session.AUTO_ACKNOWLEDGE
			 * 自动消息确认机制 消费者消费时自动向MQ中发送一条信息,MQ会将这条消息移除 Session.CLIENT_ACKNOWLEDGE
			 * 客户端确认机制 需要在客户端调用API来完成 Session.DUPS_OK_ACKNOWLEDGE 有副本的客户端确认机制
			 * 收到消息时不会在MQ中进行删除会一直缓存在MQ中 acknowledgeMode 事务确认机制
			session = connection.createSession(false, Session.AUTO_ACKNOWLEDGE);
			// 创建目的地,目的地的名称即队列的名称,消费者需要此名称访问对应的队列
			destination = session.createQueue("helloword-destination");
			// 创建消息生产者
			messageProducer = session.createProducer(destination);
			// 创建文本消息
			message = session.createTextMessage(msgText);
			// 发送消息
			messageProducer.send(message);
		} catch (Exception e) {
			e.printStackTrace();
		} finally {
			if (messageProducer != null) {
				try {
					messageProducer.close();
				} catch (JMSException e) {
					e.printStackTrace();
			if (session != null) {
				try {
					session.close();
				} catch (JMSException e) {
					// TODO Auto-generated catch block
					e.printStackTrace();
			if (connection != null) {
				try {
					connection.close();
				} catch (JMSException e) {
					// TODO Auto-generated catch block
					e.printStackTrace();
	}
消息消费者consumer:
public static void readHelloWordActiveMQ() {
		// 链接工厂
		ConnectionFactory connectionFactory = null;
		// 链接
		Connection connection = null;
		// 目的地
		Destination destination = null;
		// 会话
		Session session = null;
		// 消息消费者
		MessageConsumer messageConsumer = null;
		// 消息
		Message message = null;
		try {
			 * userName访问消息服务用户名,默认admin 在jetty-ream.xml文件中进行配置
			 * password访问消息服务密码,默认admin 在jetty-ream.xml文件中进行配置
			 * brokerURL访问消息服务的url, 协议+ip+端口
			// 创建链接工厂
			connectionFactory = new ActiveMQConnectionFactory("admin", "admin", "tcp://192.168.75.137:61616");
			// 创建链接
			connection = connectionFactory.createConnection();
			// 启动链接
			connection.start();
			 * transacted 是否使用事务 true时 配合事务提交批量把消息插入到消息队列中 acknowledgeMode必须取值
			 * Session.SESSION_TRANSACTED 表示把事务管理交给session来管理 false时
			 * 每次都会提交到消息队列中,不使用事务 acknowledgeMode取值: Session.AUTO_ACKNOWLEDGE
			 * 自动消息确认机制 消费者消费时自动向MQ中发送一条信息,MQ会将这条消息移除 Session.CLIENT_ACKNOWLEDGE
			 * 客户端确认机制 需要在客户端调用API来完成 Session.DUPS_OK_ACKNOWLEDGE 有副本的客户端确认机制
			 * 收到消息时不会在MQ中进行删除会一直缓存在MQ中 acknowledgeMode 事务确认机制
			session = connection.createSession(false, Session.AUTO_ACKNOWLEDGE);
			// 创建目的地,目的地的名称即队列的名称,消费者需要此名称访问对应的队列
			destination = session.createQueue("helloword-destination");
			// 创建消息消费者
			messageConsumer = session.createConsumer(destination);
			// 监听消息队列,接收消息
			messageConsumer.setMessageListener(new MessageListener() {
				// ActiveMQ 回调的方法。通过该方法将消息传递到 consumer
				@Override
				public void onMessage(Message message) {
					String msg = "";
					try {
						msg = ((TextMessage) message).getText();
					} catch (JMSException e) {
						// TODO Auto-generated catch block
						e.printStackTrace();
					System.out.println(msg);
		} catch (Exception e) {
			e.printStackTrace();
	}
4.topic模型实现
消息生产者producer:
public static void SendHelloWordActiveMQ(String msgText) {
// 链接工厂
ConnectionFactory connectionFactory = null;
// 链接
Connection connection = null;
// 目的地
Destination destination = null;
// 会话
Session session = null;
// 消息生产者
MessageProducer messageProducer = null;
// 消息
Message message = null;
try {
* userName访问消息服务用户名,默认admin 在jetty-ream.xml文件中进行配置
* password访问消息服务密码,默认admin 在jetty-ream.xml文件中进行配置
* brokerURL访问消息服务的url, 协议+ip+端口
// 创建链接工厂
connectionFactory = new ActiveMQConnectionFactory("admin", "admin", "tcp://192.168.75.137:61616");
// 创建链接
connection = connectionFactory.createConnection();
// 启动链接
connection.start();
* transacted 是否使用事务 true时 配合事务提交批量把消息插入到消息队列中 acknowledgeMode必须取值
* Session.SESSION_TRANSACTED 表示把事务管理交给session来管理 false时
* 每次都会提交到消息队列中,不使用事务 acknowledgeMode取值: Session.AUTO_ACKNOWLEDGE
* 自动消息确认机制 消费者消费时自动向MQ中发送一条信息,MQ会将这条消息移除 Session.CLIENT_ACKNOWLEDGE
* 客户端确认机制 需要在客户端调用API来完成 Session.DUPS_OK_ACKNOWLEDGE 有副本的客户端确认机制
* 收到消息时不会在MQ中进行删除会一直缓存在MQ中 acknowledgeMode 事务确认机制
session = connection.createSession(false, Session.AUTO_ACKNOWLEDGE);
// 创建目的地,目的地的名称即队列的名称,消费者需要此名称访问对应的队列
destination = session.createTopic("topic");
// 创建消息生产者
messageProducer = session.createProducer
(destination);
// 创建文本消息
message = session.createTextMessage(msgText);
// 发送消息
messageProducer.send(message);
} catch (Exception e) {
e.printStackTrace();
} finally {
if (messageProducer != null) {
try {
messageProducer.close();
} catch (JMSException e) {
e.printStackTrace();
if (session != null) {
try {
session.close();
} catch (JMSException e) {
// TODO Auto-generated catch block
e.printStackTrace();
if (connection != null) {
try {
connection.close();
} catch (JMSException e) {
// TODO Auto-generated catch block
e.printStackTrace();
}消息消费者consumer:
public void readHelloWordActiveMQ() {
		// 链接工厂
		ConnectionFactory connectionFactory = null;
		// 链接
		Connection connection = null;
		// 目的地
		Destination destination = null;
		// 会话
		Session session = null;
		// 消息消费者
		MessageConsumer messageConsumer = null;
		// 消息
		Message message = null;
		try {
			 * userName访问消息服务用户名,默认admin 在jetty-ream.xml文件中进行配置
			 * password访问消息服务密码,默认admin 在jetty-ream.xml文件中进行配置
			 * brokerURL访问消息服务的url, 协议+ip+端口
			// 创建链接工厂
			connectionFactory = new ActiveMQConnectionFactory("admin", "admin", "tcp://192.168.75.137:61616");
			// 创建链接
			connection = connectionFactory.createConnection();
			// 启动链接
			connection.start();
			 * transacted 是否使用事务 true时 配合事务提交批量把消息插入到消息队列中 acknowledgeMode必须取值
			 * Session.SESSION_TRANSACTED 表示把事务管理交给session来管理 false时
			 * 每次都会提交到消息队列中,不使用事务 acknowledgeMode取值: Session.AUTO_ACKNOWLEDGE
			 * 自动消息确认机制 消费者消费时自动向MQ中发送一条信息,MQ会将这条消息移除 Session.CLIENT_ACKNOWLEDGE
			 * 客户端确认机制 需要在客户端调用API来完成 Session.DUPS_OK_ACKNOWLEDGE 有副本的客户端确认机制
			 * 收到消息时不会在MQ中进行删除会一直缓存在MQ中 acknowledgeMode 事务确认机制
			session = connection.createSession(false, Session.AUTO_ACKNOWLEDGE);
			// 创建目的地,目的地的名称即队列的名称,消费者需要此名称访问对应的队列
			destination = session.createTopic("topic");
			// 创建消息消费者
			messageConsumer = session.createConsumer(destination);
			// 接收消息
			messageConsumer.setMessageListener(new MessageListener() {
				@Override
				public void onMessage(Message message) {
					String msg = "";
					try {
						msg = ((TextMessage) message).getText();
					} catch (JMSException e) {
						// TODO Auto-generated catch block
						e.printStackTrace();
					System.out.println("接收服务端发送的消息:" + msg + "1");
		} catch (Exception e) {
			e.printStackTrace();
	}
12.Spring整合ActiveMQ相关配置
①ActiveMQ相关jar依赖
             <!-- ActiveMQ客户端完整jar包依赖 -->
		<dependency>
			<groupId>org.apache.activemq</groupId>
			<artifactId>activemq-all</artifactId>
			<version>5.9.0</version>
		</dependency>
		<!-- ActiveMQ和Spring整合配置文件标签处理jar包依赖 -->
		<dependency>
			<groupId>org.apache.xbean</groupId>
			<artifactId>xbean-spring</artifactId>
			<version>4.5</version>
		</dependency>
		<!-- Spring-JMS插件相关jar包依赖 -->
		<dependency>
			<groupId>org.springframework</groupId>
			<artifactId>spring-jms</artifactId>
			<version>4.1.6.RELEASE</version>
		</dependency>
		<!-- Spring-JMS插件相关jar包依赖 -->
		<dependency>
		    <groupId>org.apache.activemq</groupId>
		    <artifactId>activemq-pool</artifactId>
		    <version>5.9.0</version>
		</dependency>
		<dependency>
		    <groupId>org.apache.activemq</groupId>
		    <artifactId>activemq-jms-pool</artifactId>
		    <version>5.9.0</version>
		</dependency>
②producer生成者applicationContext-jms.xml
<?xml version="1.0" encoding="UTF-8"?>
<beans xmlns="http://www.springframework.org/schema/beans"
	xmlns:xsi="http://www.w3.org/2001/XMLSchema-instance" xmlns:jms="http://www.springframework.org/schema/jms"
	xmlns:context="http://www.springframework.org/schema/context"
	xmlns:amq="http://activemq.apache.org/schema/core"
	xsi:schemaLocation="
		http://www.springframework.org/schema/beans
		http://www.springframework.org/schema/beans/spring-beans.xsd
		http://www.springframework.org/schema/jms
		http://www.springframework.org/schema/jms/spring-jms.xsd
		http://activemq.apache.org/schema/core
		http://activemq.apache.org/schema/core/activemq-core.xsd
		http://www.springframework.org/schema/context
		http://www.springframework.org/schema/context/spring-context.xsd">
	<!-- 需要创建一个连接工厂,连接ActiveMQ. ActiveMQConnectionFactory. 需要依赖ActiveMQ提供的amq标签 -->
	<!-- amq:connectionFactory 是bean标签的子标签, 会在spring容器中创建一个bean对象. 可以为对象命名.
		类似: <bean id="" class="ActiveMQConnectionFactory"></bean> -->
	<amq:connectionFactory brokerURL="tcp://192.168.75.137:61616"
		userName="admin" password="admin" id="amqConnectionFactory" />
	<!-- 配置池化的ConnectionFactory。 为连接ActiveMQ的connectionFactory提供连接池 -->
	<bean id="pooledConnectionFactory" class="org.apache.activemq.pool.PooledConnectionFactoryBean">
		<property name="connectionFactory" ref="amqConnectionFactory"></property>
		<property name="maxConnections" value="10"></property>
	</bean>
	<!-- spring管理JMS相关代码的时候,必须依赖jms标签库. spring-jms提供的标签库. -->
	<!-- 定义Spring-JMS中的连接工厂对象 CachingConnectionFactory - spring框架提供的连接工厂对象.
		不能真正的访问MOM容器. 类似一个工厂的代理对象. 需要提供一个真实工厂,实现MOM容器的连接访问. -->
	<!-- 配置有缓存的ConnectionFactory,session的缓存大小可定制。 -->
	<bean id="connectionFactory"
		class="org.springframework.jms.connection.CachingConnectionFactory">
		<property name="targetConnectionFactory" ref="pooledConnectionFactory"></property>
		<property name="sessionCacheSize" value="3"></property>
	</bean>
	<!-- JmsTemplate配置 -->
	<bean id="jmsTemplate" class="org.springframework.jms.core.JmsTemplate">
		<!-- 给定连接工厂, 必须是spring创建的连接工厂. -->
		<property name="connectionFactory" ref="connectionFactory"></property>
		<!-- 可选 - 默认目的地命名 -->
		<property name="defaultDestinationName" value="test-spring"></property>
	</bean>
</beans>
发送消息到activeMQ:
@Service
public class MessageServiceImpl implements MessageService {
	@Autowired
	private JmsTemplate JmsTemplate;
	@Override
	public void addMsg(Users user) {
		//设置目的地名称
//		JmsTemplate.setDefaultDestinationName("test");
		JmsTemplate.send(new MessageCreator() {
			@Override
			public Message createMessage(Session session) throws JMSException {
				return session.createObjectMessage(user);
}
③consumer消费者applicationContext-jms.xml
<?xml version="1.0" encoding="UTF-8"?>
<beans xmlns="http://www.springframework.org/schema/beans"
	xmlns:xsi="http://www.w3.org/2001/XMLSchema-instance"
	xmlns:jms="http://www.springframework.org/schema/jms"
	xmlns:amq="http://activemq.apache.org/schema/core"
	xsi:schemaLocation="
		http://www.springframework.org/schema/beans
		http://www.springframework.org/schema/beans/spring-beans.xsd
		http://www.springframework.org/schema/jms
		http://www.springframework.org/schema/jms/spring-jms.xsd
		http://activemq.apache.org/schema/core
		http://activemq.apache.org/schema/core/activemq-core.xsd">
	<!-- 需要创建一个连接工厂,连接ActiveMQ. ActiveMQConnectionFactory. 需要依赖ActiveMQ提供的amq标签 -->
	<!-- amq:connectionFactory 是bean标签的子标签, 会在spring容器中创建一个bean对象.
		可以为对象命名. 类似: <bean id="" class="ActiveMQConnectionFactory"></bean>
	<amq:connectionFactory brokerURL="tcp://192.168.75.137:61616"
		userName="admin" password="admin" id="amqConnectionFactory"/>
<!-- 配置池化的ConnectionFactory。 为连接ActiveMQ的connectionFactory提供连接池 -->
	<bean id="pooledConnectionFactory" class="org.apache.activemq.pool.PooledConnectionFactoryBean">
		<property name="connectionFactory" ref="amqConnectionFactory"></property>
		<property name="maxConnections" value="10"></property>
	</bean>
	<!-- spring管理JMS相关代码的时候,必须依赖jms标签库. spring-jms提供的标签库. -->
	<!-- 定义Spring-JMS中的连接工厂对象
		CachingConnectionFactory - spring框架提供的连接工厂对象. 不能真正的访问MOM容器.
			类似一个工厂的代理对象. 需要提供一个真实工厂,实现MOM容器的连接访问.
	<bean id="connectionFactory"
		class="org.springframework.jms.connection.CachingConnectionFactory">
		<property name="targetConnectionFactory" ref="pooledConnectionFactory"></property>
		<property name="sessionCacheSize" value="3"></property>
	</bean>
	<!-- 注册监听器 -->
	<!-- 开始注册监听.
		需要的参数有:
			acknowledge - 消息确认机制
			container-type - 容器类型 default|simple
			simple:SimpleMessageListenerContainer最简单的消息监听器容器,只能处理固定数量的JMS会话,且不支持事务。
			default:DefaultMessageListenerContainer是一个用于异步消息监听器容器 ,且支持事务
			destination-type - 目的地类型. 使用队列作为目的地.
			connection-factory - 连接工厂, spring-jms使用的连接工厂,必须是spring自主创建的
			不能使用三方工具创建的工程. 如: ActiveMQConnectionFactory.
	<jms:listener-container acknowledge="auto" container-type="default"
		destination-type="queue" connection-factory="connectionFactory" >
		<!-- 在监听器容器中注册某监听器对象.
			destination - 设置目的地命名
			ref - 指定监听器对象
		<jms:listener destination="test-spring" ref="myListener"/>
	</jms:listener-container>
</beans>
消息监听器 从activeMQ从获取消息进行消费
@Component(value="myListener")
public class MyMessageListener implements MessageListener{
	@Autowired
	private DisposeMsg disposeMsg;
	@Override
	public void onMessage(Message message) {
		try {
			Serializable obj = ((ObjectMessage)message).getObject();
			disposeMsg.showMsg((Users)obj);