项目实战——Spark将Hive表的数据写入ElasticSearch(Java版本)
此篇文章需要Java代码,实现功能和篇幅类似,直接Java一站式解决Hive内用Spark取数,新建ES索引,灌入数据,并且采用ES别名机制,实现ES数据更新的无缝更新,底层采用Spark计算框架,导入速度相对文章1的做法较快的多!;
项目实战——钉钉报警验证ElasticSearch和Hive数据仓库内的数据质量(Java版本)
此篇文章主要选取关键性指标,数据校验数据源Hive和目标ES内的数据是否一致;
项目实战——Spark将Hive表的数据写入需要用户名密码认证的ElasticSearch(Java版本)
此篇文章主要讲述如何通过spark将hive数据写入带账号密码权限认证的ElasticSearch 内;
项目实战(生产环境部署上线)——参数配置化Spark将Hive表的数据写入需要用户名密码认证的ElasticSearch(Java版本))
此篇文章主要讲述如何通过spark将hive数据写入带账号密码权限认证的ElasticSearch 内,同时而是,spark,es建索引参数配置化,每次新增一张表同步到es只需要新增一个xml配置文件即可,也是博主生产环境运用的java代码,弥补下很多老铁吐槽方法4的不足。
1.如果感觉编码能力有限,又想用到Hive数据导入ElasticSearch,可以考虑文章1;
2.如果有编码能力,个人建议采用文章2和文章3的组合情况(博主推荐),作为离线或者近线数据从数据仓库Hive导入ElasticSearch的架构方案,并且此次分享的Java代码为博主最早实现的版本1,主要在于易懂,实现功能,学者们可以二次加工,请不要抱怨代码写的烂;
3.如果是elasticsearch是自带账号密码权限认证的,如云产品或者自己设置了账号密码认证的,那么办法,只能用文章4了;
4.如果部署上线,还是要看文章5。
本人Hive版本:2.3.5
本人ES版本:7.7.1
本人Spark版本:2.3.3
==背 景==
将要创建的ES索引信息和ES的连接信息参数化,这样每次新增一张表时,只需要新增一个xml配置文件即可,es服务器迁移,只需要变更一个ES文件即可,因为是大数据环境嘛,博主选择把这两类配置文件放在hdfs上,当然如果没有hdfs,也可以把配置文件放到ftp,或者某共享文件夹下,只是不同文件系统在读取配置文件的IO流略有不同,读者根据自己的文件系统来选择相应的文件IO流即可。
如图1,主要数据链路架构就是通过调用编译好的jar包读取hdfs上的配置文件信息,再通过spark将hive的表同步到Elasticsearch内。
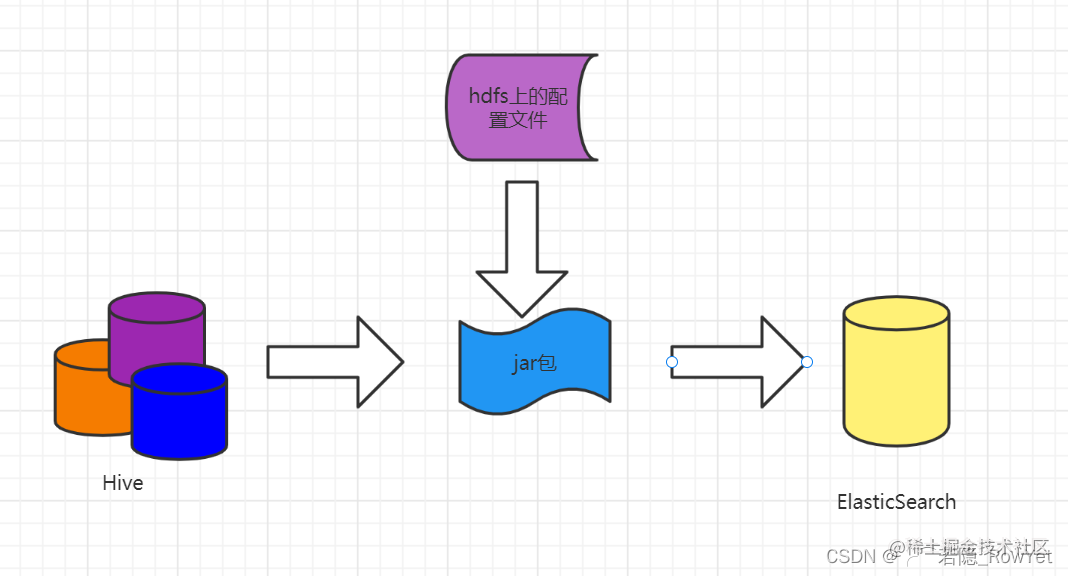
图1 参数化数据链路图
ElasticSearch是可以配置用户名,密码认证的,特别是云产品,公司如果买的ElasticSearch的云服务,那必然是带用户名密码认证的,即当你访问你的ES时,默认一般是9200端口时会弹出如图2的提示,需要你填写用户名密码;
图2 访问ES时提示需要用户名密码
==解决方案==
==ping通ES的机器==
在你要访问的源机器ping通需要目标端的es机器ip,ping不通,找网管;
==telnet通ES的机器的端口==
在你要访问的源机器telnet通需要目标端的es机器ip和端口,telnet不通,找网管;
==拿到用户名和密码==
既然是用户名和密码认证,当然需要向管理员拿到账号和密码,拿到用户名和密码后,先去测试下该用户名能否登陆es,并且能否读写权限,读写,创建index(非必要),可以在
kibana
上验证,认证访问,最好在你跑程序的地方,跑一下RESTFul风格的代码,如下(linux环境shell命令行内直接跑);
# 用户名密码有转移字符,记得前面加\转移,如abc!123,写成abc\!123
# 用户名密码有转移字符,记得前面加\转移,如abc!123,写成abc\!123
# 用户名密码有转移字符,记得前面加\转移,如abc!123,写成abc\!123
curl -k -u user:password -XGET http://es-ip:9200/your_index/_search
windows cmd下:
# 注意用户名密码后面是@符号,用户名密码有转译字符可不转译,别乱搞
# 注意用户名密码后面是@符号,用户名密码有转译字符可不转译,别乱搞
# 注意用户名密码后面是@符号,用户名密码有转译字符可不转译,别乱搞
curl "http://user:password@es-ip:9200/your_index/_search"
如果能获取到数据,说明网络,账号一切都Ok,加上kibana能读写index,说明权限Ok,否则,哪一环出了问题去找到相关的人员解决,准备工作都Ok了,再去写代码,不然代码一直报错,让你怀疑人生;
==项目树==
总体项目树图谱如图1所示,编程软件:IntelliJ IDEA 2019.3 x64,采用Maven架构;
/LXWalaz1s1s/13037253)
feign:连接ES和Spark客户端相关的Java类;
utils:操作ES和Spark相关的Java类;
resources:日志log的配置类;
pom.xml:Maven配置文件;
图1 项目树图谱
==Maven配置文件pox.xml==
该项目使用到的Maven依赖包存在pom.xml上,具体如下所示;.
<?xml version="1.0" encoding="UTF-8"?>
<?xml version="1.0" encoding="UTF-8"?>
<project xmlns="http://maven.apache.org/POM/4.0.0" xmlns:xsi="http://www.w3.org/2001/XMLSchema-instance"
xsi:schemaLocation="http://maven.apache.org/POM/4.0.0 http://maven.apache.org/xsd/maven-4.0.0.xsd">
<modelVersion>4.0.0</modelVersion>
<groupId>org.example</groupId>
<artifactId>SparkOnHiveToEs_buildinginfo_v1</artifactId>
<version>1.0-SNAPSHOT</version>
<name>SparkOnHiveToEs_buildinginfo_v1</name>
<url>http://www.example.com</url>
<properties>
<project.build.sourceEncoding>UTF-8</project.build.sourceEncoding>
<maven.compiler.source>1.7</maven.compiler.source>
<maven.compiler.target>1.7</maven.compiler.target>
</properties>
<dependencies>
<dependency>
<groupId>junit</groupId>
<artifactId>junit</artifactId>
<version>4.11</version>
<scope>test</scope>
</dependency>
<dependency>
<groupId>org.elasticsearch</groupId>
<artifactId>elasticsearch</artifactId>
<version>7.7.1</version>
</dependency>
<dependency>
<groupId>org.elasticsearch.client</groupId>
<artifactId>elasticsearch-rest-high-level-client</artifactId>
<version>7.7.1</version>
</dependency>
<dependency>
<groupId>junit</groupId>
<artifactId>junit</artifactId>
<version>4.12</version>
<scope>test</scope>
</dependency>
<dependency>
<groupId>org.projectlombok</groupId>
<artifactId>lombok</artifactId>
<version>1.18.12</version>
<scope>provided</scope>
</dependency>
<dependency>
<groupId>org.testng</groupId>
<artifactId>testng</artifactId>
<version>RELEASE</version>
<scope>compile</scope>
</dependency>
<dependency>
<groupId>com.fasterxml.jackson.core</groupId>
<artifactId>jackson-databind</artifactId>
<version>2.11.0</version>
</dependency>
<dependency>
<groupId>org.elasticsearch</groupId>
<artifactId>elasticsearch-hadoop</artifactId>
<version>7.7.1</version>
</dependency>
<dependency>
<groupId>org.elasticsearch</groupId>
<artifactId>elasticsearch-spark-20_2.11</artifactId>
<version>7.7.1</version>
</dependency>
<dependency>
<groupId>org.apache.spark</groupId>
<artifactId>spark-core_2.11</artifactId>
<version>2.3.3</version>
</dependency>
<dependency>
<groupId>org.apache.spark</groupId>
<artifactId>spark-sql_2.11</artifactId>
<version>2.3.3</version>
</dependency>
<dependency>
<groupId>org.apache.spark</groupId>
<artifactId>spark-hive_2.11</artifactId>
<version>2.3.3</version>
<scope>compile</scope>
</dependency>
<dependency>
<groupId>junit</groupId>
<artifactId>junit</artifactId>
<version>4.12</version>
<scope>compile</scope>
</dependency>
<dependency>
<groupId>
org.apache.logging.log4j</groupId>
<artifactId>log4j-core</artifactId>
<version>2.9.1</version>
</dependency>
<dependency>
<groupId>org.apache.logging.log4j</groupId>
<artifactId>log4j-api</artifactId>
<version>2.9.1</version>
</dependency>
<dependency>
<groupId>dom4j</groupId>
<artifactId>dom4j</artifactId>
<version>1.6.1</version>
</dependency>
<dependency>
<groupId>org.apache.hadoop</groupId>
<artifactId>hadoop-common</artifactId>
<version>2.8.5</version>
</dependency>
<dependency>
<groupId>org.apache.hadoop</groupId>
<artifactId>hadoop-hdfs</artifactId>
<version>2.8.5</version>
</dependency>
<dependency>
<groupId>org.apache.hadoop</groupId>
<artifactId>hadoop-client</artifactId>
<version>2.8.5</version>
</dependency>
</dependencies>
<build>
<plugins>
<plugin>
<groupId>org.scala-tools</groupId>
<artifactId>maven-scala-plugin</artifactId>
<version>2.15.2</version>
<executions>
<execution>
<goals>
<goal>compile</goal>
<goal>testCompile</goal>
</goals>
</execution>
</executions>
</plugin>
<plugin>
<artifactId>maven-assembly-plugin</artifactId>
<version>2.4</version>
<configuration>
<descriptorRefs>
<descriptorRef>jar-with-dependencies</descriptorRef>
</descriptorRefs>
<archive>
<manifest>
<mainClass>com.bjsxt.scalaspark.core.examples.ExecuteLinuxShell</mainClass>
</manifest>
</archive>
</configuration>
<executions>
<execution>
<id>make-assembly</id>
<phase>package</phase>
<goals>
<goal>assembly</goal>
</goals>
</execution>
</executions>
</plugin>
</plugins>
</build>
</project>
==日志配置文件==
最终这个Job是需要给spark-submit调用的,所以希望有一些有用关键的信息可以通过日志输出,而不是采用System,out.println的形式输出到console端,所以要用到log.info("关键内容信息")方法,所以设置两个log的配置信息,如,只输出bug,不输出warn等,可以根据自己需求来配置,具体两个log配置文件内容如下;
log4j.properties配置如下;
log4j.rootLogger=INFO, stdout, R
log4j.appender.stdout=org.apache.log4j.ConsoleAppender
log4j.appender.stdout.layout=org.apache.log4j.PatternLayout
log4j.appender.stdout.layout.ConversionPattern=%5p - %m%n
log4j.appender.R=org.apache.log4j.RollingFileAppender
log4j.appender.R.File=firestorm.log
log4j.appender.R.MaxFileSize=100KB
log4j.appender.R.MaxBackupIndex=1
log4j.appender.R.layout=org.apache.log4j.PatternLayout
log4j.appender.R.layout.ConversionPattern=%p %t %c - %m%n
log4j.logger.com.codefutures=INFO
log4j2.xml配置如下;
<?xml version="1.0" encoding="UTF-8"?>
<Configuration status="warn">
<Appenders>
<Console name="Console" target="SYSTEM_OUT">
<PatternLayout pattern="%m%n" />
</Console>
</Appenders>
<Loggers>
<Root level="INFO">
<AppenderRef ref="Console" />
</Root>
</Loggers>
</Configuration>
==读取hdfs配置文件==
注意配置是存在hdfs上的,当然读者也可以根据自己需求存在不同的文件系统内,因为存在hdfs文件系统,所以要遵循hdfs文件系统的IO流,具体参看一下PropertiesUtils.java
package cn.focusmedia.esapp.utils;
import org.apache.hadoop.conf.Configuration;
import org.apache.hadoop.fs.FSDataInputStream;
import org.apache.hadoop.fs.FileSystem;
import org.apache.hadoop.fs.Path;
import org.dom4j.Document;
import org.dom4j.DocumentException;
import org.dom4j.Element;
import org.dom4j.io.SAXReader;
import java.io.*;
import java.util.Iterator;
import java.util.Properties;
public class PropertiesUtils {
public static String getProperties(String filePath,String key)
Configuration conf = new Configuration();
FileSystem fs=null;
Properties prop =new Properties();
try {
fs= FileSystem.get(conf);
} catch (IOException e) {
e.printStackTrace();
Path path = new Path(filePath);
FSDataInputStream inputStream=null;
try {
inputStream = fs.open(path);
prop.load(inputStream);
} catch (IOException e) {
e.printStackTrace();
return prop.getProperty(key);
public static String getXML(String filePath,String key)
Configuration conf = new Configuration();
FileSystem fs=null;
try {
fs= FileSystem.get(conf);
} catch (IOException e) {
e.printStackTrace();
Path path = new Path(filePath);
FSDataInputStream inputStream=null;
try {
inputStream = fs.open(path);
} catch (IOException e) {
e.printStackTrace();
File file=new File(filePath);
SAXReader reader=new SAXReader();
String myValue = null;
try {
Document doc=reader.read(inputStream);
Element root = doc.getRootElement();
Element foo;
for (Iterator i = root.elementIterator("VALUE"); i.hasNext();) {
foo = (Element) i.next();
myValue= foo.elementText(key);
} catch (DocumentException e) {
e.printStackTrace();
return myValue;
==连接Spark的客户端==
程序最终选择在yarn上跑,所以这一块可以选择忽略。
==连接ElasticSearch的客户端==
将ES的连接信息配置文件存在hdfs的/app/hive_to_es/configure/prod_es_connection.properties,内容如下,用户名密码可以配进去,但是没必要,因为毕竟hdfs文件系统,安全性不高,博主用户名密码是写死在程序内。
#ElasticSearch Connection
node_num=3
node1=10.218.10.22
node2=10.218.10.21
node3=10.218.10.20
port=9200
要想操作ES,首先需要配置连接ES的客户端,具体代码如下的EsClient.java文件;
package cn.focusmedia.esapp.feign;
import cn.focusmedia.esapp.utils.PropertiesUtils;
import org.apache.http.HttpHost;
import lombok.extern.slf4j.Slf4j;
import org.apache.http.auth.AuthScope;
import org.apache.http.auth.UsernamePasswordCredentials;
import org.apache.http.client.CredentialsProvider;
import
org.apache.http.impl.client.BasicCredentialsProvider;
import org.apache.http.impl.nio.client.HttpAsyncClientBuilder;
import org.elasticsearch.action.get.GetRequest;
import org.elasticsearch.action.get.GetResponse;
import org.elasticsearch.client.RequestOptions;
import org.elasticsearch.client.RestClient;
import org.elasticsearch.client.RestClientBuilder;
import org.elasticsearch.client.RestHighLevelClient;
import org.junit.Test;
import java.io.IOException;
@Slf4j
public class EsClient
public static RestHighLevelClient getClient()
int num=Integer.parseInt(PropertiesUtils.getProperties("/app/hive_to_es/configure/prod_es_connection.properties", "node_num"));
int port=Integer.parseInt(PropertiesUtils.getProperties("/app/hive_to_es/configure/prod_es_connection.properties","port"));
HttpHost[] myHttpHost = new HttpHost[num];
for(int i=1;i<=num;i++)
myHttpHost[i-1]=new HttpHost(PropertiesUtils.getProperties("/app/hive_to_es/configure/prod_es_connection.properties","node"+i),port);
final CredentialsProvider credentialsProvider = new BasicCredentialsProvider();
credentialsProvider.setCredentials(AuthScope.ANY,
new UsernamePasswordCredentials("test", "test1234"));
RestClientBuilder builder = RestClient.builder(
myHttpHost)
.setHttpClientConfigCallback(new RestClientBuilder.HttpClientConfigCallback() {
@Override
public HttpAsyncClientBuilder customizeHttpClient(
HttpAsyncClientBuilder httpClientBuilder) {
httpClientBuilder.disableAuthCaching();
return httpClientBuilder
.setDefaultCredentialsProvider(credentialsProvider);
RestHighLevelClient myclient=new RestHighLevelClient(builder);
log.info("RestClientUtil intfo create rest high level client successful!");
return myclient;
==Spark将Hive表的数据写入ElasticSearch工具类实现==
Spark将Hive表的数据写入ElasticSearch工具类实现主要在utils/EsUtils.java文件下,我这里比较偷懒,将所有的实现方法都放在这个文件下,大家觉得不爽的话可以自己按需拆分,具体设计的内容如下;
package cn.focusmedia.esapp.utils;
import cn.focusmedia.esapp.feign.EsClient;
import lombok.extern.slf4j.Slf4j;
import org.apache.spark.SparkConf;
import org.apache.spark.sql.Dataset;
import org.apache.spark.sql.Row;
import org.apache.spark.sql.SparkSession;
import org.elasticsearch.action.admin.indices.alias.IndicesAliasesRequest;
import org.elasticsearch.action.admin.indices.alias.get.GetAliasesRequest;
import org.elasticsearch.action.admin.indices.delete.DeleteIndexRequest;
import org.elasticsearch.action.admin.indices.flush.FlushRequest;
import org.elasticsearch.action.admin.indices.flush.FlushResponse;
import org.elasticsearch.action.support.master.AcknowledgedResponse;
import org.elasticsearch.client.GetAliasesResponse;
import org.elasticsearch.client.RequestOptions;
import org.elasticsearch.client.RestHighLevelClient;
import org.elasticsearch.client.indices.CreateIndexRequest;
import org.elasticsearch.client.indices.CreateIndexResponse;
import org.elasticsearch.client.indices.DeleteAliasRequest;
import org.elasticsearch.client.indices.GetIndexRequest;
import org.elasticsearch.common.xcontent.XContentType;
import org.elasticsearch.spark.sql.api.java.JavaEsSparkSQL;
import org.junit.Test;
import java.io.IOException;
@Slf4j
public class EsUtils
static RestHighLevelClient myClient= EsClient.getClient();
@Test
public static boolean exsitsIndex(String index) throws IOException
GetIndexRequest myrequest=new GetIndexRequest(index);
boolean myresult = myClient.indices().exists(myrequest, RequestOptions.DEFAULT);
log.info("The index:"+index+" is exist? :"+myresult);
return myresult;
@Test
public static CreateIndexResponse creatIndex(String index,String index_mapping) throws IOException
log.info("The index name will be created : "+index);
CreateIndexRequest myrequest = new CreateIndexRequest(index).source(index_mapping, XContentType.JSON);
CreateIndexResponse myCreateIndexResponse=myClient.indices().create(myrequest, RequestOptions.DEFAULT);
log.info("The index : "+index+" was created response is "+ myCreateIndexResponse.isAcknowledged());
return myCreateIndexResponse;
@Test
public static AcknowledgedResponse deleteIndex(String index) throws IOException {
DeleteIndexRequest myDeleteIndexRequest = new DeleteIndexRequest();
myDeleteIndexRequest.indices(index);
AcknowledgedResponse myAcknowledgedResponse = myClient.indices().delete(myDeleteIndexRequest,RequestOptions.DEFAULT);
log.info("The index :"+index+"create response is "+myAcknowledgedResponse.isAcknowledged());
return myAcknowledgedResponse;
public static void tableToEs(String index,String index_auto_create,String es_mapping_id,String table_name,String es_nodes)
SparkConf conf=new SparkConf().setMaster("yarn").setAppName("SparkToES");
conf.set("es.nodes",es_nodes);
conf.set("es.net.http.auth.user" ,"test");
conf.set("es.net.http.auth.pass","test1234");
conf.set("es.nodes.wan.only","true");
conf.set("es.nodes.discovery","false");
conf.set("es.index.auto.create",index_auto_create);
conf.set("es.resource",index);
conf.set("es_mapping_id",es_mapping_id);
SparkSession spark = SparkSession
.builder()
.config(conf)
.appName("SparkToES")
.enableHiveSupport()
.config("spark.sql.hive.convertMetastoreParquet", false)
.getOrCreate();
Dataset<Row> table = spark.sql(""+table_name+"").repartition(60);
JavaEsSparkSQL.saveToEs(table,index);
log.info("Spark data from hive to ES index: "+index+" is over,go to alias index! ");
spark.stop();
public static void tableToEs(String index,String index_auto_create,String table_name,String es_nodes)
SparkConf conf=new SparkConf().setMaster("yarn").setAppName("SparkToES");
conf.set("es.nodes",es_nodes);
conf.set("es.net.http.auth.user" ,"test");
conf.set("es.net.http.auth.pass","test1234");
conf.set("es.nodes.wan.only","true");
conf.set("es.nodes.discovery","false");
conf.set("es.index.auto.create",index_auto_create);
conf.set("es.resource",index);
SparkSession spark = SparkSession
.builder()
.config(conf)
.appName("SparkToES")
.enableHiveSupport()
.config("spark.sql.hive.convertMetastoreParquet", false)
.getOrCreate();
Dataset<Row> table = spark.sql(""+table_name+"").repartition(60);
JavaEsSparkSQL.saveToEs(table,index);
log.info("Spark data from hive to ES index: "+index+" is over,go to alias index! ");
spark.stop();
public static void flushIndex(String index) throws IOException
FlushRequest myFlushRequest =new FlushRequest(index);
FlushResponse myFlushResponse=myClient.indices().flush(myFlushRequest,RequestOptions.DEFAULT);
int totalShards =myFlushResponse.getTotalShards();
log.info("index: "+index+" has"+ totalShards +"flush over! ");
public static String getAlias(String alias) throws Exception
GetAliasesRequest requestWithAlias = new GetAliasesRequest(alias);
GetAliasesResponse response = myClient.indices().getAlias(requestWithAlias, RequestOptions.DEFAULT);
String AliasesString = response.getAliases().toString();
String alias_index_name = null;
alias_index_name = AliasesString.substring(AliasesString.indexOf("{") + 1, AliasesString.indexOf("="));
catch (Exception e)
throw new Exception("your index do not has alias,please create a alias for you index!");
return alias_index_name;
public static void indexUpdateAlias(String index,String index_alias) throws Exception
String old_index_name=EsUtils.getAlias(index_alias);
log.info(index_alias+ " old index is "+old_index_name);
DeleteAliasRequest myDeleteAliasRequest = new DeleteAliasRequest(old_index_name, index_alias);
org.elasticsearch.client.core.AcknowledgedResponse myDeleteResponse=myClient.indices().deleteAlias(myDeleteAliasRequest, RequestOptions.DEFAULT);
boolean deletealisaacknowledged = myDeleteResponse.isAcknowledged();
log.info("delete index successfully? " + deletealisaacknowledged);
IndicesAliasesRequest request = new IndicesAliasesRequest();
IndicesAliasesRequest.AliasActions aliasAction = new IndicesAliasesRequest.AliasActions(IndicesAliasesRequest.AliasActions.Type.ADD).index(index).alias(index_alias);
request.addAliasAction(aliasAction);
org.elasticsearch.action.support.master.AcknowledgedResponse indicesAliasesResponse = myClient.indices().updateAliases(request, RequestOptions.DEFAULT);
boolean createaliasacknowledged = indicesAliasesResponse.isAcknowledged();
log.info("create index successfully? "+createaliasacknowledged);
String now_index=EsUtils.getAlias(index_alias);
log.info(index_alias+ " now index is "+now_index);
if(now_index.equals(index))
log.info("index: "+index+ " alias update successfully!");
public static void indexUAddAlias(String index,String index_alias) throws Exception
IndicesAliasesRequest request = new IndicesAliasesRequest();
IndicesAliasesRequest.AliasActions aliasAction = new IndicesAliasesRequest.AliasActions(IndicesAliasesRequest.AliasActions.Type.ADD).index(index).alias(index_alias);
request.addAliasAction(aliasAction);
org.elasticsearch.action.support.master.AcknowledgedResponse indicesAliasesResponse = myClient.indices().updateAliases(request, RequestOptions.DEFAULT);
boolean createaliasacknowledged = indicesAliasesResponse.isAcknowledged();
log.info("create index alias successfully? "+createaliasacknowledged);
String now_index=EsUtils.getAlias(index_alias);
log.info(index_alias+ " now index is "+now_index);
if(now_index.equals(index))
log.info("index: "+index+ " alias create successfully!");
==主函数调用工具类实现整体功能==
主函数的实现的 功能顺序下所示;
spark导入数据
flush下新的index数据
获取目前的索引别名对应的索引名字,该索引名马上要失效
替换最新数据别名
确认别名成功切换后清除老的索引
如果4步失败,说明是因为还没有建立起indexalias导致的,需要重建indexalias。
注意,这里抽取Hive的哪张表,在ES建索引的名称,别名,index表结构要求等等做成xml存入hdfs,博主存在/app/hive_to_es/configure下,配置文件举例如dw_ads_resource_amap_city_district.xml;
index:你要建ES的索引名;
index_alias:你要建ES的索引别名;
index_auto_create:ES主键_id是否自动生成,如果写true表示自动生成,如果是false,则还需要补一个hive表内的唯一键作为es的主键_id,如下的客户表
<index_auto_create>false</index_auto_create>
<es_mapping_id>custom_id</es_mapping_id>
sql_script:spark取数语句;
index_mapping:ES的index结构,类似建表语句要求。
<configurations>
<VALUE>
<index>dw_sat_rs_amap_city_district</index>
<index_alias>dw_sat_rs_amap_city_district_v0</index_alias>
<index_auto_create>true</index_auto_create>
<sql_script>select * from ads.ads_resource_amap_city_district_d</sql_script>
<index_mapping>
"settings":{
"number_of_replicas":2,
"number_of_shards":1,
"max_result_window":1000000
"mappings":{
"properties":{
"amap_province_code":{
"type":"keyword"
"amap_province_name":{
"type":"keyword"
"amap_city_code":{
"type":"keyword"
"amap_city_name":{
"type":"keyword"
"amap_district_code":{
"type":"keyword"
"amap_district_name":{
"type":"keyword"
"dept_type_name":{
"type":"keyword"
"shops":{
"type":"integer"
"event_day":{
"type":"keyword"
</index_mapping>
</VALUE>
</configurations>
注意:以上配置文件的hdfs全路径,作为以下主函数jar包的参数,具体调用还是回到主函数内,代码如下的app.java文件;
package cn.focusmedia.esapp;
import cn.focusmedia.esapp.utils.EsUtils;
import cn.focusmedia.esapp.utils.PropertiesUtils;
import lombok.extern.slf4j.Slf4j;
import java.io.IOException;
* Hello world!
@Slf4j
public class App
public static void main( String[] args ) throws Exception
String index=PropertiesUtils.getXML(args[0],"index")+ System.currentTimeMillis();
log.info("index:"+index);
String index_alias=PropertiesUtils.getXML(args[0],"index_alias");
log.info("index_alias:"+index_alias);
String index_mapping=PropertiesUtils.getXML(args[0],"index_mapping");
log.info("index_mapping:"+index_mapping);
String index_auto_create=PropertiesUtils.getXML(args[0],"index_auto_create");
log.info("index_auto_create:"+index_auto_create);
String es_mapping_id =PropertiesUtils.getXML(args[0],"es_mapping_id");
log.info("es_mapping_id:"+es_mapping_id);
String table_name=null;
table_name=PropertiesUtils.getXML(args[0],"sql_script");
table_name=table_name.replaceAll("[\\t\\n\\r]"," ");
log.info("table_name:"+table_name);
int num=Integer.parseInt(PropertiesUtils.getProperties("/app/hive_to_es/configure/prod_es_connection.properties", "node_num"));
int port=Integer.parseInt(PropertiesUtils.getProperties("/app/hive_to_es/configure/prod_es_connection.properties","port"));
StringBuilder my_es_nodes=new StringBuilder("");
for(int i=1;i<=num;i++)
my_es_nodes.append(PropertiesUtils.getProperties("/app/hive_to_es/configure/prod_es_connection.properties","node"+i)+":"+port+",");
String es_nodes= my_es_nodes.substring(0,my_es_nodes.length()-1);
log.info("es_nodes:"+es_nodes);
if(EsUtils.exsitsIndex(index))
EsUtils.deleteIndex(index);
EsUtils.creatIndex(index,index_mapping);
if(!Boolean.parseBoolean(index_auto_create))
EsUtils.tableToEs(index,index_auto_create,es_mapping_id,table_name,es_nodes);
}else
EsUtils.tableToEs(index,index_auto_create,table_name,es_nodes);
EsUtils.flushIndex(index);
try {
String old_index=EsUtils.getAlias(index_alias);
EsUtils.indexUpdateAlias(index,index_alias);
EsUtils.deleteIndex(old_index);
catch (Exception e)
e.printStackTrace();
log.info("no old index alias,create new index alias");
EsUtils.indexUAddAlias(index,index_alias);
==打成Jar包并部署==
将调试无误的项目打成Jar包,如果还不会打Jar包,可以参考博客IntelliJ IDEA将代码打成Jar包的方式,这里我打成的Jar包名字为SparkOnHiveToEs_PROD.jar;
将SparkOnHiveToEs_PROD.jar上传到hdfs的/app/hive_to_es/etl_jar/SparkOnHiveToEs_PROD.jar路径下,然后写一个spark-submit调用的shell脚本spark_on_hive_and_es.sh,具体如下:
#!/bin/bash
cur_dir=`pwd`
spark-submit --master yarn --deploy-mode cluster --executor-memory 8G --executor-cores 5 --num-executors 4 --queue etl --conf spark.kryoserializer.buffer.max=256m --conf spark.kryoserializer.buffer=64m --class cn.focusmedia.esapp.App hdfs://my-cluster/app/hive_to_es/etl_jar/SparkOnHiveToEs_PROD.jar hdfs://my-cluster/app/hive_to_es/configure/dw_ads_resource_amap_city_district.xml
dq_check_flag=$?
if [ $dq_check_flag -eq 0 ];then
echo "city and district frome hive to es has successed!"
echo "city and district frome hive to es has failed!"
# cd ${cur_dir}/../src/ding_talk_warning_report_py/main/
# python3 ding_talk_with_agency.py 411 此处为报错后钉钉报警,可以参考博主python栏的钉钉报警的实现
exit 3
最后就是将这个spark_on_hive_and_es.sh脚本调度起来,如用Azkaban调度,设置自己需求的调度频率;
==总 结==
采用Spark将Hive表的数据写入ElasticSearch,速度较快,可以作为离线数据从数据仓库Hive写入ElasticSearch的首席参考方案,稳定,无缝连接,且快速;至于丢失的一环,如何校验Hive的数据是否准确的通过Spark写入了ES,请参考本文的目录的文章3;
如此一来,新增一张表,只需要填写一个xml文件,非常方便。
- 4434
-
若隐_RowYet_大数据
Apache
- 3398
-
若隐_RowYet_大数据
Apache Hive
- 2121
-
若隐_RowYet_大数据
Python
- 590
-
若隐_RowYet_大数据
Apache Hive
- 415
-
若隐_RowYet_大数据
Apache Hive
- 333
-
若隐_RowYet_大数据
Apache Hive
- 313
-
若隐_RowYet_大数据
Apache Hive
- 308
-
若隐_RowYet_大数据
Elasticsearch
- 379
-
Elasticsearch
Elasticsearch