富文本编辑器进阶使用
最近,自己想用vue 做一个商品详情编辑器, 选择技术方案如下:
样式与UI不符合 并且还要后端配合 加载速度比较慢
文档全英文 (CKEditor4的文档比CKEditor5的文档全面一点) 看了半天也没搞清楚怎么扩展
加载速度快,文档全中文,但是功能不够全面
全英文文档 稍微体验了一下 无法评价
这个就是我最终选中的编辑器,在此 记录下开发流程
1.引入到vue项目中
npm install @tinymce/tinymce-vue --save
npm install tinymce --save
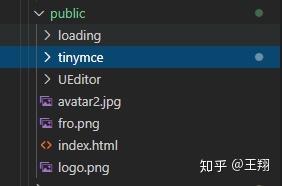
2.文本编辑器本地化 (官网上面的例子都是通过 api-key 的方式去引用js 如果没有网络连接,可能会无法引用,作者使用 vue-cli3 搭建的 如果使用vue-cli2 的 )

tinymce包 在 node_modules/tinymce 拷贝下来的 如下图

拷贝完后 还要到官网上去找语言包 最终目录如下

好了,前期的准备工作完成了,接下该在页面中使用了
代码如下:
<template>
  <div class="editor">
    <editor :init="init" ref="editor" :tinymce-script-src="tinymceScriptSrc" @onInit="onReady"/>
    <!-- <textarea id="tinymceEl" ref="tinymceRef"></textarea> -->
</template>
<script>
import Editor from '@tinymce/tinymce-vue'
export default {
  components: { Editor, PhotoAlbum },
  name: 'CkEditor',
  props: {
    baseUrl: {
      type: String,
      default: process.env.BASE_URL
  data () {
    return {
      visible: false,
      editor: null,
      tinymceScriptSrc: '/tinymce/tinymce.min.js',//本地的tinymce文件地址
      init: {
        height: 500,
        menubar: false,
        resize: false, // 调整编辑器大小工具 true(仅允许改变高度), false(完全不让你动), 'both'(宽高都能改变,注意引号)
        statusbar: true, // 显示隐藏状态栏 状态栏指的是编辑器最底下、左侧显示dom信息、右侧显示Tiny版权链接和调整大小的那一条。默认是显示的,设为false可将其隐藏。
        branding: false, // 隐藏右下角技术支持
        toolbar: 'code bullist numlist emoticons charmap hr insertdatetime link | help fullscreen image',
        language: 'zh_CN',
        language_url: '/tinymce/langs/zh_CN.js',
        theme: 'silver',
        theme_url: '/tinymce/themes/silver/theme.min.js',
        base_url: '/tinymce',
        suffix: '.min',
        plugins: 'image,wordcount,charmap,code,hr,lists,advlist,emoticons,fullscreen,help,insertdatetime,link',
        setup: function (editor) {
  mounted () {
    var that = this
    this.init.clickImage = function (editor) {
      that.visible = true
  methods: {
    onReady (e) {
      this.editor = e.target
</script>
总算成功的引入了,接下来就要开发自己的组件了
功能:
1.导入图片, 作者不想使用自带的图片上传插件 如图:

比较难用, 自己撸
先阅读一下插件的源码

发现就是ui.registry.addButton 和 .ui.registry.addMenuItem 这两个方法注册插件的
onAction 就是点击事件触发器 怎么触发事件 直接打印 tinymce 全局 发现我们自定义的参数也可以在 tinymce.settings中找到 ojbk 找到解决方案了 直接在onAction中 去调用tinymce.settings中的回调函数 不就行了吗
最终实现效果

点击图片选择弹出自己写的弹窗组件
饶了一大圈 终于可以自由的开发 tinymce 组件, 想咋玩就咋玩呀
最终代码如下
!(function () {
  'use strict'
  var e = tinymce.util.Tools.resolve('tinymce.PluginManager')
  var o = function (o) {
    var e = o.getContent({
      source_view: !0
    o.windowManager.open({
      title: 'Source Code',
      size: 'large',
      body: {
        type: 'panel',
        items: [{
          type: 'textarea',
          name: 'code'
      buttons: [{
        type: 'cancel',
        name: 'cancel',
        text: 'Cancel'
        type: 'submit',
        name: 'save',
        text: 'Save',
        primary: !0
      initialData: {
        code: e
      onSubmit: function (e) {
        var t, n
        t = o,
        n = e.getData().code,
        t.focus(),
        t.undoManager.transact(function () {
          t.setContent(n)
        t.selection.setCursorLocation(),
        t.nodeChanged(),
        e.close()
  !(function t () {
    e.add('imageUpload', function (e) {
      var t, n
      return (t = e).addCommand('InsertImageUpload', function (e) {
        if (Array.isArray(e) && e.length > 0) {
          var html = ''
          for (var i in e) {
            var obj = e[i]
            html += '<img src="' + obj + '" class="image" /><br />'
            if (i < e.length - 1) {
              html += '<br />'
          t.execCommand('mceInsertContent', false, html)
      (n = e).ui.registry.addButton('imageUpload', {
        icon: 'image',
        tooltip: 'Insert/edit image',
        onAction: function () {
          if (typeof n.settings.clickImage === 'function') {
            return n.settings.clickImage(n)
          return null
      n.ui.registry.addMenuItem('imageUpload', {
        icon: 'image',
        text: 'Insert/edit image',
        onAction: function () {
          if (typeof n.settings.clickImage === 'function') {
            return n.settings.clickImage(n)
          return null
插件js /tinymce/plugins/imageUpload.js
<template>
  <div class="editor">
    <editor :init="init" ref="editor" :tinymce-script-src="tinymceScriptSrc" @onInit="onReady"/>
    <!-- <textarea id="tinymceEl" ref="tinymceRef"></textarea> -->
    <!-- 自定义弹窗组件 -->
    <photo-album :visible.sync="visible" @confirm="confirm"></photo-album>
</template>
<script>
import Editor from '@tinymce/tinymce-vue'
import PhotoAlbum from '@/components/photoAlbum/src/album.vue'
export default {
  components: { Editor, PhotoAlbum },
  name: 'CkEditor',
  props: {
    baseUrl: {
      type: String,
      default: process.env.BASE_URL
  data () {
    return {
      visible: false,
      editor: null,
      tinymceScriptSrc: '/tinymce/tinymce.min.js',
      init: {
        height: 500,
        menubar: false,
        resize: false, // 调整编辑器大小工具 true(仅允许改变高度), false(完全不让你动), 'both'(宽高都能改变,注意引号)
        statusbar: true, // 显示隐藏状态栏 状态栏指的是编辑器最底下、左侧显示dom信息、右侧显示Tiny版权链接和调整大小的那一条。默认是显示的,设为false可将其隐藏。
        branding: false, // 隐藏右下角技术支持
        toolbar: 'code bullist numlist emoticons imageUpload charmap hr insertdatetime link | help fullscreen image',
        language: 'zh_CN',
        language_url: '/tinymce/langs/zh_CN.js',
        // skin_url: '/tinymce/skins/lightgray',
        // skin: 'oxide-dark',
        theme: 'silver',
        theme_url: '/tinymce/themes/silver/theme.min.js',
        base_url: '/tinymce',
        suffix: '.min',
        plugins: 'image,wordcount,charmap,code,hr,lists,advlist,emoticons,fullscreen,help,insertdatetime,link,imageUpload',
        setup: function (editor) {
  mounted () {
    var that = this
    this.init.clickImage = function (editor) {
      that.visible = true
  methods: {
    confirm (img) {
      if (Array.isArray(img) && img.length > 0) {
        img.forEach((item, index) => {
          // 光标放最后?
          this.editor.execCommand('selectAll')
          this.editor.selection.getRng().collapse(false)
          this.editor.focus()
          var html = '<div><img src="' + item + '"/></div>'
          this.editor.insertContent(html)
    onReady (e) {
