LaTeX排版札记:part 4—插入图片(并排显示、自定义编号)
已经到了part 4,相信大多数童鞋已经熟悉了LaTeX排版的环境。所以这次呢,咱们不唠闲嗑,走简洁路线! 语法项的释义和功能都在代码相应位置直接采用注释说明。效率要蹭蹭地向上涨啦~~~
1 常用的图片格式
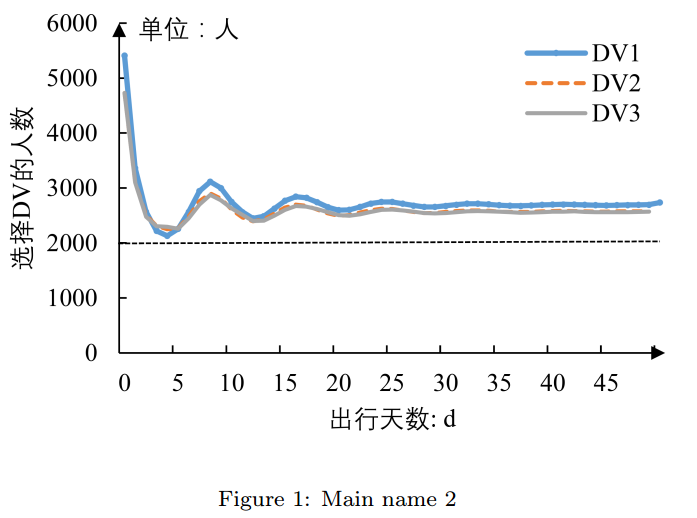
LaTeX插入图片时,常用的图片格式有:png, pdf, jpg, eps。以上四种图片格式各有优劣,其中最为显著的差异是清晰度和图片文件大小。在清晰度方面:eps是清晰度最高的,其次是pdf和png,最后是jpg。在图片的文件大小方面:与清晰度差不多一一对应,图片越清晰文件越大。看图1可感受一下差距.......(0-0)

我比较推荐用pdf格式的图片,清晰度一般是够用的,而且文件较小,当排版多图的长论文时,单个文件过大会很浪费时间。但如果排版有特殊要求,则最好按照要求来选择图片格式。
在正式开始下面的图片插入工作之前,需要注意以下几点:
(1)将要使用的图片文件放在tex文件的同一个文件夹下,确保可以直接查找到文件。
(2)图片命名中不要出现中文字符、不要空格和其他特殊符号,建议只用英文字母、下划线和简单符号。例如,本文中使用的两个图片文件名字分别为:“DV_demand.pdf”, "P+R_demand.pdf"。否则编译时容易出现“找不到文件”,或者其他奇怪的错误。
(3)上面提到的图片格式中:编译png, pdf, jpg用 pdfLaTex,编译eps 用XeLaTex。
(4)若图片格式不是以上四种,或者图片中空白边缘过多,可以用PS进行处理并转存为以上四种格式之一。
2 单图插入的基本用法
%导言区插入下面三行
\usepackage{graphicx} %插入图片的宏包
\usepackage{float} %设置图片浮动位置的宏包
\usepackage{subfigure} %插入多图时用子图显示的宏包
\begin{document}
\begin{figure}[H] %H为当前位置,!htb为忽略美学标准,htbp为浮动图形
\centering %图片居中
\includegraphics[width=0.7\textwidth]{DV_demand} %插入图片,[]中设置图片大小,{}中是图片文件名
\caption{Main name 2} %最终文档中希望显示的图片标题
\label{Fig.main2} %用于文内引用的标签
\end{figure}
\end{document}
编译之后,得到:

3 多图横排+默认编号
%导言区插入下面三行
\usepackage{graphicx}
\usepackage{float}
\usepackage{subfigure}
\begin{document}
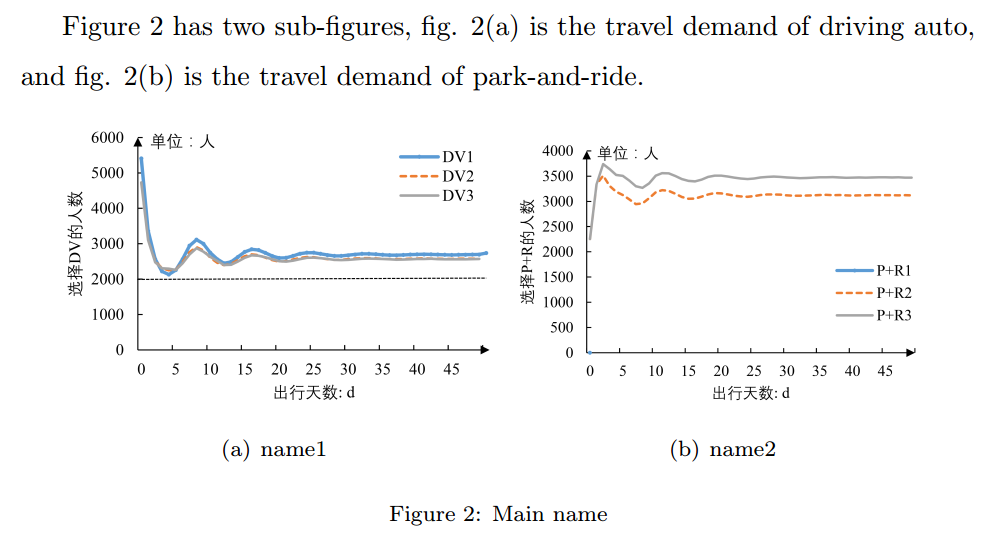
Figure \ref{Fig.main} has two sub figures, fig. \ref{Fig.sub.1} is the travel demand of driving auto, and fig. \ref{Fig.sub.2} is the travel demand of park-and-ride.
\begin{figure}[H]
\centering  %图片全局居中
\subfigure[name1]{
\label{Fig.sub.1}
\includegraphics[width=0.45\textwidth]{DV_demand}}
\subfigure[name2]{
\label{Fig.sub.2}
\includegraphics[width=0.45\textwidth]{P+R_demand}}
\caption{Main name}
\label{Fig.main}
\end{figure}
\end{document}
编译完成后的效果:

4 多图横排+自定义编号
%导言区的此三行无变化
\usepackage{graphicx}
\usepackage{float}
\usepackage{subfigure}
%以下是新增的自定义格式更改
\usepackage[]{caption2} %新增调用的宏包
\renewcommand{\figurename}{Fig.} %重定义编号前缀词
\renewcommand{\captionlabeldelim}{.~} %重定义分隔符
 %\roman是罗马数字编号,\alph是默认的字母编号,\arabic是阿拉伯数字编号,可按需替换下一行的相应位置
\renewcommand{\thesubfigure}{(\roman{subfigure})}%此外,还可设置图编号显示格式,加括号或者不加括号
\makeatletter \renewcommand{\@thesubfigure}{\thesubfigure \space}%子图编号与名称的间隔设置
\renewcommand{\p@subfigure}{} \makeatother
\begin{document}
%注意:此段中在引用中增加了主图编号的引用
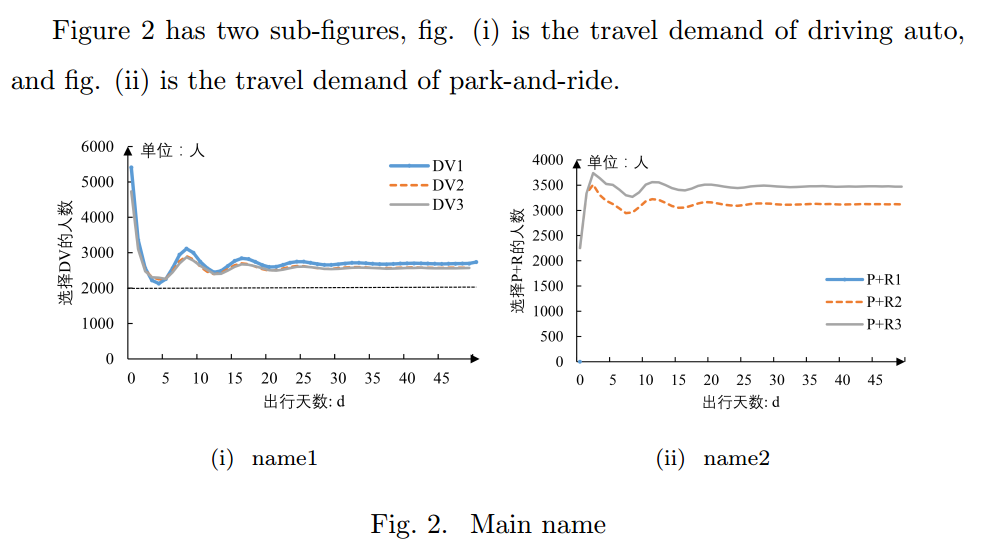
Figure \ref{Fig.main} has two sub-figures, fig. \ref{Fig.main}\ref{Fig.sub.1} is the travel demand of driving auto, and fig. \ref{Fig.main}\ref{Fig.sub.2} is the travel demand of park-and-ride.
%以下code与上一小结的无变化
\begin{figure}[H]
\centering  %图片全局居中
\subfigure[name1]{
\label{Fig.sub.1}
\includegraphics[width=0.45\textwidth]{DV_demand}}
\subfigure[name2]{
\label{Fig.sub.2}
\includegraphics[width=0.45\textwidth]{P+R_demand}}
\caption{Main name}
\label{Fig.main}
\end{figure}
\end{document}
编译后得到:

5 多图并排显示(非子图模式)
%导言区的此三行无变化
\usepackage{graphicx}
\usepackage{float}
%文章如果不涉及子图,以下代码可以删除,本文因需要一起示例排版,就保留了
\usepackage{subfigure}
\usepackage[]{caption2} %新增调用的宏包
\renewcommand{\figurename}{Fig.} %重定义编号前缀词
\renewcommand{\captionlabeldelim}{.~} %重定义分隔符
 %\roman是罗马数字编号,\alph是默认的字母编号,\arabic是阿拉伯数字编号,可按需替换下一行的相应位置
\renewcommand{\thesubfigure}{(\roman{subfigure})}%此外,还可设置图编号显示格式,加括号或者不加括号
\makeatletter \renewcommand{\@thesubfigure}{\thesubfigure \space}%子图编号与名称的间隔设置
\renewcommand{\p@subfigure}{} \makeatother
\begin{document}
\begin{figure}[H]
\centering %图片全局居中
%并排几个图,就要写几个minipage
\begin{minipage}[b]{0.45\textwidth} %所有minipage宽度之和要小于1,否则会自动变成竖排
\centering %图片局部居中
\includegraphics[width=0.8\textwidth]{DV_demand} %此时的图片宽度比例是相对于这个minipage的,不是全局
\caption{name 1}
\label{Fig.1}
\end{minipage}
\begin{minipage}[b]{0.45\textwidth} %所有minipage宽度之和要小于1,否则会自动变成竖排
\centering %图片局部居中
\includegraphics[width=0.8\textwidth]{P+R_demand}%此时的图片宽度比例是相对于这个minipage的,不是全局
\caption{name 2}

