torch.nn.Conv1d
(
in_channels
,
out_channels
,
kernel_size
,
stride=1
,
padding=0
,
dilation=1
,
groups=1
,
bias=True
,
padding_mode=‘zeros’
)
这个函数用来对输入张量做一维卷积
现在我有一个音频的梅尔频谱数据输入,一个batch为十张频谱, 一张频谱大小为129帧, 频率幅度为128,这个张量表示为(10, 128, 129),
import torch.nn as nn
import torch
input = torch.randn(10, 128, 129)
m = nn.Conv1d(128, 128, kernel_size=4, padding=2)
out = m(input)
print(out.size())
可以看出来上面这个函数只在频谱的时域上进行一维卷积,卷积核大小为4帧,在频域上没有卷积.为什么输出是130,反而多了一帧呢?
这是因为这个一维卷积函数
-
Input(batch_size, Channel_input, length_input)
-
Output(batch_size, Channel_output, length_output)
L_{out}=\lfloor\frac{L_{in}+2\times padding-dilation\times(kernel\_size-1)-1}{stride}+1\rfloor=\frac{129+2\times2-1\times(4-1)-1}1+1=130
Lout=⌊strideLin+2×padding−dilation×(kernel_size−1)−1+1⌋=1129+2×2−1×(4−1)−1+1=130
torch.nn.RNN(*args, **kwargs)
这个函数对输入的的sequence施加一个带tanh或者Relu的RNN.对输入的sequence每一个元素,每一层都施加如下计算:
bhh,默认为Truebatch_first: 如果是True,输入和输出张量的形状是{batch,seq,feature}bidirectional: 如果是True,那么是一个双向RNN
输入:input和h_0
- input的形状是{seq_len,batch,input_size},我看大家一般喜欢用{batch,seq_len,input_size}一些
- h_0的形状是(num_layers*num_birections,batch,hidden_size),对batch中每一个元素的初始隐层状态
输出:output,h_n
- output的形状是(seq_len,batch,num_directions*hidden_size),最后一个RNN层的输出特征(h_t)
- h_n的形状是(num_layers*num_birections,batch,hidden_size),t=seq_len时刻的隐层状态
Note:h_n和output的关系:output包括了seq_len中每一个时间点的隐层状态,而h_n是第seq_len时刻的隐层状态,所以output中最后一个元素就是h_n,即output[-1] ==h_n.
下面是一个pytorch中使用RNN通过Sin来预测Cos
import torch
import torch.nn as nn
from torch import optim
import numpy as np
from matplotlib import pyplot as plt
TIME_STEP = 40
INPUT_SIZE = 1
DEVICE = torch.device("cuda" if torch.cuda.is_available() else "cpu")
H_SIZE = 128
EPOCHS=480
h_state = None
class RNN(nn.Module):
def __init__(self):
super(RNN, self).__init__()
self.rnn = nn.RNN(
input_size=INPUT_SIZE,
hidden_size=H_SIZE,
num_layers=1,
batch_first=True,
self.out = nn.Linear(H_SIZE, 1)
def forward(self, x, h_state):
r_out, h_state = self.rnn(x, h_state)
outs = []
for time_step in range(r_out.size(1)):
outs.append(self.out(r_out[:, time_step, :]))
return torch.stack(outs, dim=1), h_state
rnn = RNN().to(DEVICE)
optimizer = torch.optim.Adam(rnn.parameters())
criterion = nn.MSELoss()
rnn.train()
plt.figure(2)
for step in range(0,EPOCHS,2):
start, end = step * np.pi, (step+2)*np.pi
steps = np.linspace(start, end, TIME_STEP, dtype=np.float32)
x_np = np.sin(steps)
y_np = np.cos(steps)
x = torch.from_numpy(x_np[np.newaxis, :, np.newaxis])
y = torch.from_numpy(y_np[np.newaxis, :, np.newaxis])
prediction, h_state = rnn(x, h_state)
h_state = h_state.data
loss = criterion(prediction, y)
optimizer.zero_grad()
loss.backward()
optimizer.step()
if (step)%20==0:
print("EPOCHS: {},Loss:{:4f}".format(step,loss))
plt.plot(steps, y_np.flatten(), 'r-')
plt.plot(steps, prediction.data.numpy().flatten(), 'b-')
plt.draw()
plt.pause(0.01)
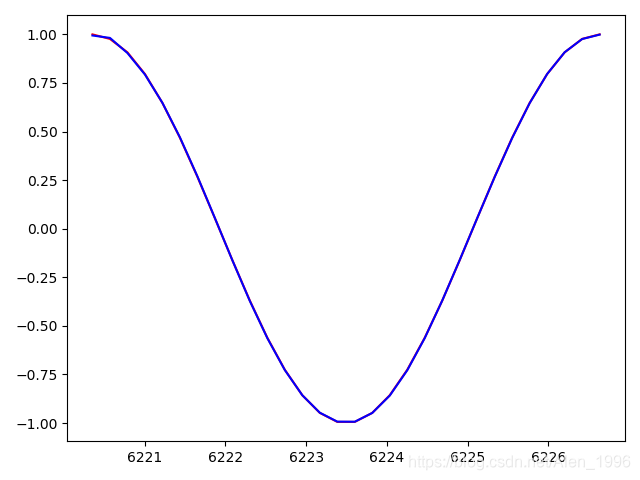
训练到460epoch, loss0.000313,可以看到已经完全拟合了

torch.nn.LSTM(*args, **kwargs)
这个函数对输入的sequence施加一个多层的长短周期记忆RNN.对输入的sequence的每一个元素,每一层都施加如下计算.
σ是sigmoid函数,*是元素乘积
LSTM函数的参数和RNN都是一致的,区别在于输入输出不同,从上面的简图可以看出,LSTM多了一个细胞的状态,所以每一个循环层都增加了一个细胞状态的输出.
输入:input,(h_0,c_0)
input的形状和RNN的一样,都是(seq_len,betch,input_size)
h_0:(num_layers*numpy_directions,batch,hidden_size),对batch中每一个元素的初始隐层状态
c_0:(num_layers*numpy_directions,batch,hidden_size),对batch中的每一个元素的初始细胞状态
输出:output,(h_n,c_n)
output的形状和RNN一样,都是(seq_len,batch,num_directions*hidden_size),最后一个LSTM层的输出特征(h_t)
h_n:(num_layers*numpy_directions,batch,hidden_size),t=seq_len时刻的隐层状态
c_n:(num_layers*numpy_directions,batch,hidden_size),t=seq_len时刻的细胞状态
还是使用LSTM通过Sin来预测Cos
import torch
import torch.nn as nn
from torch import optim
import numpy as np
from matplotlib import pyplot as plt
TIME_STEP = 30
INPUT_SIZE = 1
DEVICE = torch.device("cuda" if torch.cuda.is_available() else "cpu")
H_SIZE = 64
EPOCHS=2000
h_state = None
c_state = None
class RNN(nn.Module):
def __init__(self):
super(RNN, self).__init__()
self.rnn = nn.LSTM(
input_size=INPUT_SIZE,
hidden_size=H_SIZE,
num_layers=1,
batch_first=True,
self.out = nn.Linear(H_SIZE, 1)
def forward(self, x):
r_out, (h_state,c_state) = self.rnn(x)
outs = []
for time_step in range(r_out.size(1)):
outs.append(self.out(r_out[:, time_step, :]))
return torch.stack(outs, dim=1), h_state, c_state
rnn = RNN().to(DEVICE)
optimizer = torch.optim.Adam(rnn.parameters())
criterion = nn.MSELoss()
rnn.train()
plt.figure(2)
for step in range(0,EPOCHS,2):
start, end = step * np.pi, (step+2)*np.pi
steps = np.linspace(start, end, TIME_STEP, dtype=np.float32)
x_np = np.sin(steps)
y_np = np.cos(steps)
x = torch.from_numpy(x_np[np.newaxis, :, np.newaxis])
y = torch.from_numpy(y_np[np.newaxis, :, np.newaxis])
prediction, h_state,c_state = rnn(x)
loss = criterion(prediction, y)
optimizer.zero_grad()
loss.backward()
optimizer.step()
if (step)%20==0:
print("EPOCHS: {},Loss:{:4f}".format(step,loss))
plt.plot(steps, y_np.flatten(), 'r-')
plt.plot(steps, prediction.data.numpy().flatten(), 'b-')
plt.draw()
plt.pause(0.01)
训练到1980epoch, loss0.000004,可以看到已经完全拟合了.

Pytorch中文手册:https://github.com/zergtant/pytorch-handbook/blob/master/chapter3/3.3-rnn.ipynb
一维卷积torch.nn.Conv1d(in_channels, out_channels, kernel_size, stride=1, padding=0, dilation=1, groups=1, bias=True, padding_mode=‘zeros’)这个函数用来对输入张量做一维卷积in_channel和out_channel是卷积核个数kernel_size是卷...
我们首先看这样一条影评
这是一部很棒的电影。你无法想象我第一次看到它时的震惊。天哪!这是我出生以来看过的最好的电影。没有比这更好的了。我相信大多数人会和我保持同样的看法。
其英文翻译为:
It’s such a great movie. You can’t imagine the shock when I saw it for the first time. My God! It’s the be...
结合 CNN 和 RNN 来处理长序列一维CNN在处理顺序敏感问题的弊端一维卷积再处理序列文本的时候,它对时间序列的敏感度不是很强。因为这里通过上面的温度预测的模型来测试。 数据的准备参考前面的文章:深度学习笔记26_RNN网络预测温度模型_数据准备 深度学习笔记27_RNN网络预测温度模型_搭建基准模型# 构建模型
from keras.models import Sequential
from...
使用卷积神经网络处理序列一、可以使用卷积处理序列的原因二、一维卷积神经网络1、一维卷积层Conv1D:2、一维池化MaxPool1D:3、实现一维卷积神经网络
一、可以使用卷积处理序列的原因
前面提到过:
循环神经网络就是一类以序列(sequence)数据为输入,在序列的演进方向进行递归(recursion)且所有节点(循环单元)按链式连接的递归神经网络(recursive neural network)。
LSTM,GRU,BRNN(双向循环神经网络),都是为了将该词与周围的词相关联,而离得太远的词之间的
本文主要讲解了深度学习中常用的激活函数的各种形式以及如何利用 PyTorch 对其进行实现。最后利用学到的激活函数,建立了一个简单的三层神经网络模型。
激活函数及可视化一、激活函数1.Sigmoid函数2.Tanh函数3.ReLU函数二、神经网络的建立
一、激活函数
激活函数是深度学习中一个很重要的概念。在神经网络中,我们经常使用线性运算来解决线性问题。但是日常生活中的大多数问题,都不是简单的线性问题。为此,我们引入了激活函数来解决非线性的问题。
常见的激活函数有 Sigmoid 函数(又名 L
import pylab
from pandas import DataFrame, Series
from keras import models, layers, optimizers, losses, metrics
from keras.model...
对于某些序列处理问题,这种一维卷积神经网络的效果可以媲美RNN,而且计算代价通常要小很多。
一维卷积神经网络在音频生成和机器翻译领域取得了巨大成功。对于文本分类和时间序列预测等简单任务,小型的一维卷积神经网络可以替代RNN,而且速度更快。
那么如何理解一维卷积?
这种一维卷积层可以识别序列中的局部模式,因为对每个序列段执行相同输入变换,所以在句子中某个位置学到的模式稍后可以在其他位置被识别,这使得一维卷积神经网络具有平移不变性。(即在前面的位置判断到一些例如词汇是不好的,在后面遇到同样的不好的词汇
在机器学习中,卷积神经网络是一种深度前馈人工神经网络,已成功地应用于图像识别。 [1]
卷积神经网络,是一种前馈神经网络,人工神经元可以响应周围单元,可以进行大型图像处理。卷积神经网络包括卷积层和池化层。
卷积神经网络包括一维卷积神经网络、二维卷积神经网络以及三维卷积神经网络。一维卷积神经网络常应用于序列类的数据处理;二维卷积神经网络常应用于图像类文本的识别;三...
class ResNet1D(nn.Module):
def __init__(self, in_channels, out_channels, kernel_size, stride, padding):
super(ResNet1D, self).__init__()
self.conv1 = nn.Conv1d(in_channels, out_channels, kernel_size, stride, padding)
self.bn1 = nn.BatchNorm1d(out_channels)
self.relu = nn.ReLU(inplace=True)
self.conv2 = nn.Conv1d(out_channels, out_channels, kernel_size, stride, padding)
self.bn2 = nn.BatchNorm1d(out_channels)
self.stride = stride
self.in_channels = in_channels
self.out_channels = out_channels
self.padding = padding
def forward(self, x):
residual = x
out = self.conv1(x)
out = self.bn1(out)
out = self.relu(out)
out = self.conv2(out)
out = self.bn2(out)
if self.stride != 1 or self.in_channels != self.out_channels:
residual = nn.functional.conv1d(x, self.out_channels, kernel_size=1, stride=self.stride, padding=)
residual = nn.BatchNorm1d(self.out_channels)
out += residual
out = self.relu(out)
return out
这是一个基本的 ResNet1D 类,它包含两个卷积层和一个残差块。在前向传递期间,输入通过第一个卷积层,然后通过批量标准化和 ReLU 激活函数。然后,输出通过第二个卷积层和批量标准化。如果输入和输出通道数不同,或者步幅不为 1,则使用 1x1 卷积层和批量标准化来调整残差。最后,输出通过 ReLU 激活函数并返回。

