

从0开始搭建Flutter条形码二维码扫描插件及应用

Google今年推出了Flutter 2。一套Dart代码可以覆盖桌面,web和移动开发,大大降低跨平台应用开发成本。然而平台相关的逻辑还是需要用相应的本地代码去实现。这篇文章分享如何从0开始,搭建发布Flutter的条形码二维码扫描插件,以及如何使用该插件来实现一个Android的扫码应用。
Flutter安装
参考Flutter中国区安装指南: https:// flutter.dev/community/c hina
Linux, mac配置环境变量:
export PUB_HOSTED_URL=https://pub.flutter-io.cn
 export FLUTTER_STORAGE_BASE_URL=https://storage.flutter-io.cn
Windows在系统设置里添加
PUB_HOSTED_URL
和
FLUTTER_STORAGE_BASE_URL
。
Flutter条形码,二维码SDK插件搭建及发布
创建对应平台的插件模板。这里使用安卓:
flutter create --org com.dynamsoft --template=plugin --platforms=android -a java flutter_barcode_sdk后面要添加iOS可以在当前工程目录里运行:
flutter create --template=plugin --platforms=ios .开发Flutter插件
Dart代码
打开自动生成的
lib/flutter_barcode_sdk.dart
文件。这里面定义插件的API。
创建一个
BarcodeResult
类,用于反序列化Android Java返回的结果数据:
class BarcodeResult {
  final String format;
  final String text;
  final int x1;
  final int y1;
  final int x2;
  final int y2;
  final int x3;
  final int y3;
  final int x4;
  final int y4;
  BarcodeResult(this.format, this.text, this.x1, this.y1, this.x2, this.y2,
      this.x3, this.y3, this.x4, this.y4);
  BarcodeResult.fromJson(Map<dynamic, dynamic> json)
      : format = json['format'],
        text = json['text'],
        x1 = json['x1'],
        y1 = json['y1'],
        x2 = json['x2'],
        y2 = json['y2'],
        x3 = json['x3'],
        y3 = json['y3'],
        x4 = json['x4'],
        y4 = json['y4'];
  Map<String, dynamic> toJson() => {
        'format': format,
        'text': text,
        'x1': x1,
        'y1': y1,
        'x2': x2,
        'y2': y2,
        'x3': x3,
        'y3': y3,
        'x4': x4,
        'y4': y4,
}
创建两个接口。
decodeFile()
用于文件解码,
decodeImageBuffer()
用于图像数据解码。
List<BarcodeResult> _convertResults(List<Map<dynamic, dynamic>> ret) {
return ret.map((data) => BarcodeResult.fromJson(data)).toList();
Future<List<BarcodeResult>> decodeFile(String filename) async {
List<Map<dynamic,
dynamic>> ret = List<Map<dynamic, dynamic>>.from(
await _channel.invokeMethod('decodeFile', {'filename': filename}));
return _convertResults(ret);
Future<List<BarcodeResult>> decodeImageBuffer(
Uint8List bytes, int width, int height, int stride, int format) async {
List<Map<dynamic, dynamic>> ret = List<Map<dynamic, dynamic>>.from(
await _channel.invokeMethod('decodeImageBuffer', {
'bytes': bytes,
'width': width,
'height': height,
'stride': stride,
'format': format
return _convertResults(ret);
}
这里要注意数据类型转换的问题。在Java层定义的
List<Map<String, Object>>
类型是不能直接返回给Dart的
List<Map<dynamic, dynamic>>
类型的。需要使用
List<Map<dynamic, dynamic>>.from()
来转换。另外,使用
map
把
List<Map<dynamic, dynamic>>
转换成
List<BarcodeResult>
。
Android Java代码
这里使用 Dynamsoft Barcode Reader SDK 。
首先打开
android
目录下的
build.gradle
文件添加依赖:
rootProject.allprojects {
    repositories {
        maven {
            url "http://download2.dynamsoft.com/maven/dbr/aar"
        google()
        jcenter()
dependencies {
    implementation 'com.dynamsoft:dynamsoftbarcodereader:8.2.0@aar'
}
然后打开
android/src/main/java/com/dynamsoft/flutter_barcode_sdk/FlutterBarcodeSdkPlugin.java
添加Java代码。
onMethodCall
是Dart通向Java的入口:
@Override
public void onMethodCall(@NonNull MethodCall call, @NonNull Result result) {
    switch (call.method) {
        case "getPlatformVersion":
            result.success("Android " + android.os.Build.VERSION.RELEASE);
            break;
        case "decodeFile": {
            final String filename = call.argument("filename");
            List<Map<String, Object>> results = mBarcodeManager.decodeFile(filename);
            result.success(results);
        break;
        case "decodeFileBytes": {
            final byte[] bytes = call.argument("bytes");
            List<Map<String, Object>> results = mBarcodeManager.decodeFileBytes(bytes);
            result.success(results);
        break;
        case "decodeImageBuffer": {
            final byte[] bytes = call.argument("bytes");
            final int width = call.argument("width");
            final int height = call.argument("height");
            final int stride = call.argument("stride");
            final int format = call.argument("format");
            final Result r = result;
            mExecutor.execute(new Runnable() {
                @Override
                public void run() {
                    final List<Map<String, Object>> results = mBarcodeManager.decodeImageBuffer(bytes, width, height, stride, format);
                    mHandler.post(new Runnable() {
                        @Override
                        public void run() {
                            r.success(results);
        break;
        default:
            result.notImplemented();
}
每一个
case
对应一个接口名。这里的调用在主线程。在视频模式下会持续调用
decodeImageBuffer
,为了不影响性能,把解码放到线程中执行。
新建
BarcodeManager.java
来管理条形码解码相关代码。创建
BarcodeReader
对象以及解码调用方法:
public BarcodeManager() {
try {
mBarcodeReader = new BarcodeReader();
DMLTSConnectionParameters parameters = new DMLTSConnectionParameters();
parameters.organizationID = "200001";
mBarcodeReader.initLicenseFromLTS(parameters, new DBRLTSLicenseVerificationListener() {
@Override
public void LTSLicenseVerificationCallback(boolean isSuccess, Exception error) {
if (!isSuccess) {
error.printStackTrace();
mBarcodeReader.initRuntimeSettingsWithString("{\"ImageParameter\":{\"Name\":\"Balance\",\"DeblurLevel\":5,\"ExpectedBarcodesCount\":512,\"LocalizationModes\":[{\"Mode\":\"LM_CONNECTED_BLOCKS\"},{\"Mode\":\"LM_SCAN_DIRECTLY\"}]}}", EnumConflictMode.CM_OVERWRITE);
PublicRuntimeSettings settings = mBarcodeReader.getRuntimeSettings();
settings.intermediateResultTypes = EnumIntermediateResultType.IRT_TYPED_BARCODE_ZONE;
settings.barcodeFormatIds = EnumBarcodeFormat.BF_ONED | EnumBarcodeFormat.BF_DATAMATRIX | EnumBarcodeFormat.BF_QR_CODE | EnumBarcodeFormat.BF_PDF417;
settings.barcodeFormatIds_2 = 0;
mBarcodeReader.updateRuntimeSettings(settings);
} catch (Exception e) {
e.printStackTrace();
public List<Map<String, Object>>
decodeFile(String filename) {
List<Map<String, Object>> ret = new ArrayList<Map<String, Object>>();
try {
TextResult[] results = mBarcodeReader.decodeFile(filename, "");
wrapResults(results, ret);
} catch (Exception e) {
e.printStackTrace();
return ret;
public List<Map<String, Object>> decodeImageBuffer(byte[] bytes, int width, int height, int stride, int format) {
List<Map<String, Object>> ret = new ArrayList<Map<String, Object>>();
int pixelFormat = EnumImagePixelFormat.IPF_BGR_888;
switch(format) {
case 0:
pixelFormat = EnumImagePixelFormat.IPF_GRAYSCALED;
break;
case 1:
pixelFormat = EnumImagePixelFormat.IPF_ARGB_8888;
break;
try {
TextResult[] results = mBarcodeReader.decodeBuffer(bytes, width, height, stride, pixelFormat, "");
wrapResults(results, ret);
} catch (Exception e) {
e.printStackTrace();
return ret;
}发布Flutter插件
发布前先运行下面的命令分析工程:
flutter pub publish --dry-run如果没有问题,就可以发布了:
flutter pub publish这里是我发布之后的页面:
https:// pub.dev/packages/flutte r_barcode_sdk
开发Flutter扫码应用
有了插件,就可以用Dart快速实现扫码应用了。
创建一个新的Flutter工程
flutter create myapp添加依赖:
dependencies:
  camera:
  flutter_barcode_sdk:
打开
main.dart
,初始化camera和barcode SDK:
CameraController _controller;
Future<void> _initializeControllerFuture;
FlutterBarcodeSdk _barcodeReader;
bool _isScanAvailable = true;
bool _isScanRunning = false;
String _barcodeResults = '';
String _buttonText = 'Start Video Scan';
@override
void initState() {
super.initState();
_controller = CameraController(
widget.camera,
ResolutionPreset.medium,
_initializeControllerFuture = _controller.initialize();
_initializeControllerFuture.then((_) {
setState(() {});
_barcodeReader = FlutterBarcodeSdk();
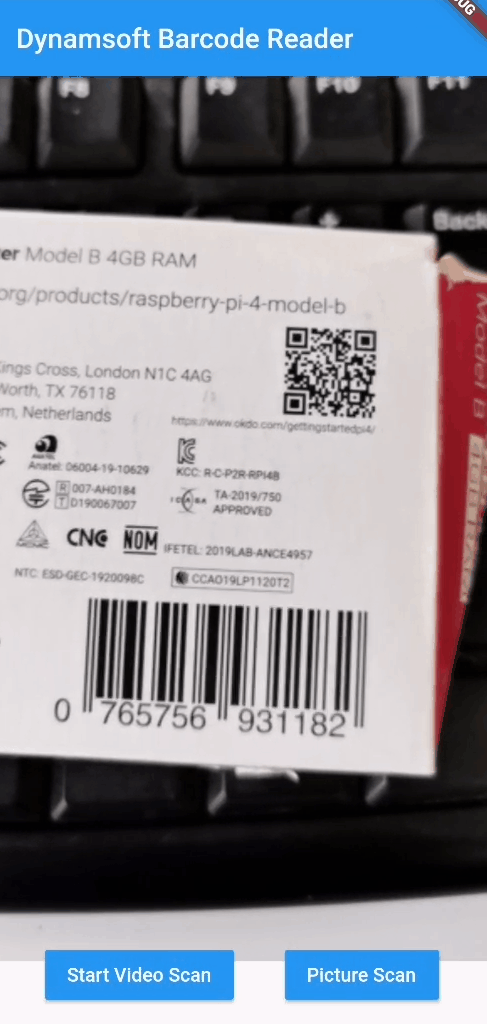
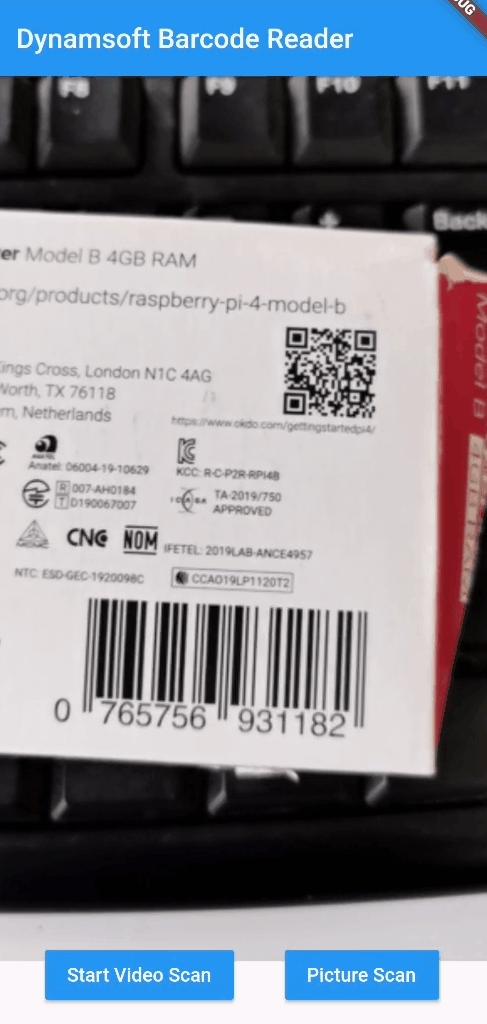
}界面布局。创建视频预览窗口,文字显示控件和两个按钮:
@override
Widget build(BuildContext context) {
  return Column(children: [
    Expanded(child: getCameraWidget()),
    Container(
      height: 100,
      child: Row(children: <Widget>[
        Text(
          _barcodeResults,
          style: TextStyle(fontSize: 14, color: Colors.white),
    Container(
      height: 100,
      child: Row(
          mainAxisAlignment: MainAxisAlignment.spaceEvenly,
          children: <Widget>[
            MaterialButton(
                child: Text(_buttonText),
                textColor: Colors.white,
                color: Colors.blue,
                onPressed: () async {
                  try {
                    // Ensure that the camera is initialized.
                    await _initializeControllerFuture;
                    videoScan();
                    // pictureScan();
                  } catch (e) {
                    // If an error occurs, log the error to the console.
                    print(e);
            MaterialButton(
                child: Text("Picture Scan"),
                textColor: Colors.white,
                color: Colors.blue,
                onPressed: () async {
                  pictureScan();
}
一个按钮触发视频流扫码,一个按钮触发拍照解码:
void videoScan() async {
  if (!_isScanRunning) {
    setState(() {
      _buttonText = 'Stop Video Scan';
    _isScanRunning = true;
    await _controller.startImageStream((CameraImage availableImage) async {
      assert(defaultTargetPlatform == TargetPlatform.android ||
          defaultTargetPlatform == TargetPlatform.iOS);
      int format = FlutterBarcodeSdk.IF_UNKNOWN;
      switch (availableImage.format.group) {
        case ImageFormatGroup.yuv420:
          format = FlutterBarcodeSdk.IF_YUV420;
          break;
        case ImageFormatGroup.bgra8888:
          format = FlutterBarcodeSdk.IF_BRGA8888;
          break;
        default:
          format = FlutterBarcodeSdk.IF_UNKNOWN;
      if (!_isScanAvailable) {
        return;
      _isScanAvailable = false;
      _barcodeReader
          .decodeImageBuffer(
              availableImage.planes[0].bytes,
              availableImage.width,
              availableImage.height,
              availableImage.planes[0].bytesPerRow,
              format)
          .then((results) {
        if (_isScanRunning) {
          setState(() {
            _barcodeResults = getBarcodeResults(results);
        _isScanAvailable = true;
      }).catchError((error) {
        _isScanAvailable = false;
  } else {
    setState(() {
      _buttonText = 'Start Video Scan';
      _barcodeResults = '';
    _isScanRunning = false;
    await _controller.stopImageStream();
void pictureScan() async {
  final image = await _controller.takePicture();
  List<BarcodeResult> results = await _barcodeReader.decodeFile(image?.path);
  Navigator.push(
    context,
    MaterialPageRoute(