通过iOS15 Communication Notifications实现自定义通知图标

昨天产品观察到飞书和钉钉在收到通知消息的时候,通知图标是发信人的头像,让我也实现一下,经过一天多的探索终于搓出来了一个可用的方案。效果图如下。
实现效果

实现原理很简单,就是通过 Notifiction Service Extension 在通知内容展示到通知栏里前进行一次处理,其中使用了 SiriKit 中的 INPerson INmage
Notifiction Service Extension

MainTarget的配置

1.配置info.plist文件

将以下配置添加到项目的 info.plist 文件中

NSUserActivityTypes (Array)
    - INStartCallIntent
    - INSendMessageIntent

2.配置Capability

Signing&Capability中添加** Communication Notifications** 和 Push Notifications
添加
效果

3.配置推送

通知的配置就不再这里详细说明了,我是用的友盟推送。只要能正常推送消息到通知栏即可。

Notifiction Service Extension配置

1.添加Notifiction Service Extension到Targets

Xcode->New->Target->选择Notifiction Service Extension->Next->填写Product Name->选择开发语言(Swift Or Objective-C) ->Finish。我用的是OC开发,所以下面的代码都是OC版本。
add target

1.配置info.plist文件

Notifiction Service Extensioninfo.plist也需要加入下面的字段,千万注意位置,很重要!加错位置都不生效!

NSUserActivityTypes (Array)
    - INStartCallIntent
    - INSendMessageIntent

2.配置Capability

Notifiction Service ExtensionSigning&Capability中添加Push Notifications即可。

3.检查Notifiction Service Extension代码是否正常运行

创建Notifiction Service Extension后会生成NotificationService.hNotificationService.m(Swift版本会生成NotificationService.swift)文件。

// NotificationService.m // NotificationService #import "NotificationService.h" @interface NotificationService () @property (nonatomic, strong) void (^contentHandler)(UNNotificationContent *contentToDeliver); @property (nonatomic, strong) UNMutableNotificationContent *bestAttemptContent; @implementation NotificationService - (void)didReceiveNotificationRequest:(UNNotificationRequest *)request withContentHandler:(void (^)(UNNotificationContent * _Nonnull))contentHandler { self.contentHandler = contentHandler; self.bestAttemptContent = [request.content mutableCopy]; // Modify the notification content here... self.bestAttemptContent.title = [NSString stringWithFormat:@"%@ [modified]", self.bestAttemptContent.title]; self.contentHandler(self.bestAttemptContent); - (void)serviceExtensionTimeWillExpire { // Called just before the extension will be terminated by the system. // Use this as an opportunity to deliver your "best attempt" at modified content, otherwise the original push payload will be used. self.contentHandler(self.bestAttemptContent);

这时,测试发送通知,通知的标题后面带着 [modified]证明已经成功。或者在Debug模式下断点能进入到这个方法内就算配置成功了。
注意:要使用 Notifiction Service Extension 需要在高级设置的内容链接中添加键值对

// 这是必须的
mutable-content : 1 
// 注意格式层级是和 alert一个级别的
    "payload":{
        "aps":{
            "alert":{
                "body":"测试一下内容",
                "title":"测试一下标题",
                "subtitle":"测试一下副标题"
            "sound":"default",
            "mutable-content":"1"

4.推送添加字段

我需要在通知的自定义参数内配置一个字段来传递头像的URLKey定为sender_image_urlValue是我随便在百度上找的一张表情
https://img2.baidu.com/it/u=1880320954,1568482765&fm=253&fmt=auto&app=138&f=JPEG?w=542&h=500
配置

// json结构大致如下
    "payload":{
        "aps":{
            "alert":{
                "body":"测试一下内容",
                "title":"测试一下标题",
                "subtitle":"测试一下副标题"
            "sound":"default",
            "mutable-content":"1"
        "sender_image_url":"https://img2.baidu.com/it/u=1880320954,1568482765&fm=253&fmt=auto&app=138&f=JPEG?w=542&h=500"

5.处理并显示通知

首先,我们需要一个下载并保存图片到本地的方法。将图片下载并保存到本地后取出配置给通知。详细的说明见下面的示例代码吧!

#import "NotificationService.h"
#import <Intents/Intents.h>
@interface NotificationService ()
@property (nonatomic, strong) void (^contentHandler)(UNNotificationContent *contentToDeliver);
@property (nonatomic, strong) UNMutableNotificationContent *bestAttemptContent;
@implementation NotificationService
// 下载并保存图片的方法
- (void)downloadINPersonWithURLString:(NSString *)urlStr completionHandle:(void(^)(NSData *data))completionHandler{
    __block NSData *data = nil;
    NSURL *imageURL = [NSURL URLWithString:urlStr];
    NSURLSession *session = [NSURLSession sessionWithConfiguration:[NSURLSessionConfiguration defaultSessionConfiguration]];
    [[session downloadTaskWithURL:imageURL completionHandler:^(NSURL *temporaryFileLocation, NSURLResponse *response, NSError *error) {
        if (error != nil) {
            NSLog(@"%@", error.localizedDescription);
        } else {
            NSFileManager *fileManager = [NSFileManager defaultManager];
            NSURL *localURL = [NSURL fileURLWithPath:[temporaryFileLocation.path stringByAppendingString:@".png"]];
            [fileManager moveItemAtURL:temporaryFileLocation toURL:localURL error:&error];
            NSLog(@"localURL = %@", localURL);
            data = [[NSData alloc] initWithContentsOfURL:localURL];
        completionHandler(data);
    }]resume];
- (void)didReceiveNotificationRequest:(UNNotificationRequest *)request withContentHandler:(void (^)(UNNotificationContent * _Nonnull))contentHandler {
    self.contentHandler = contentHandler;
    self.bestAttemptContent = [request.content mutableCopy];
    // 这一行只是方便查看,记得在上线前去掉哦!
    self.bestAttemptContent.title = [NSString stringWithFormat:@"%@ [modified]", self.bestAttemptContent.title];
    // 头像
    NSString *senderImageURLString = self.bestAttemptContent.userInfo[@"sender_image_url"];
    // 标题
    NSString *title = self.bestAttemptContent.title;
    // 副标题
    NSString *subtitle = self.bestAttemptContent.subtitle;
    // 内容
    NSString *body = self.bestAttemptContent.body;
    // 下载并获取图片
    [self loadINPersonWithURLString:senderImageURLString completionHandle:^(NSData *data) {
        if (data) {
        	// 将图片数据转换成INImage(需要 #import <Intents/Intents.h>)
            INImage *avatar = [INImage imageWithImageData:data];
            // 创建发信对象
            INPersonHandle *messageSenderPersonHandle = [[INPersonHandle alloc] initWithValue:@"" type:INPersonHandleTypeUnknown];
            NSPersonNameComponents *components = [[NSPersonNameComponents alloc] init];
            INPerson *messageSender = [[INPerson alloc] initWithPersonHandle:messageSenderPersonHandle
                                                              nameComponents:components
                                                                 displayName:title
                                                                       image:avatar
                                                           contactIdentifier:nil
                                                            customIdentifier:nil
                                                                        isMe:NO
                                                              suggestionType:INPersonSuggestionTypeNone];
            // 创建自己对象
            INPersonHandle *mePersonHandle = [[INPersonHandle alloc] initWithValue:@"" type:INPersonHandleTypeUnknown];
            INPerson *mePerson = [[INPerson alloc] initWithPersonHandle:mePersonHandle
                                                         nameComponents:nil
                                                            displayName:nil
                                                                  image:nil
                                                      contactIdentifier:nil
                                                       customIdentifier:nil
                                                                   isMe:YES
                                                         suggestionType:INPersonSuggestionTypeNone];
            // 创建intent
            INSpeakableString *speakableString = [[INSpeakableString alloc] initWithSpokenPhrase:subtitle];
            INSendMessageIntent *intent = [[INSendMessageIntent alloc] initWithRecipients:@[mePerson, messageSender]
                                                                      outgoingMessageType:INOutgoingMessageTypeOutgoingMessageText
                                                                                  content:body
                                                                       speakableGroupName:speakableString
                                                                   conversationIdentifier:nil
                                                                              serviceName:nil
                                                                                   sender:messageSender
                                                                              attachments:nil];
            [intent setImage:avatar forParameterNamed:@"speakableGroupName"];
            // 创建 interaction
            INInteraction *interaction = [[INInteraction alloc] initWithIntent:intent response:nil];
            interaction.direction = INInteractionDirectionIncoming;
            [interaction donateInteractionWithCompletion:nil];
            // 创建 处理后的 UNNotificationContent
            NSError *error = nil;
            UNNotificationContent *messageContent = [request.content contentByUpdatingWithProvider:intent error:&error];
            if (!error && messageContent) {
            	// 处理过的
                self.contentHandler(messageContent);
            } else {
            	// 处理失败的情况
                self.contentHandler(self.bestAttemptContent);
        } else {
       		// 处理下载失败的情况
            self.contentHandler(self.bestAttemptContent);
    }];
- (void)serviceExtensionTimeWillExpire {
    // Called just before the extension will be terminated by the system.
    // Use this as an opportunity to deliver your "best attempt" at modified content, otherwise the original push payload will be used.
    self.contentHandler(self.bestAttemptContent);

至此,发送测试通知后即可得到前言中的效果图了。

[补充]本地通知实现通信通知

以上都是通过服务器下发通知产生通信通知,本地通知也是可以带上这个效果的,只需要构建一个专门的Content就行,参考代码如下:
实现效果

	#import <Intents/Intents.h>
	#import <UserNotifications/UserNotifications.h>
	// 这个是头像,可以使用本地的图片,也可以使用网络下载好图片后再回调中传递过来
	INImage *avatarImage = [INImage imageWithImageData:UIImagePNGRepresentation([UIImage imageNamed:@"icon_acfun"])];
    UNUserNotificationCenter *center = [UNUserNotificationCenter currentNotificationCenter];
    UNMutableNotificationContent *content = [[UNMutableNotificationContent alloc] init];
    content.title = @"111";
    content.subtitle = @"哈哈哈";
    content.body = @"你在干嘛????";
    content.sound = [UNNotificationSound defaultSound];
    content.badge = @([UIApplication sharedApplication].applicationIconBadgeNumber + 1);
    // 注意版本判断
    if (@available(iOS 15.0, *)) {
        NSPersonNameComponents *nameComponents = [[NSPersonNameComponents alloc] init];
        nameComponents.nickname = content.title;
        // 注意:displayName: 是显示到通信通知标题部分的文案,会顶替掉content.title,所以建议与 content.title保持一致
        // customIdentifier 消息的id,无所谓了
        INPerson *messageSender = [[INPerson alloc]initWithPersonHandle:[[INPersonHandle alloc]initWithValue:nil type:INPersonHandleTypeUnknown] nameComponents:nameComponents displayName:content.title image:avatarImage contactIdentifier:nil customIdentifier:@"需要一个消息id" isMe:NO suggestionType:(INPersonSuggestionTypeNone)];
        // initWithSpokenPhrase 展示的是subtitle部分,所以与content.subtitle保持一致,不写的话content.subtitle是显示不出来的
        INSendMessageIntent *intent = [[INSendMessageIntent alloc] initWithRecipients:@[messageSender] outgoingMessageType:(INOutgoingMessageTypeOutgoingMessageText) content:content.body speakableGroupName:[[INSpeakableString alloc]initWithSpokenPhrase:content.subtitle] conversationIdentifier:@"123456" serviceName:nil sender:messageSender attachments:nil];
        [intent setImage:avatarImage forParameterNamed:@"speakableGroupName"];
        INInteraction *interaction = [[INInteraction alloc]initWithIntent:intent response:nil];
        interaction.direction = INInteractionDirectionIncoming;
        [interaction donateInteractionWithCompletion:nil];
        // requestWithIdentifier 通知的id  可以与 上面 customIdentifier保持一致
        // 关键代码 就是 contentByUpdatingWithProvider:intent 这个创建方法。
        UNNotificationRequest *request = [UNNotificationRequest requestWithIdentifier:@"123456" content:[content contentByUpdatingWithProvider:intent error:nil] trigger:nil];
        [center addNotificationRequest:request withCompletionHandler:^(NSError *_Nullable error) {
            NSLog(@"成功添加推送");
        }];
    }else{
        UNNotificationRequest *request = [UNNotificationRequest requestWithIdentifier:@"123456" content:content trigger:nil];
        [center addNotificationRequest:request withCompletionHandler:^(NSError *_Nullable error) {
            NSLog(@"成功添加推送");
        }];

是不是很简单呢,这部分我是参考的《iOS 通信通知 Communication Notifications 的实现》这篇文章写的很棒。

[补充]推送副标题为空时会自动显示一个【你与+标题】问题解决

其实【你与+标题】属于参数speakableGroupName管辖,我们在写
INSpeakableString *speakableString = [[INSpeakableString alloc] initWithSpokenPhrase:subtitle];
INSpeakableString *speakableString = [[INSpeakableString alloc] initWithSpokenPhrase:subtitle.length ? subtitle : @""];
主要就是判断一下副标题是否为空,初始化speakableString时给一个空字符串即可将副标题直接隐藏掉
将speakableGroupName 直接赋值nil也是无效的

容易出现问题的地方

1、info.plist文件配置错误,一定要看好键值对配置的位置。

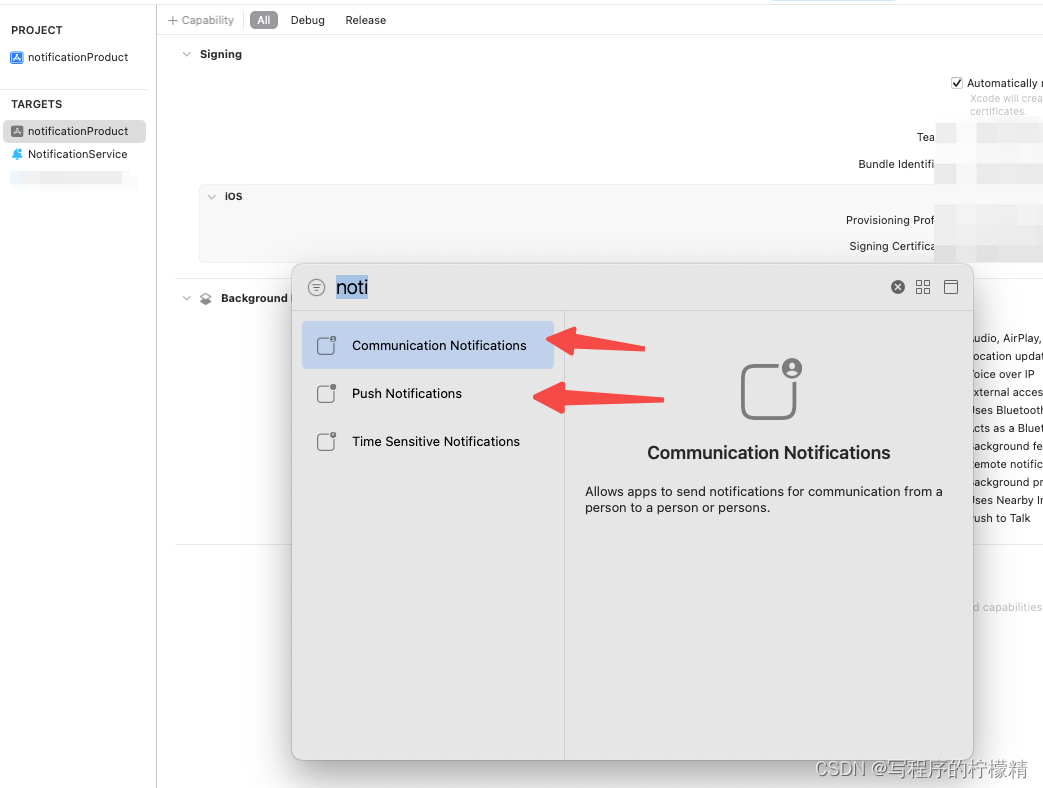
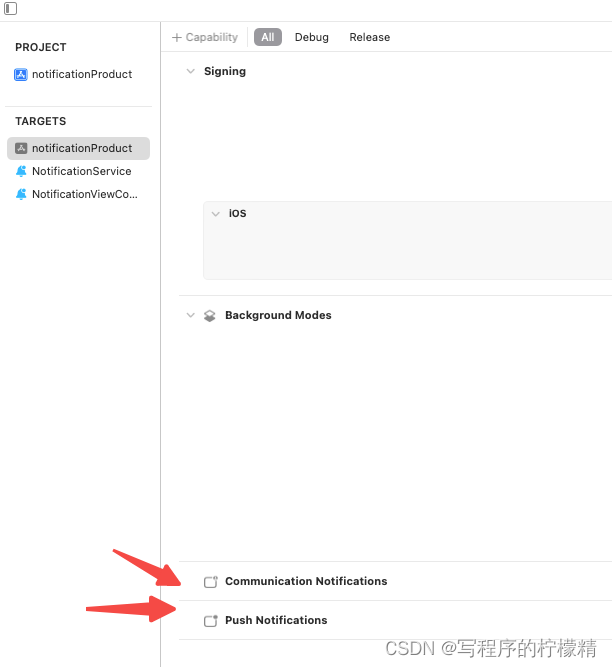
2、Capability的配置,一定要记得MainTarget里是2个,Extension里是1个。

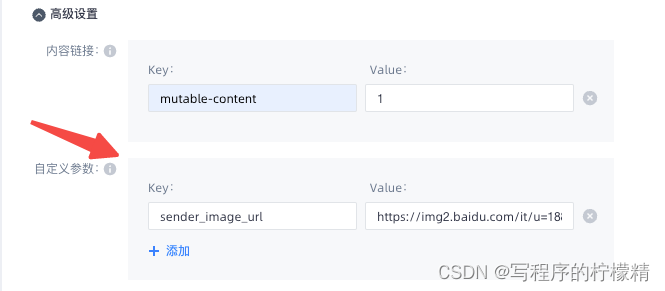
3、测试推送一定要记得加上 mutable-content : 1哦!

4、项目运行要注意是否存在Build的缓存,如果写了代码没反应记得清除一下缓存。

Apple Developer Documentation - Implementing Communication Notifications.
Apple Developer Forums - iOS 15 Communication Notifications not working!.
Stackoverflow - iOS 15 Communication Notification picture not shown.
GitHub - Dexwell/LocalCommunicationNotification.swift
CSDN - 通信通知 Communication Notifications 的实现 (iOS 15+)
友盟+开发者文档 - iOS集成文档
51cto - 这份 iOS 15 推送通知设计指南,值得设计师们仔细阅读!
likecs - Ios 推送扩展Notification Service Extension 与简单的语音合成 (学习笔记)
CSDN - iOS10推送通知进阶(Notification Extension)
iOS 通信通知 Communication Notifications 的实现

本地通知 NSLocalNotificationScheduler 类是一个单例类,这是一个需要理解的重要概念,因为它们展示了非常有用的设计模式。 这个想法在整个 iPhone SDK 中都有使用,例如,UIApplication 有一个名为 sharedApplication 的方法,当从任何地方调用它时,将返回与当前运行的应用程序相关的 UIApplication 实例。 NSLocalNotificationScheduler 单例类能够根据特定的触发日期、警报文本、警报操作、声音文件、启动图像、用户信息和重复间隔来安排本地通知。 还有几种辅助方法可以管理每个通知的 bagde 计数,在操作系统收到通知时处理通知,以及取消特定通知。 #####版本 版本 1.0 - 本地通知的设计和实现 #####建造 Master -> 仅适用于 iOS 5.0 或更高版本
一、iOS推送通知简介 众所周知苹果的推送通知iOS3开始出现, 每一年都会更新一些新的用法. 譬如iOS7出现的Silent remote notifications(远程静默推送), iOS8出现的Category(分类, 也可称之为快捷回复), iOS9出现的Text Input action(文本框快捷回复). 而在iOS10, 苹果可谓是大刀阔斧般的, 对远程通知和本地通知进行了大范围的更新. iOS10推出了全新的UserNotifications框架(iOS10之前从属于UIKit框架). 新的推送通知框架, 整合了本地推送和远程推送的点击处理方法, 使得以前专门处理推送点击
:面向跨平台插件的代码,用于在Flutter应用程序中显示本地通知 :通用平台接口的代码 这些可以在相同名称的相应目录中找到。 大多数开发人员都在这里,因为他们希望使用flutter_local_notifications插件。 每个目录中都有一个自述文件,其中包含更多信息。 如果遇到错误,请在GitHub存储库上提出它们。 请不要通过电子邮件将它们发送给我,因为GitHub是适合他们使用的地方,并且允许社区成员回答问题,尤其是如果我错过了电子邮件。 如果它们可以限于实际的错误或功能请求,也将不胜感激。 如果您正在寻找如何使用插件来执行特定类型的通知,请检查示例应用程序是否提供了每种受支持功能的详细代码示例。 如果您错过了某些内容(例如,特定于平台的设置),也请尝试先检查自述文件。 可以在找到有关提交拉取请求的准则
TL; 博士; meteor-notifications包使向 Meteor 应用程序添加用户通知成为一种乐趣。 它也可以简单地定制。 没有提供模板(鼓励程序员提供自己的模板),但模板处理程序是为了程序员的方便而存在的。 您可以使用两种通知: 分布式- 显示给其他用户 本地- 显示给当前登录的用户 流星通知提供了两个模板处理程序,您可以开箱即用: Notifications和NotificationsItem 。 您可以使用它们来处理您自己的自定义模板(只要您分别命名它们)。 还有一些全局模板处理程序可用于应用程序内的任何其他模板: Notifications和NotificationsItem 。 使用 Meteor 安装: meteor add miro:notifications 像这样定义您的自定
WWDC 2021 苹果在 iOS 15 系统中对通知做了很多改变, 让通知更加个性化. 这里只有讨论通信通知 Communication Notifications, 苹果自带的很多应用, 以及第三方App 飞书, 都使用了这个通知功能。 通信通知 Communication Notifications 简介 iOS 15系统后, Apple 添加了通信通知的功能。这些通知将包含发送它们的联系人的头像,并且可以与 SiriKit 集成,以便 Siri 可以智能地根据常用联系人提供通信操作的快捷方式和建议
原文链接:Dude, Where's my Call?译文原链:【译】哥们儿,我的方法哪儿去了? 想象有一天你正在给 Swift 编译器喂一些看起来无害的代码。 // xcrun -sdk macosx swiftc -emit-executable cg.swift import CoreGraphics let path = CG...
借助iOS 10,Apple现在允许应用程序开发人员为发送给用户的通知创建自定义界面。 在Messages应用程序中显示了该框架的可能性,您可以在其中查看对话界面,就像在应用程序本身中一样。 新的UserNotificationsUI框架使所有这些功能成为可能。 通过使用此框架,您可以调整任何UIViewController子类来呈现您的通知内容。 在本教程中,我将向您展示如何使...
iOS开发中,有这样一个场景:某件重要的事情必须立刻让用户知道,甚至不惜以打断用户当前操作为代价来强调这份重要性。这就是通知Notifiations)。目前常用的框架为UserNotifications,它主要用来在锁屏和应用界面通过弹窗来显示通知。另一个框架是NotificationCenter,以它实现的跨object通知以及原生的KVO(Key-Value-Observing)是iOS中观察者模式的主要实现手段。本文内容:UserNotifications介绍本地通知(LocalNotifications)远程通知(RemoteNotifications)观察者模式(Observer
//创建通知 UNMutableNotificationContent *content = [[UNMutableNotificationContent alloc] init]; content.title = @"戒指断开通知"; content.subtitle = @""; content.body = @"您的戒指已断开,请重新连接"; content.badge = @1;//角标数 content.categoryIdentifier = @.
示例代码:http://download.csdn.net/detail/chenscda/7230625 介绍一下iOS下如何使用UILocalNotification进行应用程序的本地通知,基本上大部分的app都会有这个功能。 我们在设置的通知中心中可以自定义本地通知的三种形式(分别是在ios6和ios7): 下面给出简单...
在做项目的时候遇到这样一个需求,写一个备忘录,可以设定闹钟提醒。 然后闹钟提醒怎样做,查了查查到的都是使用本地通知,然后就使用UILocalNotification实现的功能 使用UILocalNotification实现本地推送,类似于闹钟提醒功能。
Websocket是一种 HTML5的协议,它允许在客户端和服务器之间建立持久的连接。这个连接是双向的,因此可以通过它来实现实时的通讯。Websocket协议是一种基于事件的协议,其中,服务器可以向客户端发送消息,而客户端接收到消息之后,可以进行相应的操作。 在实现通知功能时,Websocket是一种非常方便的技术。一般来说,我们可以使用Websocket建立一个持久的连接,并将这个连接保存在服务器端。当有需要发送通知的时候,服务器端可以通过这个连接将消息发送给客户端,客户端接收到消息之后,可以通过事件处理程序来处理收到的消息。 Websocket通知功能的实现有两种基本的方式:一种是客户端主动请求服务器查看是否有新的消息,另一种是服务器主动向客户端发送消息,推送新的通知。 1. 客户端主动请求方式: 在这种方式中,客户端定期向服务器发送请求,询问是否有新的通知。服务器在接收到请求之后查看是否有新的通知,如果有,就将通知信息返回给客户端,否则返回空信息。 客户端的实现: // 建立Websocket连接 var ws = new WebSocket("ws://localhost:8080/"); // 每隔1秒向服务器请求是否有新的通知 setInterval(function() { ws.send("getNewNotification"); }, 1000); // 处理服务器返回的消息 ws.onmessage = function(event) { var message = event.data; if(message == "") { // 没有新的通知 } else { // 处理返回的通知信息 服务器端的实现: // 建立Websocket服务 var server = new WebSocketServer({port: 8080}); // 当客户端连接时,记录连接 server.on('connection', function(ws) { console.log("connected"); // 处理客户端发送来的请求 ws.on('message', function(message) { if(message == "getNewNotification") { // 如果有新的通知,将通知信息发送到客户端 ws.send("newNotification"); } else { // 其他情况 2. 服务器向客户端推送方式: 在这种方式中,服务器维护一个通知列表,当有新的通知产生时,就将通知信息发送给客户端。 客户端的实现: // 建立Websocket连接 var ws = new WebSocket("ws://localhost:8080/"); // 处理服务器返回的消息 ws.onmessage = function(event) { var message = event.data; if(message == "") { // 没有新的通知 } else { // 处理返回的通知信息 服务器端的实现: // 建立Websocket服务 var server = new WebSocketServer({port: 8080}); // 通知列表(存储一个通知数组) var notifications = []; // 将新的通知加入列表并发送给客户端 function sendNewNotification(notification) { notifications.push(notification); server.clients.forEach(function(client) { client.send(notification); // 模拟新的通知产生(实际中通知可以通过其他方式产生) setInterval(function() { sendNewNotification("newNotification"); }, 1000); // 当客户端连接时,记录连接 server.on('connection', function(ws) { console.log("connected"); // 将通知列表发送给客户端 notifications.forEach(function(notification) { ws.send(notification); 以上是使用Websocket实现通知功能的基本思路和代码示例。在实际应用中,我们还需要考虑如何确保通知的可靠性和安全性,如何避免通知消息漏掉等问题。