

SpringBoot2x系列教程79--SpringBoot整合WebService实现远程接口调用

SpringBoot2.x系列教程79--SpringBoot整合Web Service实现远程接口调用
作者:一一哥
上一章节中,我带大家学习了Web Service的理论知识,接下来在本节中,我带大家实现SpringBoot中整合Web Service,实现远程接口调用。
SpringBoot整合Web Service的详细实现
一. 创建通用模块
本项目中,我们需要进行远程接口的调用,也就是需要有一个A项目来调用B项目里的接口,然后A,B两个项目都需要依赖一些共同的内容,所以我们首先创建这个被共同依赖的通用模块C。
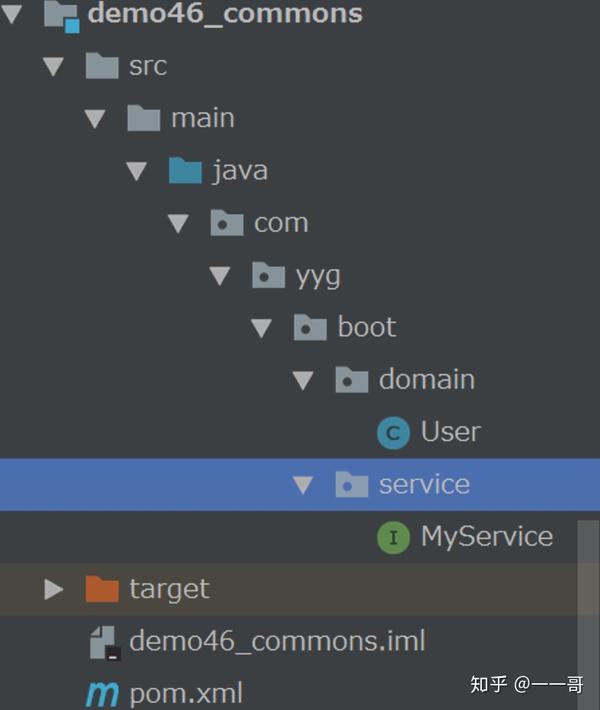
1. 创建通用的实体类User
package com.yyg.boot.domain;
import lombok.AllArgsConstructor;
import lombok.Data;
import lombok.NoArgsConstructor;
import java.io.Serializable;
 * @Author 一一哥Sun
 * @Date Created in 2020/5/9
 * @Description Description
@Data
@NoArgsConstructor
@AllArgsConstructor
public class User implements Serializable {
    private Long id;
    private String username;
    private String address;
}
2. 定义通用的MyService接口
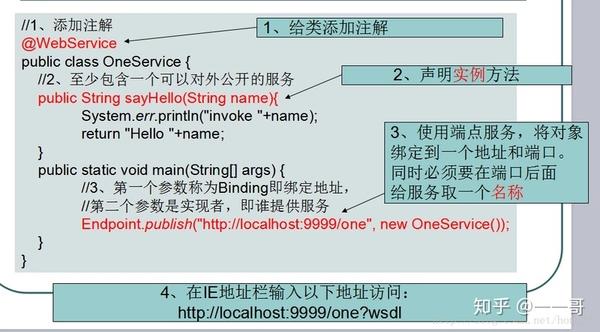

- 先在接口类上添加@WebService注解,代表发布一个WebService服务。
- 给类添加上@WebService注解后,类中所有的非静态方法都将会对外公布。
- 如果希望某个方法不对外公开,可以在方法上添加@WebMethod(exclude=true),阻止对外公开。
- 如果一个类上,被添加了@WebService注解,则必须此类至少有一个可以公开的方法,否则将会启动失败。
- protected、private、final、static方法不能对外公开。
package com.yyg.boot.service;
import com.yyg.boot.domain.User;
import javax.jws.WebService;
import java.util.List;
* @Author 一一哥Sun
* @Date Created in 2020/5/9
* @Description Description
@WebService(name = "MyService", // 暴露服务名称
targetNamespace = "http://service.boot.yyg.com"// 命名空间,一般是接口的包名倒序
public interface MyService {
String sayHello(String msg);
List<User> getUsers();
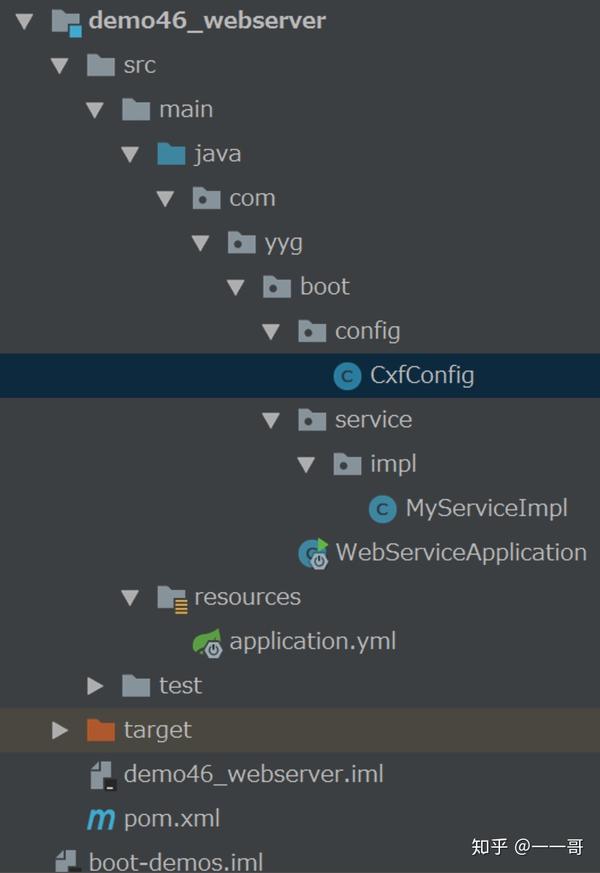
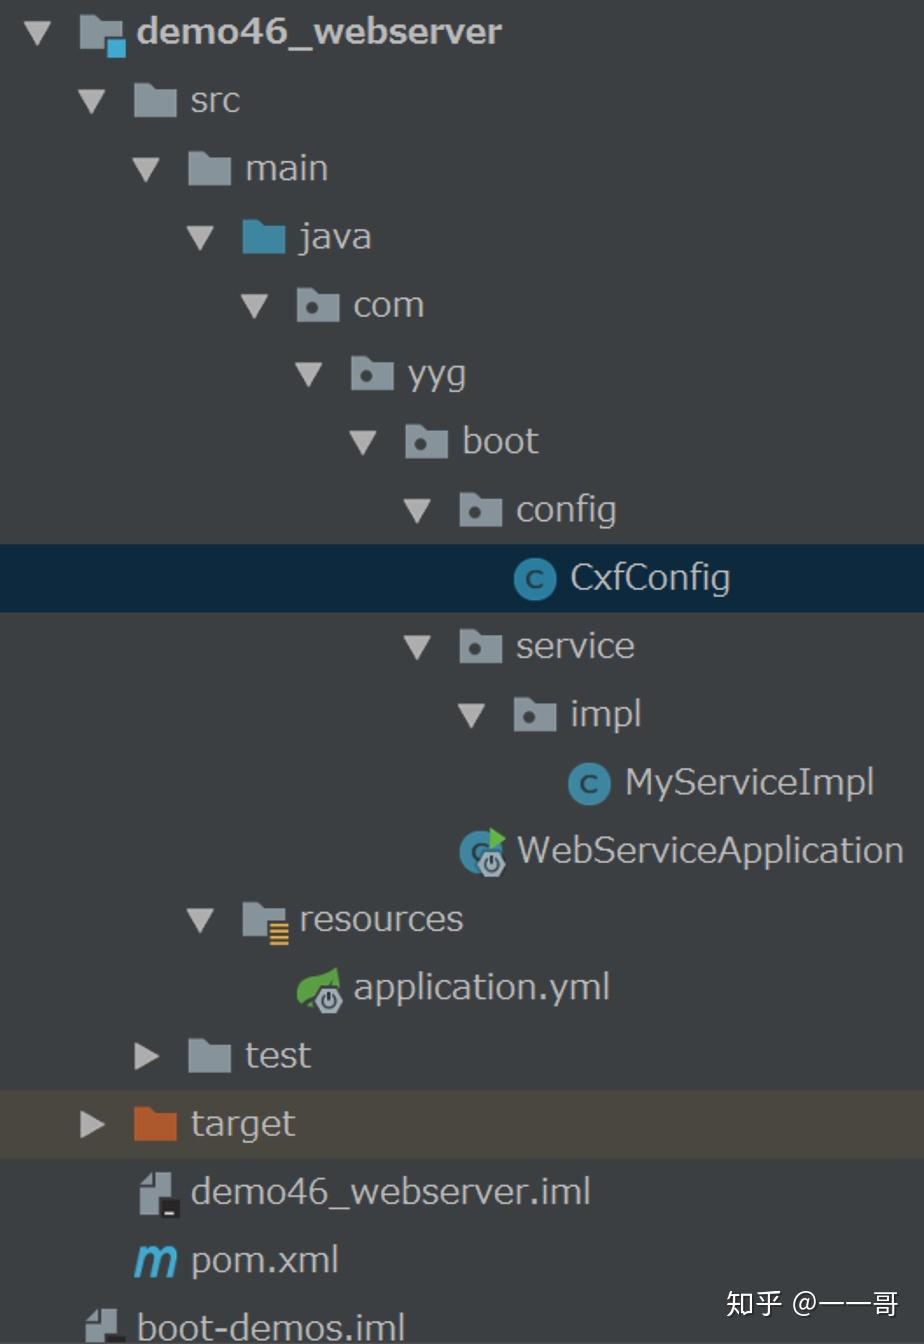
}二. 创建Web Service中的Server端项目
完整项目结构如下图所示:
1. 添加依赖包
<dependency>
    <groupId>com.yyg.boot</groupId>
    <artifactId>demo46_commons</artifactId>
    <version>1.0-SNAPSHOT</version>
</dependency>
<dependency>
    <groupId>org.springframework.boot</groupId>
    <artifactId>spring-boot-starter-web-services</artifactId>
</dependency>
<dependency>
    <groupId>org.apache.cxf</groupId>
    <artifactId>cxf-rt-frontend-jaxws</artifactId>
    <version>3.1.12</version>
</dependency>
<dependency>
    <groupId>org.apache.cxf</groupId>
    <artifactId>cxf-rt-transports-http</artifactId>
    <version>3.1.12</version>
</dependency>
注意:
网上有网友用cxf-spring-boot-starter-jaxws这个依赖包,但是我在Spring Boot2.2.5的环境中,使用该依赖会导致如下异常:
java.lang.ClassNotFoundException: org.springframework.boot.context.embedded.EmbeddedServletContainerCustomizer所以我这里不适用该依赖,而是使用cxf-rt-frontend-jaxws与cxf-rt-transports-http依赖包。
2. 定义CXFServlet的配置类
- 通过EndPoint(端点服务)发布一个webService。Endpoint也是jdk提供的一个专门用于发布服务的类,它的publish方法接收两个参数,一个是本地的服务地址,二是提供服务的类。它位于javax.xml.ws.*包中。
- Endpoint.publish(String address, Object implementor) 静态方法在给定地址处针对指定的实现者对象创建并发布端点。
package com.yyg.boot.config;
import com.yyg.boot.service.MyService;
import com.yyg.boot.service.impl.MyServiceImpl;
import org.apache.cxf.Bus;
import org.apache.cxf.bus.spring.SpringBus;
import org.apache.cxf.jaxws.EndpointImpl;
import org.apache.cxf.transport.servlet.CXFServlet;
import org.springframework.boot.web.servlet.ServletRegistrationBean;
import org.springframework.context.annotation.Bean;
import org.springframework.context.annotation.Configuration;
import javax.xml.ws.Endpoint;
 * @Author 一一哥Sun
 * @Date Created in 2020/5/9
 * @Description Description
@Configuration
public class CxfConfig {
    @Bean
    public ServletRegistrationBean createServletRegistrationBean() {
        return new ServletRegistrationBean(new CXFServlet(), "/myService/*");
    @Bean(name = Bus.DEFAULT_BUS_ID)
    public SpringBus springBus() {
        return new SpringBus();
    @Bean
    public MyService myService() {
        return new MyServiceImpl();
    @Bean
    public Endpoint endpoint() {
        EndpointImpl endpoint = new EndpointImpl(springBus(), myService());
        endpoint.publish("/api");
        return endpoint;
}
注意:
在该配置类中,网上有不少文章,在注册CXFServlet的时候,定义的方法名称都是dispatcherServlet,注意不要这么定义!!!否则会导致ErrorMvcAutoConfiguration错误.
//注意:该方法的名称不能使用dispatcherServlet(),否则会导致ErrorMvcAutoConfiguration错误.
    //org.springframework.boot.autoconfigure.web.servlet.error.ErrorMvcAutoConfiguration
    //required a bean of type 'org.springframework.boot.autoconfigure.web.servlet.DispatcherServletPath'
    // that could not be found.
//    @Bean
//    public ServletRegistrationBean dispatcherServlet() {
//        return new ServletRegistrationBean(new CXFServlet(), "/myService/*");
//    }
3. 定义MyServiceImpl接口实现类
在实现类中也有添加@WebService注解,指定serviceName,targetNamespace,endpointInterface属性。
package com.yyg.boot.service.impl;
import com.yyg.boot.domain.User;
import com.yyg.boot.service.MyService;
import javax.jws.WebService;
import java.util.ArrayList;
import java.util.Date;
import java.util.List;
 * @Author 一一哥Sun
 * @Date Created in 2020/5/9
 * @Description Description
@WebService(serviceName = "MyService", // 与接口中指定的服务name一致
        targetNamespace = "http://service.boot.yyg.com", // 与接口中的命名空间一致,一般是接口的包名倒
        endpointInterface = "com.yyg.boot.service.MyService"// 接口地址
public class MyServiceImpl implements MyService {
    @Override
    public String sayHello(String msg) {
        return "收到的信息是:--->" + msg + ",现在时间是:--->" + new Date();
    @Override
    public List<User> getUsers() {
        List<User> users = new ArrayList<>();
        users.add(new User(1L, "一一哥", "北京"));
        users.add(new User(2L, "一一哥", "上海"));
        return users;
}
4.创建application.yml配置文件
server:
  port: 8080
spring:
  application:
    name: web-service-server
5. 创建入口类
package com.yyg.boot;
import org.springframework.boot.SpringApplication;
import org.springframework.boot.autoconfigure.SpringBootApplication;
* @Author 一一哥Sun
* @Date Created in 2020/5/9
* @Description Description
@SpringBootApplication
public class WebServiceApplication {
public static void main(String[] args) {
SpringApplication.run(WebServiceApplication.class, args);
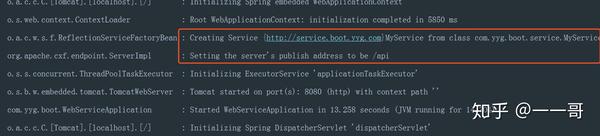
}6. 启动Server端项目
会发现在控制台中打印出如下启动信息。

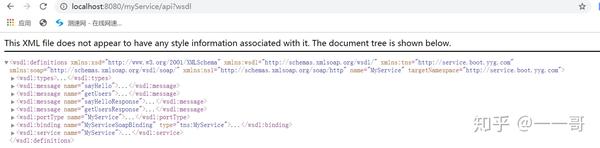
然后我们在浏览器中输入如下地址:
http://
localhost:8080/myServic
e/api?wsdl
会看到如下xml信息:
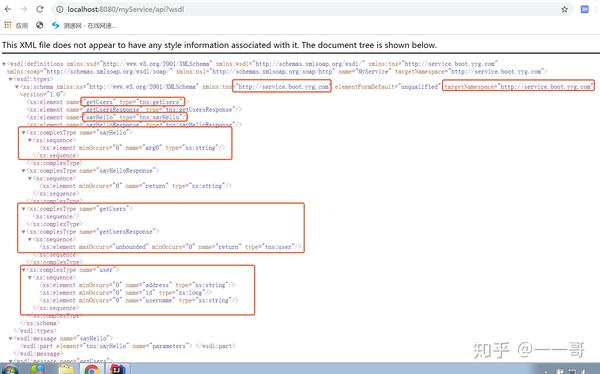

在这份xml文件中,指明了我们在service中定义的接口等信息。
三. 创建Web Service的client项目
1. 添加依赖包
<dependency>
    <groupId>com.yyg.boot</groupId>
    <artifactId>demo46_commons</artifactId>
    <version>1.0-SNAPSHOT</version>
</dependency>
<dependency>
    <groupId>org.apache.cxf</groupId>
    <artifactId>cxf-rt-frontend-jaxws</artifactId>
    <version>3.1.12</version>
</dependency>
<dependency>
    <groupId>org.apache.cxf</groupId>
    <artifactId>cxf-rt-transports-http</artifactId>
    <version>3.1.12</version>
</dependency>
2. 创建application.yml配置文件
定义端口为8081。
server:
  port: 8081
spring:
  application:
    name: web-service-client
3. 定义一个Controller进行测试
package com.yyg.boot.web;
import com.yyg.boot.domain.User;
import com.yyg.boot.service.MyService;
import org.apache.cxf.jaxws.JaxWsProxyFactoryBean;
import org.springframework.web.bind.annotation.GetMapping;
import org.springframework.web.bind.annotation.RestController;
import java.util.List;
 * @Author 一一哥Sun
 * @Date Created in 2020/5/9
 * @Description Description
@RestController
public class ClientController {
     * webservice接口地址
    private static String address = "http://localhost:8080/myService/api?wsdl";
    @GetMapping("/show")
    public String showMsg() {
        try {
            // 代理工厂
            JaxWsProxyFactoryBean jaxWsProxyFactoryBean = new JaxWsProxyFactoryBean();
            // 设置代理地址
            jaxWsProxyFactoryBean.setAddress(address);
            //添加用户名密码拦截器
            //jaxWsProxyFactoryBean.getOutInterceptors().add(new LoginInterceptor("root","admin"));;
            // 设置接口类型
            jaxWsProxyFactoryBean.setServiceClass(MyService.class);
            // 创建一个代理接口实现
            MyService service = (MyService) jaxWsProxyFactoryBean.create();
            // 调用代理接口的方法调用并返回结果
            return service.sayHello("hello");
        } catch (Exception e) {
            e.printStackTrace();
            return "error";
    @GetMapping("/users")
    public List<User> showUsers() {
        try {
            // 代理工厂
            JaxWsProxyFactoryBean jaxWsProxyFactoryBean = new JaxWsProxyFactoryBean();
            // 设置代理地址
            jaxWsProxyFactoryBean.setAddress(address);
            // 设置接口类型
            jaxWsProxyFactoryBean.setServiceClass(MyService.class);
            // 创建一个代理接口实现
            MyService service = (MyService) jaxWsProxyFactoryBean.create();
            // 调用代理接口的方法调用并返回结果
            return service.getUsers();
        } catch (Exception e) {
            e.printStackTrace();
            return null;
}
4. 创建应用程序入口类
package com.yyg.boot;
import org.springframework.boot.SpringApplication;
import org.springframework.boot.autoconfigure.SpringBootApplication;
 * @Author 一一哥Sun
 * @Date Created in 2020/5/9
 * @Description Description
@SpringBootApplication
public class CxfClientApplication  {
    public static void main(String[] args){
        SpringApplication.run(CxfClientApplication.class,args);
}
5. 启动项目进行测试
测试show接口:
发现展示如下信息,说明我们的客户端已经成功的调用了服务端的接口,实现了RPC跨进程通信。


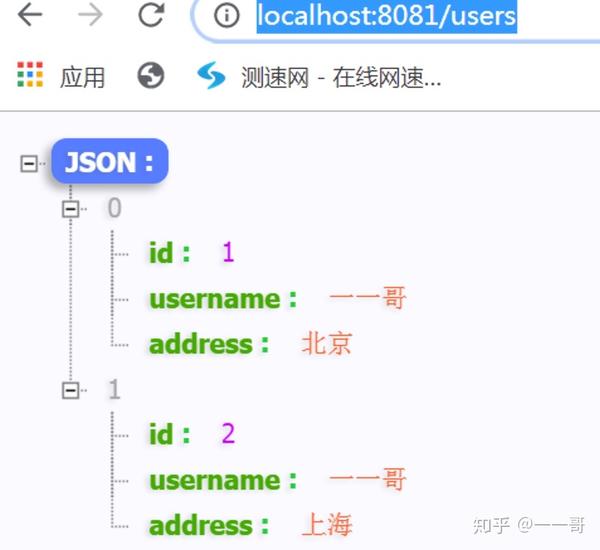
 测试users接口:
发现展示如下信息,说明我们的客户端已经成功的调用了服务端的接口,也实现了RPC跨进程通信。

四. WSDL文件解析
1. WSDL报文概述

<definitions>
    <types>
        定义 web service 使用的数据类型
    </types>
    <message>
        每个消息均由一个或多个部件组成。可以把它当做java中一个函数调用的参数。
    </message>
    <portType>
        它类似Java中的一个函数库(或一个模块、或一个类)
    </portType>