|
|
|
相关文章推荐

|
灰常酷的炒面 · 认证鉴权框架SpringSecurity-6 ...· 5 月前 · |
|
|
睿智的钢笔 · 山东省畜牧兽医局 每周行评 ...· 1 年前 · |
|
|
豪爽的皮带 · 本地服务启动连接Linux服务器上的kafk ...· 1 年前 · |
|
|
纯真的哑铃 · 使用Java开发OpenCV3程序-2.读取 ...· 2 年前 · |
|
|
悲伤的小刀 · 华泰金融工程研究组研报学习笔记——Boost ...· 2 年前 · |

- Java线程池核心原理与最佳实践
- 前言
-
- Java中的线程池
- SpringBoot集成线程池
- 使用ThreadPoolTaskExecutor
-
- 使用@Async实现异步调用
- 线程池的监控与管理
-
- 线程信息简单统计
- 线程参数动态修改
- 进一步统计线程执行情况
- Java8中的异步编程
-
- 创建异步任务
- 异步回调
-
- 1)、计算结果完成时的回调方法(线程串行化)
- 2)、计算结果完成时的回调方法时抛出异常
- 异步组合
-
- runAfterBoth/thenAcceptBoth/thenCombine
- thenCompose
- runAfterEither/acceptEither/applyToEither
- allOf
- anyOf
Java线程池核心原理与最佳实践
Java后端开发中我们经常使用线程池( ThreadPool )去提升程序的性能。通过池化的思想进行线程复用、管理,可以降低系统资源消耗、提升系统响应速度、减少系统处理耗时。
熟悉服务器端开发的同学都知道,Web 服务器在接收客户端请求时,通常不会采取来一个请求就新建一个线程处理的方式。虽然这种方式实现起来简单易懂,但是如果并发的请求数非常多,并且每个请求的实际处理耗时又非常短,那么就会导致频繁地创建和销毁线程,这将大大降低系统的性能。因为线程切换是有成本的,CPU 需要保存当前执行线程的上下文信息,并且后期还要恢复执行线程的上下文,即所谓的“上下文切换”开销。通常系统中的线程数量和系统性能成抛物线的关系,即线程数量达到某个阈值时,性能不升反降。因此对线程的管理,尤其是对其数量的控制关系到整个系统的性能。
线程池则为 多线程 创建的开销问题以及线程管理提供了解决方案。通过多任务下线程的重用,即线程池中的线程执行完一个任务后并不立即销毁,而是可以继续执行其它任务。将线程创建的开销摊薄到了多任务上,便能获得高并发环境下系统性能上的提升。
线程池这么好,那么如何实现一个线程池呢?放心,不需要我们重新发明轮子了。从JDK1.5开始,java.util.concurrent包下已经内置了线程池 Executor 、 ExecutorService 接口。下面我们就娓娓道来JAVA中的线程池的原理和用法。
Java中的线程池
在Java中,我们通常使用
ThreadPoolExecutor来创建一个线程池。我们先来看看ThreadPoolExecutor的详细类图。

在介绍ThreadPoolExecutor这个具体的线程池实现之前,我们不妨先看看它的继承结构图。1)Executor
首先是顶层的
Executor接口。该接口只有一个execute方法。public interface Executor { void execute(Runnable command);Executor接口提供了一种将任务提交与任务的执行解耦的机制,可以让使用者不必在意Thread对象的创建、使用、调度等细节。
实际开发中通常应该使用Executor而不是显式创建线程。
例如,我们不需要为一组任务中的每一个任务都调用new Thread(new(RunnableTask())).start() 来执行,而是可以使用下列方式:Executor executor = anExecutor; executor.execute(new RunnableTask1()); executor.execute(new RunnableTask2());从上述类图中我们可以看到Executor接口还有两个子接口。
ExecutorService:扩展了Executor接口。添加了一些用来管理Executor生命周期和任务生命周期的方法;public interface ExecutorService extends Executor { void shutdown(); List<Runnable> shutdownNow(); boolean isShutdown(); boolean isTerminated(); boolean awaitTermination(long timeout, TimeUnit unit) throws InterruptedException; <T> Future<T> submit(Callable<T> task); <T> Future<T> submit(Runnable task, T result); Future<?> submit(Runnable task); <T> List<Future<T>> invokeAll(Collection<? extends Callable<T>> tasks) throws InterruptedException; <T> List<Future<T>> invokeAll(Collection<? extends Callable<T>> tasks, long timeout, TimeUnit unit) throws InterruptedException; <T> T invokeAny(Collection<? extends Callable<T>> tasks) throws InterruptedException, ExecutionException; <T> T invokeAny(Collection<? extends Callable<T>> tasks, long timeout, TimeUnit unit) throws InterruptedException, ExecutionException, TimeoutException;ScheduledExecutorService:扩展了ExecutorService。支持延迟执行和定期执行任务。schedule方法可以在指定的延时后执行一个Runnable或者Callable任务。
public interface ScheduledExecutorService extends ExecutorService { public ScheduledFuture<?> schedule(Runnable command, long delay, TimeUnit unit); public <V> ScheduledFuture<V> schedule(Callable<V> callable, long delay, TimeUnit unit); public ScheduledFuture<?> scheduleAtFixedRate(Runnable command, long initialDelay, long period, TimeUnit unit); public ScheduledFuture<?> scheduleWithFixedDelay(Runnable command, long initialDelay, long delay, TimeUnit unit);2)AbstractExecutorService
AbstractExecutorService是ExecutorService接口的默认实现,其实现了ExecutorService定义的执行任务的方法,比如submit,invokeAll,invokeAny等。AbstractExecutorService提供了一个newTaskFor方法用于构建 RunnableFuture 对象。执行任务方法返回的跟踪任务执行结果的对象都是通过newTaskFor来构建的。可以通过自定义newTaskFor来构建RunnableFuture。
RunnableFuture是一个即实现了Runnable接口又实现了Future接口的接口。可以通过Future来获得Runnable任务的执行结果。public interface RunnableFuture<V> extends Runnable, Future<V> { void run();3)ThreadPoolExecutor
这个
ThreadPoolExecutor就是我们日常使用的具体的线程池对象。ThreadPoolExecutor继承了AbstractExecutorService,实现了多线程的管理,任务的执行、监控,是具体的线程池实现。
先来看看ThreadPoolExecutor构造方法。public ThreadPoolExecutor(int corePoolSize, int maximumPoolSize, long keepAliveTime, TimeUnit unit, BlockingQueue<Runnable> workQueue, ThreadFactory threadFactory, RejectedExecutionHandler handler) { if (corePoolSize < 0 || maximumPoolSize <= 0 || maximumPoolSize < corePoolSize || keepAliveTime < 0) throw new IllegalArgumentException(); if (workQueue == null || threadFactory == null || handler == null) throw new NullPointerException(); this.acc = System.getSecurityManager() == null ? null : AccessController.getContext(); this.corePoolSize = corePoolSize; this.maximumPoolSize = maximumPoolSize; this.workQueue = workQueue; this.keepAliveTime = unit.toNanos(keepAliveTime); this.threadFactory = threadFactory; this.handler = handler;构造器中各个参数的说明如下:
corePoolSize:核心线程数。默认情况下核心线程会一直保持,即使这些线程是空闲的也是会一直存在的,可以理解为线程池中的常驻线程。
从JDK1.6开始,可以使用ThreadPoolExecutor#allowCoreThreadTimeOut(true)方法改变此策略。即当设置为true 时,线程池中的核心线程在空闲时间达到keepAliveTime时也会销毁。
maximumPoolSize:最大线程数,该线程池最大允许创建的线程总数。
keepAliveTime:所允许的非核心线程空闲时间。当线程池中的实际线程数量大于corePoolSize时,如果没有新的任务需要执行,核心线程之外的线程不会立即销毁,而是会等待任务,当等待的时间超过了keepAliveTime时会被销毁。
unit:上述等待时间的单位,比如毫秒、秒。
workQueue:等待队列。提交任务时,如果此时线程池中的线程数已经大于等于corePoolSize了,则会把该任务封装成一个Worker对象放入等待队列中。
threadFactory:线程工厂。用来创建具体的线程对象的一个工厂类。如果没有指定默认会使用Executors.defaultThreadFactory()作为线程工厂。
handler: 拒绝策略。当线程池中的线程数达到了最大限制,并且等待队列也已经满了的情况下的处理策略。线程池已经提供了如下4种策略。- AbortPolicy:直接抛出运行时RejectedExecutionException异常,这是默认策略;
- CallerRunsPolicy:由调用者自身的线程来执行该任务,该任务最终会被执行;
- DiscardPolicy:直接丢弃任务,不做任何处理,不报异常;
- DiscardOldestPolicy:丢弃等待队列中队头的任务(最老的任务),并尝试执行当前任务;如果失败,重复此过程。
综上所述,当新任务通过execute方法提交到线程池中执行时,会执行以下判断逻辑:
ThreadPoolExecutor执行顺序:- 如果当前线程池中运行的线程数少于corePoolSize,则会直接创建新线程来处理任务,哪怕线程池中已经存在空闲的线程;
- 如果当前线程池中运行的线程数大于等于corePoolSize,将任务加入等待队列BlockingQueue中。
- 如果上一步加入BlockingQueue成功,则需要二次检查(recheck)线程池的状态。 如果线程池不是Running状态,则从BlockingQueue移除任务,启动拒绝策略。
如果线程池处于Running状态,则检查工作线程(worker)是否为0。如果为0,则创建新的线程来处理任务。
如果这时创建的线程数大于maximumPoolSize,则启动拒绝策略。 - 如果加入BlockingQueue失败,即等待队列已满时会创建新的线程处理任务; 如果这时创建的线程数大于maximumPoolSize,则启动拒绝策略,即通过handler所指定的策略来处理任务。
由此可见,提交任务执行时,判断的顺序依次为 corePoolSize –> workQueue –> maximumPoolSize
介绍完线程池的基本概念之后,我们通过一个入门案例,看下如何创建一个线程池,并提交任务。
下面的例子很简单,就是通过new的方式创建了一个ThreadPoolExecutor线程池对象。
指定了5个核心线程数,20个最大线程数,非核心线程数最大空闲时间为60秒。指定了工作队列的大小为10000。

public static void main(String[] args) { ThreadPoolExecutor pool = new ThreadPoolExecutor(5, 20 , 60L, TimeUnit.SECONDS, new ArrayBlockingQueue(10000)); pool.execute(new Runnable() { @Override public void run() { System.out.println("run task..."); try { Thread.sleep(2000); } catch (InterruptedException e) { e.printStackTrace(); System.out.println("run task done!"); }); System.out.println("main thread running"); pool.shutdown();上述例子中没有额外指定而是采用默认的拒绝策略和线程池工厂。实际开发中建议手动指定。
比如像下面这样指定一个可以设置有意义的线程名字的线程池工厂。并且在任务被线程池拒绝时由调用者本身的线程(本例中是main线程)去执行任务。public static void main(String[] args) { ThreadPoolExecutor pool = new ThreadPoolExecutor(2, 5, 60L, TimeUnit.SECONDS, new ArrayBlockingQueue(3), new NamedThreadFactory("my-task-pool"), new ThreadPoolExecutor.CallerRunsPolicy()); for (int i = 0; i < 12; i++) { pool.execute(new Runnable() { @Override public void run() { System.out.println(Thread.currentThread().getName() + " run task..."); try { Thread.sleep(2000); } catch (InterruptedException e) { e.printStackTrace(); }); System.out.println("main thread running"); pool.shutdown();NamedThreadFactory:自定义的可传入线程名的线程池工厂public class NamedThreadFactory implements ThreadFactory { private String namePrefix; private AtomicInteger threadNumber = new AtomicInteger(1); private SecurityManager s = System.getSecurityManager(); private ThreadGroup group = s != null ? s.getThreadGroup() : Thread.currentThread().getThreadGroup(); public NamedThreadFactory(String namePrefix) { this.namePrefix = namePrefix; @Override public Thread newThread(Runnable r) { Thread t = new Thread(group, r, namePrefix + "-thread-" + threadNumber.getAndIncrement(), 0); if (t.isDaemon()) t.setDaemon(false); if (t.getPriority() != Thread.NORM_PRIORITY) t.setPriority(Thread.NORM_PRIORITY); return t;运行上述程序,会发现,所有任务都得到执行。在核心线程数用完后,启用到了最大线程数。达到最大线程数,且队列也满了时,执行拒绝策略。
控制台输出了main线程和线程池线程共同执行任务的日志。
如果不指定拒绝策略,而使用默认的AbortPolicy,将会在线程数达到最大且队列满抛出异常。
本例中提交了12个任务,由于最大线程数是5,且队列大小为3。因此在极限条件下只能处理8个任务。my-task-pool-thread-1 run task... my-task-pool-thread-4 run task... my-task-pool-thread-3 run task... my-task-pool-thread-2 run task... my-task-pool-thread-5 run task... Exception in thread "main" java.util.concurrent.RejectedExecutionException: Task com.zpc.test.TestThread$1@377dca04 rejected from java.util.concurrent.ThreadPoolExecutor@728938a9[Running, pool size = 5, active threads = 5, queued tasks = 3, completed tasks = 0] at java.util.concurrent.ThreadPoolExecutor$AbortPolicy.rejectedExecution(ThreadPoolExecutor.java:2063) at java.util.concurrent.ThreadPoolExecutor.reject(ThreadPoolExecutor.java:830) at java.util.concurrent.ThreadPoolExecutor.execute(ThreadPoolExecutor.java:1379) at com.zpc.test.TestThread.main(TestThread.java:24) my-task-pool-thread-3 run task... my-task-pool-thread-2 run task... my-task-pool-thread-5 run task...4)线程池工厂Executors
上述创建线程池的方式采用的是手动new的方式,实际上jdk提供了创建线程池的工厂类。
Executors是创建线程池的工厂类或者叫工具类。其实在Java中,很多以类名+s的复数式方式命名的类都是一类工具类。比如Arrays、Collections。- FixedThreadPool
- 创建线程数量固定的线程池。核心线程数等于最大线程数,空闲时间为0,由于没有核心线程以外的线程,因此空闲时间不再起作用。不过可以使用allowCoreThreadTimeOut(true)来设置核心线程的销毁策略。
- 等待队列使用的是没有指定容量的LinkedBlockingQueue,该队列默认容量是Integer.MAX_VALUE。因此可能会堆积大量的请求,从而导致OOM
public static ExecutorService newFixedThreadPool(int nThreads) { return new ThreadPoolExecutor(nThreads, nThreads, TimeUnit.MILLISECONDS, new LinkedBlockingQueue<Runnable>());- SingleThreadExecutor
创建一个单线程的线程池。和上面的FixedThreadPool区别在于指定了线程数量为1。也存在OOM-队列溢出风险
public static ExecutorService newSingleThreadExecutor() { return new FinalizableDelegatedExecutorService (new ThreadPoolExecutor(1, TimeUnit.MILLISECONDS, new LinkedBlockingQueue<Runnable>()));- CachedThreadPool
可以进行缓存的线程池。核心线程数为0,最大线程数为Integer.MAX_VALUE。意味着它的线程数可以按需任意增加。提交任务时会优先复用先前已经创建好的线程来执行。如果没有可用的线程将创建新的线程来执行任务。60秒内未使用的线程将被终止并从缓存中删除。因此这种保持一定空闲时间的线程缓存池不会消耗任何额外资源。但是某些业务场景下可能会导致创建大量的线程,从而导致OOM
public static ExecutorService newCachedThreadPool() { return new ThreadPoolExecutor(0, Integer.MAX_VALUE, 60L, TimeUnit.SECONDS, new SynchronousQueue<Runnable>());- ScheduledThreadPool
创建一个可以执行延迟任务或者定期任务的线程池,就是在给定的延迟时间之后,或周期性地执行任务。类似于Timer定时器,但是比后者更好用。
public static ScheduledExecutorService newSingleThreadScheduledExecutor() { return new DelegatedScheduledExecutorService (new ScheduledThreadPoolExecutor(1));- WorkStealingPool
JDK1.8引入的一种线程池,stealing 翻译为抢断、窃取的意思。实际返回的是基于Work-Stealing 算法的ForkJoinPool。
ForkJoinPool在JDK 1.7 时引入。ForkJoinPool适合处理那种可以拆分成多个小任务执行的大任务。
其实现机制分为Fork和Join两个阶段。Fork是将大任务拆分为多个小任务,然后让小任务执行; 是获取小任务的结果,然后进行合并;最后将合并的结果作为大任务的结果。这是一个递归的过程。ForkJoinPool也可以作为一个通用线程池使用,需要注意的是如果使用ForkJoinPool.commonPool()创建的线程池,将会被全局共享。
JDK8中的并发流(parallelStream)默认使用了fork-join框架,其默认线程数是CPU核心数。且该ForkJoinPool池是所有并行流共享的,在特定场景下可能会对性能造成严重影响。
因此我们可以手动创建单独的ForkJoinPool进行隔离,并且可以指定线程并发的数量。可以手动new ForkJoinPool(),也可以使用Executors工厂类提供的下列方法。
创建使用机器CPU核心数作为并行度的ForkJoinPool
public static ExecutorService newWorkStealingPool(int parallelism) { return new ForkJoinPool(parallelism, ForkJoinPool.defaultForkJoinWorkerThreadFactory, null, true);创建指定并行度的ForkJoinPool
public static ExecutorService newWorkStealingPool(int parallelism) { return new ForkJoinPool(parallelism, ForkJoinPool.defaultForkJoinWorkerThreadFactory, null, true); 上面的线程池除WorkStealingPool外还提供了对应的可传入线程工厂(ThreadFactory)的构建方法,此处不再赘述。
Executors框架提供了一个线程工厂的具体实现:DefaultThreadFactory,如果在创建线程池时没有手动指定线程池工厂,则会使用下面这个默认的ThreadFactory。static class DefaultThreadFactory implements ThreadFactory { private static final AtomicInteger poolNumber = new AtomicInteger(1); private final ThreadGroup group; private final AtomicInteger threadNumber = new AtomicInteger(1); private final String namePrefix; DefaultThreadFactory() { SecurityManager s = System.getSecurityManager(); group = (s != null) ? s.getThreadGroup() : Thread.currentThread().getThreadGroup(); namePrefix = "pool-" + poolNumber.getAndIncrement() + "-thread-"; public Thread newThread(Runnable r) { Thread t = new Thread(group, r, namePrefix + threadNumber.getAndIncrement(), 0); if (t.isDaemon()) t.setDaemon(false); if (t.getPriority() != Thread.NORM_PRIORITY) t.setPriority(Thread.NORM_PRIORITY); return t;至此,我们介绍完了Java中创建线程池的方法。
正如开头所说的,我们在代码中不推荐使用new Thread(new(RunnableTask())).start()的方式随意开启线程。而应该优先考虑使用线程池的方式管理线程。如果不使用线程池,有可能造成系统创建大量同类线程而导致内存耗尽或者CPU“过度切换”等问题。总结一下合理使用线程池带来的好处。
- 降低资源消耗
重复利用已经创建好的线程,降低频繁创建和销毁线程造成的系统资源开销,解决资源不足的问题。 - 提升系统响应速度
在事先创建好线程并启动的情况下,有任务到达时无需等待线程创建,立即就能执行。
在高并发系统中提升线程数能够显著提升系统的吞吐量和减少响应耗时。 - 线程的可管理性
使用线程池可以对线程进行统一分配、调优,还能实时监控线程的运行情况,统计线程池的实时信息,以便动态调整参数。
SpringBoot集成线程池
前面的案例中,我们使用线程池要么是手动new一个
ThreadPoolExecutor线程池对象,要么是使用Executors工具类创建适合特定场景的线程池。使用工厂类Executors方式屏蔽了底层细节,使用不合理时存在风险。《阿里巴巴Java开发手册》中也不建议使用这个工厂类,而是建议手动创建线程池,明确线程池的运行规则。实际开发中,我们基本上离不开Spring框架,那么能不能让Spring来帮助我们管理线程池对象呢?答案是肯定的。在Spring环境下,我们可以使用更优雅方式集成线程池。Spring框架提供了
ThreadPoolTaskExecutor、ThreadPoolExecutorFactoryBean等开箱即用的工具。简化了线程池的配置、生命周期管理。无需我们手动配置ThreadPoolExecutor就能够很方便地以Spring管理的Bean的方式使用线程池。使用ThreadPoolTaskExecutor
@Configuration public class ThreadPoolConfig { @Bean("taskExecutor") public Executor taskExecutor() { ThreadPoolTaskExecutor executor = new ThreadPoolTaskExecutor(); executor.setThreadNamePrefix("common-pool-"); executor.setCorePoolSize(20); executor.setMaxPoolSize(100); executor.setQueueCapacity(2000); executor.setKeepAliveSeconds(60); executor.setWaitForTasksToCompleteOnShutdown(true); executor.setAwaitTerminationSeconds(60); executor.setRejectedExecutionHandler(new ThreadPoolExecutor.CallerRunsPolicy()); return executor;上述示例通过Java Configuration的方式创建了一个ThreadPoolTaskExecutor线程池,并设置了下列参数:
线程池名的前缀;核心线程数20;最大线程数100;等待队列大小2000;允许线程的空闲时间60秒;优雅关闭线程池(线程关闭时将正在执行的任务和等待队列的任务执行完成);线程关闭时等待60秒钟的时间;以及线程池对拒绝任务的处理策略。
使用起来也很简单,只要在需要的地方注入即可。比如写个单元测试。@SpringBootTest public class TestThreadPool { @Autowired @Qualifier("taskExecutor") Executor threadPoolExecutor; @Test public void test01() { for (int i = 0; i < 10; i++) { threadPoolExecutor.execute(new Runnable() { @Override public void run() { System.out.println(Thread.currentThread().getName() + " run task..."); try { Thread.sleep(1000); } catch (InterruptedException e) { e.printStackTrace(); });
更进一步,我们可以将线程池的参数做成配置化的,这在SpringBoot中非常easy。
application.propertiesthreads=100 maxThreads=300 queueSize=1000@Bean("taskExecutor2") public Executor taskExecutor2(@Value("${threads}") int threads, @Value("${maxThreads}") int maxThreads, @Value("${queueSize}") int queueSize) { ThreadPoolTaskExecutor executor = new ThreadPoolTaskExecutor(); executor.setCorePoolSize(threads); executor.setMaxPoolSize(maxThreads); executor.setQueueCapacity(queueSize); executor.setKeepAliveSeconds(60); executor.setWaitForTasksToCompleteOnShutdown(true); executor.setAwaitTerminationSeconds(60); executor.setThreadFactory(new NamedThreadFactory("common-taskExecutor")); executor.setRejectedExecutionHandler(new ThreadPoolExecutor.CallerRunsPolicy()); return executor;@Autowired @Qualifier("taskExecutor2") Executor threadPoolExecutor2;上述案例中我们通过
application.properties传入的配置参数创建了一个线程池,并且使用了自定义的线程池工厂。从上面的例子中我们发现,通过在配置类中使用@Bean的方式实例化多个ThreadPoolTaskExecutor,可以创建多个线程池对象,这样一来,不同的业务就可以使用不同的线程池进行业务线程隔离,互不影响,尤其是在业务性能差别较大的情况下,一个性能消耗大的业务阻塞了也不会拖垮另一个业务,因为大家使用不同的线程池。使用@Async实现异步调用
所谓异步调用是相对同步调用而言的,同步调用就是指程序按照定义顺序依次执行,每一行程序都必须等待上一行程序执行完成之后才能执行;如果是涉及方法调用,那么要等被调的方法返回,才能继续执行。而异步调用时不需要等待调用的语句返回结果就可以继续执行后面的程序。
定义一个任务类
@Component public class MyTask { public void task1() throws InterruptedException { System.out.println("task1 start"); long start = System.currentTimeMillis(); Thread.sleep(2000); long end = System.currentTimeMillis(); System.out.println("task1 end,cost:" + (end - start) + "ms"); public void task2() throws InterruptedException { System.out.println("task2 start"); long start = System.currentTimeMillis(); Thread.sleep(2000); long end = System.currentTimeMillis(); System.out.println("task2 end,cost:" + (end - start) + "ms"); public void task3() throws InterruptedException { System.out.println("task3 start"); long start = System.currentTimeMillis(); Thread.sleep(2000); long end = System.currentTimeMillis(); System.out.println("task3 end,cost:" + (end - start) + "ms");@SpringBootTest public class MyTaskTest { @Autowired MyTask myTask; @Test public void testMyTask() throws InterruptedException { System.out.println("start all task"); long start = System.currentTimeMillis(); myTask.task1(); myTask.task2(); myTask.task3(); long end = System.currentTimeMillis(); System.out.println("done all task,cost:" + (end - start) + "ms"); Thread.sleep(3000);控制台输出
start all task task1 start task1 end,cost:2001ms task2 start task2 end,cost:2000ms task3 start task3 end,cost:2000ms done all task,cost:6001ms上面的例子演示了3个任务的顺序执行,即同步调用方式。
在SpringBoot中,只要使用
@Async注解就能将同步方法包装为异步方法执行。@Component public class MyTask { @Async public void task1() throws InterruptedException { //内容和同步一样 @Async public void task2() throws InterruptedException { //内容和同步一样 @Async public void task3() throws InterruptedException { //内容和同步一样要使
@Async注解能够生效,还需要在SpringBoot启动类中开启@EnableAsync@SpringBootApplication @EnableAsync public class ThreadpoolDemoApplication { public static void main(String[] args) { SpringApplication.run(ThreadpoolDemoApplication.class, args);再次运行单元测试,发现不再是串行执行,而是3个任务并发执行完成。
上面的3个任务都是不带返回值的,也可以使用Future<T>来返回异步调用的结果。比如我们改造一下上述任务,使其执行完成时返回一个字符串。上面的3个任务都是不带返回值的,也可以使用
Future<T>来返回异步调用的结果。比如我们改造一下上述任务,使其执行完成时返回一个字符串。@Component public class MyTask { @Async public Future<String> task1() throws InterruptedException { System.out.println("task1 start"); long start = System.currentTimeMillis(); Thread.sleep(2000); long end = System.currentTimeMillis(); System.out.println("task1 end,cost:" + (end - start) + "ms"); return new AsyncResult<>("task1done"); @Async public Future<String> task2() throws InterruptedException { System.out.println("task2 start"); long start = System.currentTimeMillis(); Thread.sleep(2000); long end = System.currentTimeMillis(); System.out.println("task2 end,cost:" + (end - start) + "ms"); return new AsyncResult<>("task2done"); @Async public Future<String> task3() throws InterruptedException { System.out.println("task3 start"); long start = System. currentTimeMillis(); Thread.sleep(2000); long end = System.currentTimeMillis(); System.out.println("task3 end,cost:" + (end - start) + "ms"); return new AsyncResult<>("task3done");@SpringBootTest public class MyTaskTest { @Autowired MyTask myTask; @Test public void testMyTask() throws Exception { System.out.println("start all task"); long start = System.currentTimeMillis(); Future<String> res1 = myTask.task1(); Future<String> res2 = myTask.task2(); Future<String> res3 = myTask.task3(); String s1 = res1.get(); String s2 = res2.get(); String s3 = res3.get(); long end = System.currentTimeMillis(); System.out.println("done all task,cost:" + (end - start) + "ms"); System.out.println("all res:" + s1 + ";" + s2 + ";" + s3);上述案例通过
Future的get()方法拿到了异步调用返回结果,注意get()方法会阻塞当前程序。控制台输出了执行日志,总耗时接近单个任务的耗时,证明了确实是并发执行的。start all task task2 start task1 start task3 start task3 end,cost:2000ms task2 end,cost:2000ms task1 end,cost:2000ms done all task,cost:2010ms all res:task1done;task2done;task3done自定义线程池
上述案例中,使用
@Async注解时没有手动指定线程池,会使用默认的线程池SimpleAsyncTaskExecutor。该默认的线程池存在很大弊端,因为其采取的策略是每来一个任务都会创建一个新的线程去处理,并不会复用线程,在高并发环境下可能导致线程创建过多,影响性能。
从@Async注解处理器AsyncExecutionInterceptor源码中我们可以看到上述结论的依据。
首先是使用super.getDefaultExecutor()方法获取容器中类型为TaskExecutor类型的Bean,如果找不到就找Bean的名字为taskExecutor的Executor类型的Bean。都找不到则new一个SimpleAsyncTaskExecutor。@Override @Nullable protected Executor getDefaultExecutor(@Nullable BeanFactory beanFactory) { Executor defaultExecutor = super.getDefaultExecutor(beanFactory); return (defaultExecutor != null ? defaultExecutor : new SimpleAsyncTaskExecutor());public static final String DEFAULT_TASK_EXECUTOR_BEAN_NAME = "taskExecutor"; @Nullable protected Executor getDefaultExecutor(@Nullable BeanFactory beanFactory) { if (beanFactory != null) { try { // Search for TaskExecutor bean... not plain Executor since that would // match with ScheduledExecutorService as well, which is unusable for // our purposes here. TaskExecutor is more clearly designed for it. return beanFactory.getBean(TaskExecutor.class); catch (NoUniqueBeanDefinitionException ex) { logger.debug("Could not find unique TaskExecutor bean", ex); try { return beanFactory.getBean(DEFAULT_TASK_EXECUTOR_BEAN_NAME, Executor.class); catch (NoSuchBeanDefinitionException ex2) { if (logger.isInfoEnabled()) { logger.info("More than one TaskExecutor bean found within the context, and none is named " + "'taskExecutor'. Mark one of them as primary or name it 'taskExecutor' (possibly " + "as an alias) in order to use it for async processing: " + ex.getBeanNamesFound()); catch (NoSuchBeanDefinitionException ex) { logger.debug("Could not find default TaskExecutor bean", ex); try { return beanFactory.getBean(DEFAULT_TASK_EXECUTOR_BEAN_NAME, Executor.class); catch (NoSuchBeanDefinitionException ex2) { logger.info("No task executor bean found for async processing: " + "no bean of type TaskExecutor and no bean named 'taskExecutor' either"); // Giving up -> either using local default executor or none at all... return null;从SimpleAsyncTaskExecutor的源码中可以看到其每次执行任务都是new了一个Thread对象。
@Override public void execute(Runnable task) { execute(task, TIMEOUT_INDEFINITE); @Override public void execute(Runnable task, long startTimeout) { Assert.notNull(task, "Runnable must not be null"); Runnable taskToUse = (this.taskDecorator != null ? this.taskDecorator.decorate(task) : task); if (isThrottleActive() && startTimeout > TIMEOUT_IMMEDIATE) { this.concurrencyThrottle.beforeAccess(); doExecute(new ConcurrencyThrottlingRunnable(taskToUse)); else { doExecute(taskToUse);因此在使用
@Async注解执行异步方法时建议指定自定义线程池,全权把握线程池的配置。
使用方法很简单,就是在注解中指定线程池参数。当然如果系统中本来就有TaskExecutor
类型的线程池对象或者名称为taskExecutor的Executor类型对象也会自动被引用。建议还是手动注明可读性比较好。比如像下面这样为不同的方法绑定不同的线程池(比如taskExecutor、taskExecutor2)。而这两个线程池都是之前我们手动明确配置的(线程池参数可以在配置文件中传入)。@Component public class MyTask { @Async("taskExecutor") public Future<String> task1() throws InterruptedException { System.out.println(Thread.currentThread() + " task1 start"); long start = System.currentTimeMillis(); Thread.sleep(2000); long end = System.currentTimeMillis(); System.out.println("task1 end,cost:" + (end - start) + "ms"); return new AsyncResult<>("task1done"); @Async("taskExecutor") public Future<String> task2() throws InterruptedException { System.out.println(Thread.currentThread() + " task2 start"); long start = System.currentTimeMillis(); Thread.sleep(2000); long end = System.currentTimeMillis(); System.out.println("task2 end,cost:" + (end - start) + "ms"); return new AsyncResult<>("task2done"); @Async("taskExecutor2") public Future<String> task3() throws InterruptedException { System.out.println(Thread.currentThread() + " task3 start"); long start = System.currentTimeMillis(); Thread.sleep(2000); long end = System.currentTimeMillis(); System.out.println("task3 end,cost:" + (end - start) + "ms"); return new AsyncResult<>("task3done");控制台输出了线程池的名字
start all task Thread[common-taskExecutor-thread-1,5,main] task3 start Thread[common-pool-1,5,main] task1 start Thread[common-pool-2,5,main] task2 start task3 end,cost:2000ms task2 end,cost:2000ms task1 end,cost:2000ms done all task,cost:2010ms all res:task1done;task2done;task3done实际项目中,不同的微服务往往使用不同的线程池。因为不同的服务其QPS不尽相同,比如serviceA的QPS远高于serviceB和serviceC,如果使用全局共享的线程池,将导致线程池被A服务大量占用,B和C的请求可能直接被reject或者在线程池阻塞队列中等待超时。
线程池的监控与管理
通过上面的介绍,我们知道线程池通常有一些核心配置,主要是核心线程数、最大线程数和队列大小。这几个参数基本决定了一个线程池的承载力。
那么这些参数该如何配置呢?实际上业界也没有一个统一的标准。虽然有些所谓的"公式",但是不同的业务场景复杂多变,配置原则也不尽相同。从实际经验来看,IO密集型、CPU密集型应用在线程配置上就比较悬殊,因此没有一个通用的适合所有场景的公式。那么我们换一种思路,就是既然不能明确配置,那么能不能支持动态配置呢?答案是肯定的,因为线程池本身就支持核心线程数和最大线程数的修改,而且是实时生效的。
通常在生产环境中,我们可以实时监控线程池的运行状态,随时掌握应用服务的性能状况,以便在系统资源紧张时及时告警,动态调整线程配置,必要时进行人工介入,排查问题,线上修复。线程信息简单统计
对于上面案例中线程池加入统计功能,定时输出线程信息。一些常见的监控指标如下。
监控指标 说明 activeCount 活跃线程数 corePoolSize 核心线程数 poolSize 当前线程池中运行的线程总数 maximumPoolSize 最大线程数 taskCount 已提交还未执行的任务数 completedTaskCount 线程池已经执行完成的任务总数 largestPoolSize 线程池容量触达过的最大值 rejectCount 被拒绝的线程的数量 queueSize/waitTaskCount 等待执行的任务数量 taskAvgTime 任务平均时长(以任务提交时间进行计时) taskAvgExecTime 任务平均执行时长(以任务开始执行时间进行计时) taskTotalTime 任务总时长(以任务提交时间进行计时) taskTotalExecTime 任务执行时长(以任务开始执行时间进行计时) minTaskTime 最短任务时间(以任务提交时间进行计时) maxTaskTime 最长任务时间(以任务提交时间进行计时) 其中的一些指标可以使用jdk自身提的API来实现。
ThreadPoolExecutor提供了如下API:- int getCorePoolSize():核心线程数。
- int getLargestPoolSize():历史峰值线程数。
- int getMaximumPoolSize():最大线程数。
- int getActiveCount():当前活跃线程数。
- int getPoolSize():当前线程池中运行的线程总数。
- getQueue.size():当前任务队列中积压任务的总数。
- long getCompletedTaskCount() :返回已完成执行的任务总数(近似值)。
- long getTaskCount() :返回已安排执行的大致任务总数。
比如我们定时输出上述案例中线程池的统计信息。
@Configuration public class ThreadPoolConfig { @Bean("taskExecutor") public Executor taskExecutor() { ThreadPoolTaskExecutor executor = new ThreadPoolTaskExecutor(); executor.setThreadNamePrefix("common-pool-"); executor.setCorePoolSize(5); executor.setMaxPoolSize(200); executor.setQueueCapacity(1000); executor.setKeepAliveSeconds(60); executor.setWaitForTasksToCompleteOnShutdown(true); executor.setAwaitTerminationSeconds(60); executor.setRejectedExecutionHandler(new ThreadPoolExecutor.CallerRunsPolicy()); return executor;单元测试
在使用Spring容器管理的情况下很容易根据Bean的名字或者类型获得线程池对象。
使用定时任务的方式取读取线程池对象的信息并输出。运行单元测试,从控制台可以看到线程池的统计信息的变化。
注意,如果提交的任务数没有超过队列大小的话是不会启用核心线程池以外的线程的,如果任务比较耗时就会长时间阻塞在队列中。@SpringBootTest public class TestThreadPool { private final ScheduledExecutorService scheduledExecutor = Executors.newSingleThreadScheduledExecutor(); @Autowired @Qualifier("taskExecutor") Executor threadPoolExecutor; @Test public void test01() throws InterruptedException { //每隔1秒钟输出一次线程池信息 scheduledExecutor.scheduleAtFixedRate(new Runnable() { @Override public void run() { try { System.out.println("=======================" + threadPoolExecutor.getClass().getSimpleName() + "======================="); ThreadPoolTaskExecutor threadPool = (ThreadPoolTaskExecutor) threadPoolExecutor; ThreadPoolExecutor executor = threadPool.getThreadPoolExecutor(); System.out.println("TaskCount:" + executor.getTaskCount()); System.out.println("CompletedTaskCount:" + executor.getCompletedTaskCount()); System.out.println("CorePoolSize:" + executor.getCorePoolSize()); System.out.println("LargestPoolSize:" + executor.getLargestPoolSize()); System.out.println("MaximumPoolSize:" + executor.getMaximumPoolSize()); System.out.println("ActiveThreadCount:" + executor.getActiveCount()); System.out.println("currentNumberOfThreads:" + executor.getPoolSize()); System.out.println("QueueSize:" + executor.getQueue().size()); } catch (Exception e) { System.out.println(e); }, 0, 1, TimeUnit.SECONDS); Thread.sleep(1000); //向线程池中提交任务 for (int i = 0; i < 1100; i++) { threadPoolExecutor.execute(new Runnable() { @Override public void run() { System.out.println(Thread.currentThread().getName() + " run task..."); try { Thread.sleep(1000); } catch (InterruptedException e) { e.printStackTrace(); }); Thread.sleep(60000);//防止程序退出线程参数动态修改
实际应用中主要有下列参数可以支持动态修改。
线程池参数 说明 corePoolSize 核心线程数 maximumPoolSize 最大线程数 queueCapacity 等待队列大小 timeout 任务超时时间告警阈值 execTimeout 任务执行超时时间告警阈值 queuedTaskWarningSize 等待队列排队数量告警阈值 checkInterval 线程池定时监控时间间隔 autoExtend 是否自动扩容 其中的corePoolSize、maximumPoolSize都可以使用
ThreadPoolExecutor提供的api实现:
public void setCorePoolSize(int corePoolSize)
public void setMaximumPoolSize(int maximumPoolSize)
从下面的ThreadPoolExecutor源码中可知, 如果设置的新值小于当前值,多余的现有线程将在下一次空闲时终止。
如果新设置的corePoolSize值更大,将在需要时启动新线程来执行任何排队的任务。public void setCorePoolSize(int corePoolSize) { if (corePoolSize < 0) throw new IllegalArgumentException(); int delta = corePoolSize - this.corePoolSize; this.corePoolSize = corePoolSize; if (workerCountOf(ctl.get()) > corePoolSize) interruptIdleWorkers(); else if (delta > 0) { // We don't really know how many new threads are "needed". // As a heuristic, prestart enough new workers (up to new // core size) to handle the current number of tasks in // queue, but stop if queue becomes empty while doing so. int k = Math.min(delta, workQueue.size()); while (k-- > 0 && addWorker(null, true)) { if (workQueue.isEmpty()) break;设置新的最大线程数时,如果新值小于当前值,多余的现有线程将在下一次空闲时终止。
public void setMaximumPoolSize(int maximumPoolSize) { if (maximumPoolSize <= 0 || maximumPoolSize < corePoolSize) throw new IllegalArgumentException(); this.maximumPoolSize = maximumPoolSize; if (workerCountOf(ctl.get()) > maximumPoolSize) interruptIdleWorkers();注意到,
ThreadPoolExecutor没有提供直接修改等待队列大小的api。这就需要我们自定义一个可以修改容量的队列。其实很简单,只要把jdk原生的队列中的容量设置为可以修改,并提供修改方法即可。
比如把jdk中的LinkedBlockingQueue拷贝一份,命名为CapacityResizableLinkedBlockingQueue。
将其capacity的属性变为可变的,并提供set方法:/** The capacity bound, or Integer.MAX_VALUE if none */ private final int capacity;将上述原生代码改为:
private volatile int capacity; public void setCapacity(int capacity) { this.capacity = capacity;使用改造后的队列就可以支持动态修改线程池等待队列的容量大小了。
进一步统计线程执行情况
上述线程池的统计、线程池参数修改只是利用了
ThreadPoolExecutor
自身提供的API。
其它的一些统计指标则需要我们对ThreadPoolExecutor进行扩展才能实现,比如统计一个任务在队列中的等待时间。
下面我们就自行扩展一个线程池对象,来较为完整地实现线程池的监控告警。
主要实现如下功能:
1.以Spring容器方式管理不同的业务线程池对象,开箱即用
2.支持开启、关闭对指定线程池的监控,线程数、队列阈值告警,统计信息输出
3.支持动态修改核心线程数、最大线程数、队列大小创建线程池
其中自定义的
CapacityResizableLinkedBlockingQueue上文已经说明。
application.propertiescoreThread=100maxThread=200queueSize=1000@Configuration public class ThreadPoolConfig { @Bean("monitoredThreadPool") MonitoredThreadPoolStatisticsExecutor monitoredPool(@Value("${coreThread}") int coreThread, @Value("${maxThread}") int maxThread, @Value("${queueSize}") int queueSize) { MonitoredThreadPoolStatisticsExecutor monitoredThreadPoolExecutor = new MonitoredThreadPoolStatisticsExecutor(coreThread, maxThread, 60, TimeUnit.SECONDS, new CapacityResizableLinkedBlockingQueue(queueSize), "monitoredThreadPool", 10000l, 10000l, 10000l, 70); return monitoredThreadPoolExecutor;MonitoredThreadPoolStatisticsExecutor:扩展的ThreadPoolExecutor线程池对象,在任务执行前后做统计
* 自定义可监控的线程池 public class MonitoredThreadPoolStatisticsExecutor extends ThreadPoolExecutor implements DisposableBean { * 线程池的名称 private String poolName; * 预设的任务超时时间阈值,用于统计功能。 * 以任务提交时间进行计时,单位 ms,大于0则记录超时次数。 private long timeout = 120000l; * 是否记录任务超时次数 private boolean taskTimeoutFlag = false; * 任务执行超时时间阈值,用于统计功能。 * 以任务开始执行进行计时,单位 ms,大于 0 则记录任务执行超时次数。 private long execTimeout = 120000l; * 是否记录任务执行超时次数 private boolean taskExecTimeoutFlag = false; * 任务在队列中等待的时间阈值,用于统计功能。 * 以任务提交时间开始计时到开始执行为止,单位 ms。 private long waitInQueueTimeout = 60000l; * 是否记录任务等待时间超时次数 private boolean taskWaitInQueueTimeoutFlag = false; * 任务队列使用率告警阈值 private int queueSizeWarningPercent = 80; * 是否进行队列容量告警 private boolean queueSizeWarningFlag = false; * 是否需要队列容量告警(队列是否曾经达到过预警值) private AtomicBoolean queueSizeHasWarningFlag = new AtomicBoolean(false); * 任务总时长,用于统计功能。以任务提交时间进行计时,单位 ms private AtomicLong taskTotalTime = new AtomicLong(0); * 任务总执行时长,用于统计功能。以任务开始执行进行计时,单位 ms private AtomicLong taskTotalExecTime = new AtomicLong(0); * 最短任务时常,以提交时间计时,单位 ms private long minTaskTime = Long.MAX_VALUE; * 最长任务时常,以提交时间计时,单位 ms private long maxTaskTime = 0; * 任务超时次数,以任务提交进行计时 private AtomicLong taskTimeoutCount = new AtomicLong(0); * 任务执行超时次数,以任务开始执行时间进行计时 private AtomicLong taskExecTimeoutCount = new AtomicLong(0); * 任务等待时间超过设定的阈值的次数 private AtomicLong taskWaitInQueueTimeoutCount = new AtomicLong(0); * 最短任务时常,以执行时间计时,单位 ms private long minTaskExecTime = Long.MAX_VALUE; * 最长任务时常,以执行时间计时,单位 ms private long maxTaskExecTime = 0; * 保存任务信息 private Map<String, TaskStatistics> taskInfoMap = new ConcurrentHashMap<String, TaskStatistics>(); public MonitoredThreadPoolStatisticsExecutor(int corePoolSize, int maximumPoolSize, long keepAliveTime, TimeUnit unit, BlockingQueue<Runnable> workQueue, RejectedExecutionHandler handler, String poolName, long timeout, long execTimeout, long waitInQueueTimeout, int queueSizeWarningPercent) { super(corePoolSize, maximumPoolSize, keepAliveTime, unit, workQueue, new NamedThreadFactory(poolName), handler); this.poolName = poolName; this.timeout = timeout; this.execTimeout = execTimeout; this.waitInQueueTimeout = waitInQueueTimeout; this.queueSizeWarningPercent = queueSizeWarningPercent; if (this.timeout > 0) { this.taskTimeoutFlag = true; if (this.execTimeout > 0) { this.taskExecTimeoutFlag = true; if (this.waitInQueueTimeout > 0) { this.taskWaitInQueueTimeoutFlag = true; if (this.queueSizeWarningPercent > 0) { this.queueSizeWarningFlag = true; public MonitoredThreadPoolStatisticsExecutor(int corePoolSize, int maximumPoolSize, long keepAliveTime, TimeUnit unit, BlockingQueue<Runnable> workQueue, String poolName, long timeout, long execTimeout, long waitInQueueTimeout, int queueSizeWarningPercent) { super(corePoolSize, maximumPoolSize, keepAliveTime, unit, workQueue, new NamedThreadFactory(poolName)); this.poolName = poolName; this.timeout = timeout; this.execTimeout = execTimeout; this.waitInQueueTimeout = waitInQueueTimeout; this.queueSizeWarningPercent = queueSizeWarningPercent; if (this.timeout > 0) { this.taskTimeoutFlag = true; if (this.execTimeout > 0) { this.taskExecTimeoutFlag = true; if (this.waitInQueueTimeout > 0) { this.taskWaitInQueueTimeoutFlag = true; if (this.queueSizeWarningPercent > 0) { this.queueSizeWarningFlag = true; @Override public void execute(Runnable command) { this.taskInfoMap.put(String.valueOf(command.hashCode()), new TaskStatistics()); if (this.queueSizeWarningFlag) { float f = (float) getQueue().size() / (getQueue().size() + getQueue().remainingCapacity()); BigDecimal bd = new BigDecimal(f).setScale(2, BigDecimal.ROUND_HALF_UP); int usedPercent = bd.multiply(new BigDecimal(100)).intValue(); if (usedPercent > this.queueSizeWarningPercent) { this.queueSizeHasWarningFlag.set(true); System.out.println("queueSize percent Warning!used:" + usedPercent + "%,qSize:" + getQueue().size() + ",remaining:" + getQueue().remainingCapacity()); super.execute(command); @Override protected void beforeExecute(Thread t, Runnable r) { TaskStatistics taskStatistics = this.taskInfoMap.get(String.valueOf(r.hashCode())); if (null != taskStatistics) { taskStatistics.setStartExecTime(System.currentTimeMillis()); super.beforeExecute(t, r); @Override protected void afterExecute(Runnable r, Throwable t) { //重写此方法做一些统计功能 long endTime = System.currentTimeMillis(); TaskStatistics taskStatistics = this.taskInfoMap.remove(String.valueOf(r.hashCode())); if (null != taskStatistics) { long taskTotalTime = endTime - taskStatistics.getCommitTime(); long taskExecTime = endTime - taskStatistics.getStartExecTime(); long taskWaitInQueueTime = taskStatistics.getStartExecTime() - taskStatistics.getCommitTime(); this.taskTotalTime.addAndGet(taskTotalTime); this.taskTotalExecTime.addAndGet(taskExecTime); if (this.minTaskTime > taskTotalTime) { this.minTaskTime = taskTotalTime; if (this.maxTaskTime < taskTotalTime) { this.maxTaskTime = taskTotalTime; if (this.taskTimeoutFlag && taskTotalTime > this.timeout) { this.taskTimeoutCount.incrementAndGet(); if (this.minTaskExecTime > taskExecTime) { this.minTaskExecTime = taskExecTime; if (this.maxTaskExecTime < taskExecTime) { this.maxTaskExecTime = taskExecTime; if (this.taskExecTimeoutFlag && taskExecTime > this.execTimeout) { this.taskExecTimeoutCount.incrementAndGet(); if (this.taskWaitInQueueTimeoutFlag && taskWaitInQueueTime > this.waitInQueueTimeout) { this.taskWaitInQueueTimeoutCount.incrementAndGet(); System.out.println("task cost info[ taskTotalTime:" + taskTotalTime + ",taskExecTime:" + taskExecTime + ",taskWaitInQueueTime:" + taskWaitInQueueTime + " ]"); super.afterExecute(r, t); * Spring容器管理线程池的生命周期,线程池Bean销毁之前先关闭 * @throws Exception @Override public void destroy() throws Exception { shutdown(); * 任务平均时长,无已完成任务时,返回 0 public long getTaskAvgTime() { if (this.getCompletedTaskCount() > 0) { return this.getTaskTotalTime().get() / this.getCompletedTaskCount(); return 0; * 任务平均执行时长,无已完成任务时,返回 0 public long getTaskAvgExecTime() { if (this.getCompletedTaskCount() > 0) { return this.getTaskTotalExecTime().get() / this.getCompletedTaskCount(); return 0; //省略setter/getter方法TaskStatistics
public class TaskStatistics { * 任务提交时间 private long commitTime; * 任务开始执行时间 private long startExecTime; public TaskStatistics() { this.commitTime = System.currentTimeMillis(); } //省略setter/getter方法测试线程池
写一个Controller,通过postman等客户端请求工具来完成测试。
可以模拟任务提交执行;可以对指定线程池开启/关闭监控功能;可以动态修改指定线程池的配置;@Controller public class TestThreadPoolController { private final ScheduledExecutorService scheduledExecutor = Executors.newSingleThreadScheduledExecutor(); private static ConcurrentHashMap<String, ScheduledFuture<?>> monitorMap = new ConcurrentHashMap<>(); @Autowired public ApplicationContext applicationContext; @Autowired @Qualifier("monitoredThreadPool") ThreadPoolExecutor threadPoolExecutor; @RequestMapping("/pool/runTask") @ResponseBody public String runPoolTask(int taskCount) { AtomicInteger atomicInteger = new AtomicInteger(); for (int i = 0; i < taskCount; i++) { threadPoolExecutor.execute(new Runnable() { @Override public void run() { try { Thread.sleep(ThreadLocalRandom.current().nextInt(500)); System.out.println(Thread.currentThread ().getName() + "_" + atomicInteger.incrementAndGet()); } catch (InterruptedException e) { e.printStackTrace(); }); return "Ok"; * 管理线程池的监控 * * @param poolName * @param flag * @return @RequestMapping("/pool/monitorControl") @ResponseBody public String poolMonitorControl(String poolName, int flag) { ScheduledFuture<?> scheduledFuture = monitorMap.get(poolName); if (null == scheduledFuture) { //关闭监控 if (0 == flag) { return "已关闭监控,无需重复关闭"; //开启监控 if (1 == flag) { MonitoredThreadPoolStatisticsExecutor executor; try { executor = applicationContext.getBean(poolName, MonitoredThreadPoolStatisticsExecutor.class); } catch (NoSuchBeanDefinitionException e) { System.out.println(e); return "Fail"; //每隔1秒钟输出一次线程池信息 ScheduledFuture<?> poolMonitorFuture = scheduledExecutor.scheduleAtFixedRate(new Runnable() { @Override public void run() { try { System.out.println("===============monitor_info_" + poolName + "==============="); System.out.println("TaskCount:" + executor.getTaskCount()); System.out.println("CompletedTaskCount:" + executor.getCompletedTaskCount()); System.out.println("CorePoolSize:" + executor.getCorePoolSize()); System.out.println("LargestPoolSize:" + executor.getLargestPoolSize()); System.out.println("MaximumPoolSize:" + executor.getMaximumPoolSize()); System.out.println("ActiveThreadCount:" + executor.getActiveCount()); System.out.println("currentNumberOfThreads:" + executor.getPoolSize()); System.out.println("CurrentQueueSize:" + executor.getQueue().size()); System.out.println("QueueRemainingCapacity:" + executor.getQueue().remainingCapacity()); System.out.println("TaskAvgExecTime:" + executor.getTaskAvgExecTime()); System.out.println("TaskAvgTime:" + executor.getTaskAvgTime()); System.out.println("WaitInQueueTimeoutCount:" + executor.getTaskWaitInQueueTimeoutCount()); System.out.println("TaskTimeoutCount:" + executor.getTaskTimeoutCount()); System.out.println("TaskExecTimeoutCount:" + executor.getTaskExecTimeoutCount()); if (executor.getQueueSizeHasWarningFlag().get()) { System.out.println("线程池" + executor.getPoolName() + "队列使用率曾经超过" + executor.getQueueSizeWarningPercent() + "%"); executor.getQueueSizeHasWarningFlag().set(false); } catch (Exception e) { System.out.println(e); }, 0, 1000, TimeUnit.MILLISECONDS); monitorMap.putIfAbsent(poolName, poolMonitorFuture); } else { //关闭监控 if (0 == flag) { scheduledFuture.cancel(false); monitorMap.remove(poolName); //开启监控 if (1 == flag) { return "已开启监控,无需重复开启"; return "Ok"; * 动态修改核心线程数、最大线程数、队列大小 * @param poolName * @param coreSize * @param maxSize * @param queueSize * @return @RequestMapping("/pool/poolConfig") @ResponseBody public String poolConfig(String poolName, int coreSize, int maxSize, int queueSize) { ThreadPoolExecutor poolExecutor; try { poolExecutor = applicationContext.getBean(poolName, ThreadPoolExecutor.class); poolExecutor.setCorePoolSize(coreSize); poolExecutor.setMaximumPoolSize(maxSize); if (poolExecutor.getQueue() instanceof CapacityResizableLinkedBlockingQueue) { ((CapacityResizableLinkedBlockingQueue<Runnable>) poolExecutor.getQueue()).setCapacity(queueSize); } catch (NoSuchBeanDefinitionException e) { System.out.println(e); return "Fail"; return "Ok";Java8中的异步编程
所谓异步调用其实就是指调用一个方法(函数)后调用者可以无需等待其返回结果,调用者代码可以直接继续运行。比如在 Java 中,我们可以通过启动一个线程的方式来完成方法调用中的部分计算逻辑,而调用者本身无需同步等待返回结果,可以继续运行或者直接返回。但是某些场景下调用者仍需要获取异步线程的计算结果。此时我们会想到JDK5 新增的Future接口。
Future,顾名思义,表示未来(将来时),即用于描述一个异步计算的结果。
虽然说Future 提供了异步执行任务的能力,但是对于异步计算结果的获取却只能通过阻塞或者主动轮询的方式得到。阻塞的方式显然违背了异步编程的初衷;而轮询的方式又会浪费 CPU 资源,并且不能及时获取到计算结果。能不能让执行异步计算的线程主动向主线程通知其进度,以及成功失败与否呢?这就是本文要介绍的 JDK8引入的CompletableFuture。
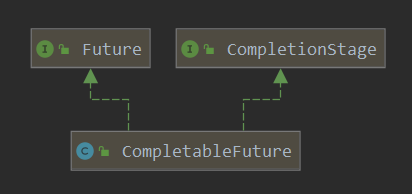
在Java8 中引入的CompletableFuture提供了非常强大的Future 的扩展功能,降低了异步编程、并发编程的复杂度,并且提供了函数式编程的能力。相比 Future 的一个明显的优势是支持异步回调,即可以传入回调函数。 当异步计算任务完成或者发生异常时,会主动调用回调对象的回调方法,这就省去了我们主动等待、获取异步计算结果,后者可以认为是一种伪异步模式。CompletableFuture还提供了多种转换和合并CompletableFuture的方法,即可以实现异步任务链、任务组合。CompletableFuture的类图结构如下图。内部持有一个Executor类型的对象asyncPool,作为执行异步任务的线程池。
创建异步任务
使用线程池的方式
我们学习了线程池的知识,使用线程池、多线程的方式就能实现异步效果。
1)executor.submit带返回值@Test public void test1() throws Exception { //阻塞等待任务执行完成,如果已完成则直接返回结果;如果执行任务异常,则get方法会重新抛出捕获的异常 ExecutorService executor = Executors.newSingleThreadExecutor(); Future<String> future = executor.submit(() -> { System.out.println(getNowTime() + Thread.currentThread() + " task start"); try { Thread.sleep(2000); } catch (InterruptedException e) { e.printStackTrace(); if (false) { throw new RuntimeException("some error"); } else { System.out.println(getNowTime() + Thread.currentThread() + " task end"); return "Success"; }); System.out.println(getNowTime() + Thread.currentThread() + "main thread go on!"); System.out.println("task result:" + future.get()); System.out.println(getNowTime() + Thread.currentThread() + "main thread over!"); executor.shutdown();2)executor.submit不带返回值
@Test public void test2() throws Exception { ExecutorService executor = Executors.newSingleThreadExecutor(); Future<?> future = executor.submit(() -> { System.out.println(getNowTime() + Thread.currentThread() + " task start"); try { Thread.sleep(2000); } catch (InterruptedException e) { e.printStackTrace(); if (false) { throw new RuntimeException("some error"); System.out.println(getNowTime() + Thread.currentThread() + " task end"); }); System.out.println(getNowTime() + Thread.currentThread() + "main thread go on!"); System.out.println("task result:" + future.get()); System.out.println(getNowTime() + Thread.currentThread() + "main thread over!"); executor.shutdown();3)executor.execute不带返回值
@Test public void test3() throws Exception { ExecutorService executor = Executors.newSingleThreadExecutor(); executor.execute(() -> { System.out.println(getNowTime() + Thread.currentThread() + " task start"); try { Thread.sleep(2000); } catch (InterruptedException e) { e.printStackTrace(); if (true) { throw new RuntimeException("some error"); System.out.println(getNowTime() + Thread.currentThread() + " task end"); }); System.out.println(getNowTime() + Thread.currentThread() + "main thread go on!"); System.out.println(getNowTime() + Thread.currentThread() + "main thread over!"); Thread.sleep(3000); executor.shutdown();使用CompletableFuture的方式
(1) runAsync 和 supplyAsync方法
1)、runAsync方法不支持返回值。
2)、supplyAsync可以支持返回值。
CompletableFuture的supplyAsync表示创建带返回值的异步任务的,功能类似于ExecutorService的submit(Callable<T> task)方法;runAsync表示创建不带返回值的异步任务,类似于ExecutorService的submit(Runnable task)方法。
CompletableFuture 中以Async结尾的方法表示异步执行,即这个方法会放到单独的线程池中执行,默认是ForkJoinPool,当然也可以自己指定。
CompletableFuture 提供了四个静态方法来创建一个异步操作。public static CompletableFuture<Void> runAsync(Runnable runnable) public static CompletableFuture<Void> runAsync(Runnable runnable, Executor executor) public static <U> CompletableFuture<U> supplyAsync(Supplier<U> supplier) public static <U> CompletableFuture<U> supplyAsync(Supplier<U> supplier, Executor executor)@Test public void testSupplyAsync() throws Exception { CompletableFuture<Integer> future = CompletableFuture.supplyAsync(() -> { System.out.println(getNowTime() + Thread.currentThread() + " task start"); try { Thread.sleep(2000); } catch (InterruptedException e) { e.printStackTrace(); //异常会在调用CompletableFuture.get()时重新抛出 if (false) { throw new RuntimeException("some error"); System.out.println(getNowTime() + Thread.currentThread() + " task end"); return 100; }); System.out.println(getNowTime() + Thread.currentThread() + "main thread go on!"); //阻塞等待任务执行完成,如果已完成则直接返回结果;如果执行任务异常,则get方法会重新抛出捕获的异常 System.out.println("task result:" + future.get()); System.out.println(getNowTime( ) + Thread.currentThread() + "main thread over!");2)创建不带返回值的异步任务(runAsync)
@Test public void testRunAsync() throws Exception { CompletableFuture<Void> future = CompletableFuture.runAsync(() -> { System.out.println(getNowTime() + Thread.currentThread() + " task start"); try { Thread.sleep(2000); } catch (InterruptedException e) { e.printStackTrace(); //异常会在调用CompletableFuture.get()时重新抛出 if (false) { throw new RuntimeException("some error"); System.out.println(getNowTime() + Thread.currentThread() + " task end"); }); System.out.println(getNowTime() + Thread.currentThread() + "main thread go on!"); //没有返回值的情况下返回null System.out.println("task result:" + future.get()); System.out.println(getNowTime() + Thread.currentThread() + "main thread over!");所谓异步任务,归根到底都是要以线程方式执行。因此上述2个方法各有一个重载版本,可以指定执行异步任务的Executor实现。如果不指定,默认使用
ForkJoinPool.commonPool(),如果当前机器是单核的,则默认使用ThreadPerTaskExecutor,该类是一个内部类,每次执行任务都会创建一个新线程。public static CompletableFuture<Void> runAsync(Runnable runnable, Executor executor) public static <U> CompletableFuture<U> supplyAsync(Supplier<U> supplier, Executor executor)@Test public void testRunAsyncWithPool() throws Exception { //手动创建线程池 ExecutorService executor= Executors.newSingleThreadExecutor(); CompletableFuture<Void> future = CompletableFuture.runAsync(() -> { System.out.println(getNowTime() + Thread.currentThread() + " task start"); try { Thread.sleep(2000); } catch (InterruptedException e) { e.printStackTrace(); //异常会在调用CompletableFuture.get()时重新抛出 if (false) { throw new RuntimeException("some error"); System.out.println(getNowTime() + Thread.currentThread() + " task end"); }, executor); //手动指定线程池 System.out.println(getNowTime() + Thread.currentThread() + "main thread go on!"); //没有返回值的情况下返回null System.out.println("task result:" + future.get()); System.out.println(getNowTime() + Thread.currentThread() + "main thread over!");@Test public void testSupplyAsyncWithPool() throws Exception { ForkJoinPool pool = new ForkJoinPool();//创建线程池 CompletableFuture<Integer> future = CompletableFuture.supplyAsync(() -> { System.out.println(getNowTime() + Thread.currentThread() + " task start"); try { Thread.sleep(2000); } catch (InterruptedException e) { e.printStackTrace(); //异常会在调用CompletableFuture.get()时重新抛出 if (false) { throw new RuntimeException("some error"); System.out.println(getNowTime() + Thread.currentThread() + " task end"); return 100; }, pool);//指定线程池 System.out.println(getNowTime() + Thread.currentThread() + "main thread go on!"); //阻塞等待任务执行完成,如果已完成则直接返回结果;如果执行任务异常,则get方法会重新抛出捕获的异常 System.out.println("task result:" + future.get()); System.out.println(getNowTime() + Thread.currentThread() + "main thread over!");1)、计算结果完成时的回调方法(线程串行化)
CompletableFuture相比传统Future的一个明显的优势是可以传入回调函数,不需要我们手动get阻塞等待,获得结果后再进行下一步处理;而是可以传入回调函数,等任务执行完成后自动调用回调函数。回调函数有很多种,下面一一讲解。- thenRun的方法没有入参,也没有返回值。
- thenAccept会接收上一个任务的返回值作为参数,但是无返回值;
- thenApply会接收上一个任务的返回值作为参数,并且有返回值。
//可以处理异常,无返回值 public CompletableFuture<T> whenComplete(BiConsumer<? super T,? super Throwable> action) public CompletableFuture<T> whenCompleteAsync(BiConsumer<? super T,? super Throwable> action) public CompletableFuture<T> whenCompleteAsync(BiConsumer<? super T,? super Throwable> action, Executor executor) //可以处理异常,有返回值 public CompletableFuture<T> exceptionally(Function<Throwable,? extends T> fn)thenRun/thenAccept
@Test public void testThenRunAndThenAccept() throws Exception { CompletableFuture<Integer> future1 = CompletableFuture.supplyAsync(() -> { //执行有返回值的异步任务 System.out.println(getNowTime() + Thread.currentThread() + " task1 start"); try { Thread.sleep(2000); } catch (InterruptedException e) { e.printStackTrace(); //异常会在调用CompletableFuture.get()时重新抛出 if (false) { throw new RuntimeException("some error"); System.out.println(getNowTime() + Thread.currentThread() + " task1 end"); return 100; }); CompletableFuture<Void> future2 = future1.thenAccept(res1 -> { //上一个任务的执行结果作为入参,无返回值 System.out.println(getNowTime() + Thread.currentThread() + " task2 start"); try { Thread.sleep(2000); } catch (InterruptedException e) { e.printStackTrace(); System.out.println("res1=" + res1); System.out.println(getNowTime() + Thread.currentThread() + " task2 end"); }); CompletableFuture<Void> future3 = future2.thenRun(() -> { //无入参,也无返回值 System.out.println(getNowTime() + Thread.currentThread() + " task3 start"); try { Thread.sleep(2000); } catch (InterruptedException e) { e. printStackTrace(); System.out.println(getNowTime() + Thread.currentThread() + " task3 end"); }); Thread.sleep(200); System.out.println(getNowTime() + Thread.currentThread() + "main thread go on,wait task1!"); //阻塞等待任务执行完成,如果已完成则直接返回结果;如果执行任务异常,则get方法会重新抛出捕获的异常 System.out.println("task1 result:" + future1.get()); System.out.println(getNowTime() + Thread.currentThread() + "main thread go on,wait task2!"); System.out.println("task2 result:" + future2.get()); System.out.println(getNowTime() + Thread.currentThread() + "main thread go on,wait task3!"); System.out.println("task3 result:" + future3.get()); System.out.println(getNowTime() + Thread.currentThread() + "main thread over!");thenApply/thenApplyAsync
thenApply表示某个任务执行完成后执行的动作,即回调方法,会将该任务的执行结果即方法返回值作为入参传递到回调方法中。
thenApplyAsync与thenApply的区别是前者将回调方法放到线程池中运行。那么执行这两个任务的就可能是线程池中的两个不同的线程。
thenApplyAsync有一个重载版本,可以指定执行异步任务的Executor实现,如果不指定,默认使用ForkJoinPool.commonPool()@Test public void testThenApply() throws Exception { ForkJoinPool pool = new ForkJoinPool(); CompletableFuture<Integer> future1 = CompletableFuture.supplyAsync(() -> { System.out.println(getNowTime() + Thread.currentThread() + " task1 start"); try { Thread.sleep(2000); } catch (InterruptedException e) { e.printStackTrace(); //异常会在调用CompletableFuture.get()时重新抛出 if (false) { throw new RuntimeException("some error"); System.out.println(getNowTime() + Thread.currentThread() + " task1 end"); return 100; }, pool); //CompletableFuture<Integer> future2 = future1.thenApplyAsync(res1 -> { CompletableFuture<Integer> future2 = future1.thenApply(res1 -> { System.out.println(getNowTime() + Thread.currentThread() + " task2 start"); try { Thread.sleep(2000); } catch (InterruptedException e) { e.printStackTrace(); System.out.println(getNowTime() + Thread.currentThread() + " task2 end"); return res1 + 99;//可以获得上一个任务的返回值,并且返回另一个值 }); Thread.sleep(200); System.out.println(getNowTime() + Thread.currentThread() + "main thread go on,wait task1!"); //阻塞等待任务执行完成,如果已完成则直接返回结果;如果执行任务异常,则get方法会重新抛出捕获的异常 System.out.println("task1 result:" + future1.get()); System.out.println(getNowTime() + Thread.currentThread() + "main thread go on,wait task2!"); System.out.println("task2 result:" + future2.get()); System.out.println(getNowTime() + Thread.currentThread() + "main thread over!" );2)、计算结果完成时的回调方法时抛出异常
当CompletableFuture的计算结果完成,或者抛出异常的时候,可以执行特定的Action。主要是下面的方法:
//可以处理异常,无返回值 public CompletableFuture<T> whenComplete(BiConsumer<? super T,? super Throwable> action) public CompletableFuture<T> whenCompleteAsync(BiConsumer<? super T,? super Throwable> action) public CompletableFuture<T> whenCompleteAsync(BiConsumer<? super T,? super Throwable> action, Executor executor) //可以处理异常,有返回值 public CompletableFuture<T> exceptionally(Function<Throwable,? extends T> fn)可以看到Action的类型是BiConsumer<? super T,? super Throwable>它可以处理正常的计算结果,或者异常情况。
whenComplete
whenComplete是当某个任务执行完成后执行的回调方法,会将执行结果或者执行期间抛出的异常传递给回调方法。如果是正常执行则没有异常,传给回调方法的异常参数为null。回调方法对应的CompletableFuture的结果和原任务一致,如果该任务正常执行,则get方法返回执行结果;如果是执行异常,则get方法抛出异常。public class ThreadTest { public static ExecutorService executor = Executors.newFixedThreadPool(10); public static void main(String[] args) throws ExecutionException, InterruptedException { System.out.println("main.............start......."); // CompletableFuture<Void> future = CompletableFuture.runAsync(() -> { // System.out.println("当前线程:" + Thread.currentThread().getId()); // int i = 10 / 2; // System.out.println("当前运行结果:" + i); // }, executor); CompletableFuture<Integer> future = CompletableFuture.supplyAsync(() -> { System.out.println("当前线程:" + Thread.currentThread().getId()); int i = 10 / 0; System.out.println("当前运行结果:" + i); return i; }, executor).whenComplete((result,exception)->{ //虽然能得到异常信息,但是没法修改返回数据 System.out.println("异步任务完成了...结果是"+result+";异常是"+exception); //可以感知异常,同时返回默认值 }).exceptionally(throwable -> { return 10; }); Integer integer = future.get(); System.out.println("main.............end......."+integer);public void testWhenComplete() throws Exception { CompletableFuture<Integer> future1 = CompletableFuture.supplyAsync(() -> {//执行有返回值的异步任务 System.out.println(getNowTime() + Thread.currentThread() + " task1 start"); try { Thread.sleep(2000); } catch (InterruptedException e) { e.printStackTrace(); //异常会在调用CompletableFuture.get()时重新抛出 if (true) { throw new RuntimeException("some error"); System.out.println(getNowTime() + Thread.currentThread() + " task1 end"); return 100; }); //上一个任务执行完成后会将执行结果和执行过程中抛出的异常传入回调方法,如果是正常执行的则传入的异常为null CompletableFuture<Integer> future2 = future1.whenComplete((r, e) -> { System.out.println("future1 res=" + r); System.out.println("exception=" + e); System.out.println(getNowTime() + Thread.currentThread() + " task2 start"); try { Thread.sleep(2000); } catch (InterruptedException ex) { ex.printStackTrace(); System .out.println(getNowTime() + Thread.currentThread() + " task2 end"); }); Thread.sleep(3000); System.out.println(getNowTime() + Thread.currentThread() + "main thread go on,wait task1!"); //如果future1是正常执行的,future2.get的结果就是future1执行的结果 //如果future1是执行异常,则future1.get()或future2.get()都会抛出异常 System.out.println("task1 result:" + future1.get()); System.out.println(getNowTime() + Thread.currentThread() + "main thread go on,wait task2!"); System.out.println("task2 result:" + future2.get()); System.out.println(getNowTime() + Thread.currentThread() + "main thread over!");handle
和
whenComplete基本一致。区别在于handle的回调方法有返回值,且handle方法返回的CompletableFuture的结果是回调方法的执行结果或者回调方法执行期间抛出的异常,而不是原CompletableFuture的结果。public <U> CompletionStage<U> handle(BiFunction<? super T, Throwable, ? extends U> fn); public <U> CompletionStage<U> handleAsync(BiFunction<? super T, Throwable, ? extends U> fn); public <U> CompletionStage<U> handleAsync(BiFunction<? super T, Throwable, ? extends U> fn,Executor executor)@Test public void testHandle() throws Exception { CompletableFuture<Integer> future1 = CompletableFuture.supplyAsync(() -> {//执行有返回值的异步任务 System.out.println(getNowTime() + Thread.currentThread() + " task1 start"); try { Thread.sleep(2000); } catch (InterruptedException e) { e.printStackTrace();//异常会在调用CompletableFuture.get()时重新抛出 if (true) { throw new RuntimeException("some error"); System.out.println(getNowTime() + Thread.currentThread() + " task1 end"); return 100; }); //上一个任务执行完成后会将执行结果和执行过程中抛出的异常传入回调方法,如果是正常执行的则传入的异常为null CompletableFuture<Integer> future2 = future1.handle((r, e) -> { System.out.println("future1 res=" + r); System.out.println("exception=" + e); System.out.println(getNowTime() + Thread.currentThread() + " task2 start"); try { Thread.sleep(2000); } catch (InterruptedException ex) { ex.printStackTrace(); System.out.println(getNowTime() + Thread.currentThread() + " task2 end"); return 99;//有返回值 }); Thread.sleep(3000); System.out.println(getNowTime() + Thread.currentThread() + "main thread go on,wait task1!"); //如果future1是执行异常,则future1.get会抛出异常 //future2.get的结果是future2的返回值,跟future1没关系了,这就是handle和whenComplete的区别 System.out.println ("task1 result:" + future1.get()); System.out.println(getNowTime() + Thread.currentThread() + "main thread go on,wait task2!"); System.out.println("task2 result:" + future2.get()); System.out.println(getNowTime() + Thread.currentThread() + "main thread over!");exceptionally
exceptionally指定某个任务执行异常时执行的回调方法,会将抛出异常作为参数传递到回调方法中。如果该任务正常执行则不会进入exceptionally方法,否则进入exceptionally方法。这比我们使用try{…}catch(){…}在任务里手动处理异常灵活得多。@Test public void testExceptionally() throws Exception { CompletableFuture<Integer> future1 = CompletableFuture.supplyAsync(() -> { //执行有返回值的异步任务 System.out.println(getNowTime() + Thread.currentThread() + " task1 start"); try { Thread.sleep(2000); } catch (InterruptedException e) { e.printStackTrace(); //异常会在调用CompletableFuture.get()时重新抛出 if (true) { throw new RuntimeException("some error"); System.out.println(getNowTime() + Thread.currentThread() + " task1 end"); return 100; }); //上一个任务执行异常则不调用此逻辑,执行异常时,将抛出的异常作为入参传递给回调方法 CompletableFuture<Integer> future2 = future1.thenApply(res1 -> { System.out.println(getNowTime() + Thread.currentThread() + " task2 start"); try { Thread.sleep(2000); } catch (InterruptedException e) { e.printStackTrace(); System.out.println("res1=" + res1); System.out.println(getNowTime() + Thread.currentThread() + " task2 end"); return 1; }).exceptionally((param) -> { System.out.println("error:" + param); param.printStackTrace(); return 0; }); Thread.sleep(200); System.out.println(getNowTime() + Thread.currentThread() + "main thread go on,wait task1!"); //阻塞等待任务执行完成,如果已完成则直接返回结果;如果执行任务异常,则get方法会重新抛出捕获的异常 System.out.println(getNowTime() + Thread.currentThread() + "main thread go on,wait task2!"); //task2的结果会随着task1有无异常而不同 System.out.println("task2 result:" + future2.get()); System.out.println(getNowTime() + Thread.currentThread() + "main thread over!");CompletableFuture允许将多个Future合并成一个Future,也允许多个独立的CompletableFuture同时并行执行。runAfterBoth/thenAcceptBoth/thenCombine
这3个方法都是将两个CompletableFuture组合起来。被组合的任务都正常执行完了才会继续执行下一个任务。
runAfterBoth既没有入参,也没有返回值。
两个CompletionStage,都完成了计算才会执行下一步的操作(Runnable)
public CompletionStage<Void> runAfterBoth(CompletionStage<?> other,Runnable action); public CompletionStage<Void> runAfterBothAsync(CompletionStage<?> other,Runnable action); public CompletionStage<Void> runAfterBothAsync(CompletionStage<?> other,Runnable action,Executor executor)thenAcceptBoth同样将两个任务的执行结果作为方法入参,但是无返回值;
当两个CompletionStage都执行完成后,把结果一块交给thenAcceptBoth来进行消耗
public <U> CompletionStage<Void> thenAcceptBoth(CompletionStage<? extends U> other,BiConsumer<? super T, ? super U> action); public <U> CompletionStage<Void> thenAcceptBothAsync(CompletionStage<? extends U> other,BiConsumer<? super T, ? super U> action); public <U> CompletionStage<Void> thenAcceptBothAsync(CompletionStage<? extends U> other,BiConsumer<? super T, ? super U> action, Executor executor);thenCombine将两个任务的执行结果作为方法入参传递到指定方法中,且该方法有返回值;
thenCombine 会把 两个 CompletionStage 的任务都执行完成后,把两个任务的结果一块交给 thenCombine 来处理。
public <U,V> CompletionStage<V> thenCombine(CompletionStage<? extends U> other,BiFunction<? super T,? super U,? extends V> fn); public <U,V> CompletionStage<V> thenCombineAsync(CompletionStage<? extends U> other,BiFunction<? super T,? super U,? extends V> fn); public <U,V> CompletionStage<V> thenCombineAsync(CompletionStage<? extends U> other,BiFunction<? super T,? super U,? extends V> fn,Executor executor);注意两个任务中只要有一个执行异常,则将该异常信息作为指定任务的执行结果。
@Test public void testCombine() throws Exception { System.out.println(getNowTime() + Thread.currentThread() + " main thread start!"); CompletableFuture<Integer> future1 = CompletableFuture.supplyAsync(() -> { System.out.println(getNowTime() + Thread.currentThread() + " task1 start"); try { Thread.sleep(2000); } catch (InterruptedException e) { //异常会在调用CompletableFuture.get()时重新抛出 e.printStackTrace(); if (false) { throw new RuntimeException("some error"); System.out.println(getNowTime() + Thread.currentThread() + " task1 end"); return 100; }); CompletableFuture<Integer> future2 = CompletableFuture.supplyAsync(() -> { System.out.println(getNowTime() + Thread.currentThread() + " task2 start"); try { Thread.sleep(2000); } catch (InterruptedException e) { e.printStackTrace();//异常会在调用CompletableFuture.get()时重新抛出 if (false) { throw new RuntimeException("some error"); System.out.println(getNowTime() + Thread.currentThread() + " task2 end"); return 88; }); //runAfterBoth既没有入参,也没有返回值 //task3要等到其组合的task1和task2执行完成后才会执行 CompletableFuture<Void> future3 = future2.runAfterBoth(future1, () -> { System.out.println(getNowTime() + Thread.currentThread() + " task3 start"); try { Thread.sleep(2000); } catch (InterruptedException e) { e.printStackTrace(); System.out.println(getNowTime() + Thread.currentThread() + " task3 end"); }); //thenAcceptBoth也是将两个任务的执行结果作为方法入参,但是无返回值 //task4要等到其组合的task1和task2执行完成后才会执行 CompletableFuture<Void> future4 = future1.thenAcceptBoth(future2, (res1, res2) -> { System.out.println(getNowTime() + Thread.currentThread() + " task4 start"); try { Thread.sleep(2000); } catch (InterruptedException e) { e.printStackTrace(); System.out.println("res1=" + res1 + ",res2=" + res2); System.out.println(getNowTime() + Thread.currentThread() + " task4 end"); }); //thenCombine将两个任务的执行结果分别作为方法入参传递到指定方法中,且该方法有返回值 //task5要等到其组合的task1和task2执行完成后才会执行 CompletableFuture<Integer> future5 = future1.thenCombine(future2, (res1, res2) -> { System.out.println(getNowTime() + Thread.currentThread() + " task5 start"); try { Thread.sleep(2000); } catch (InterruptedException e) { e.printStackTrace(); //异常会在调用CompletableFuture.get()时重新抛出 if (false) { throw new RuntimeException("some error"); System.out.println(getNowTime() + Thread.currentThread() + " task5 end"); return res1 + res2; }); //主线程在没有调用CompletableFuture.get()之前都不会阻塞 System.out.println(getNowTime() + Thread.currentThread() + "main thread go on,wait task1!"); System.out.println("task1 result:" + future1.get()); System.out.println(getNowTime() + Thread.currentThread() + "main thread go on,wait task2!"); System.out.println("task2 result:" + future2.get()); System.out.println(getNowTime() + Thread.currentThread() + "main thread go on,wait task3!"); System.out.println("task3 result:" + future3.get()); System.out.println(getNowTime() + Thread.currentThread() + "main thread go on,wait task4!"); System.out.println("task4 result:" + future4.get()); System.out.println(getNowTime() + Thread.currentThread() + "main thread go on,wait task5!"); System.out.println("task5 result:" + future5.get()); System.out.println(getNowTime() + Thread.currentThread() + "main thread over!");thenCompose
thenCompose会在某个任务执行完成后,将该任务的执行结果作为方法入参然传入指定的方法。该方法会返回一个新的CompletableFuture实例。新的CompletableFuture返回的结果作为组合任务的结果。@Test public void testCompose() throws Exception { System.out.println(getNowTime() + Thread.currentThread() + " main thread start!"); CompletableFuture<Integer> future1 = CompletableFuture.supplyAsync(() -> { System.out.println(getNowTime() + Thread.currentThread() + " task1 start"); try { Thread.sleep(2000); } catch (InterruptedException e) { e.printStackTrace(); //异常会在调用CompletableFuture.get()时重新抛出 if (false) { throw new RuntimeException("some error"); System.out.println(getNowTime() + Thread.currentThread() + " task1 end"); return 100; }); //thenCompose方法会在某个任务执行完成后,将该任务的执行结果作为方法入参然传入指定的方法 //该方法执行完成后会返回一个新的CompletableFuture实例 CompletableFuture<Integer> future3 = future1.thenCompose((res1) -> { System.out.println(getNowTime() + Thread.currentThread() + " task2 start"); System.out.println("res1=" + res1); try { Thread.sleep(2000); } catch (InterruptedException e) { e.printStackTrace(); //异常会在调用CompletableFuture.get()时重新抛出 if (false) { throw new RuntimeException("some error"); System.out.println(getNowTime() + Thread.currentThread() + " task2 end"); return CompletableFuture.supplyAsync(() -> { System.out.println(getNowTime() + Thread.currentThread() + " task3 start"); try { Thread.sleep(2000); } catch (InterruptedException e) { e.printStackTrace(); System.out.println(getNowTime() + Thread.currentThread() + " task3 end"); return res1 + 88;//"组合"了上一个任务的结果 }); }); //主线程在没有调用CompletableFuture.get()之前都不会阻塞 System.out.println(getNowTime() + Thread.currentThread() + "main thread go on!"); System.out.println("task3 result:" + future3.get());runAfterEither/acceptEither/applyToEither
这3个方法都是将两个CompletableFuture组合起来,只要其中一个执行完成就会执行回调方法。
runAfterEither既没有方法入参,也没有返回值。
public CompletionStage<Void> runAfterEither(CompletionStage<?> other,Runnable action); public CompletionStage<Void> runAfterEitherAsync(CompletionStage<?> other,Runnable action); public CompletionStage<Void> runAfterEitherAsync(CompletionStage<?> other,Runnable action,Executor executor);acceptEither同样将执行完成的任务的结果作为方法入参,但没有返回值;
两个CompletionStage,谁执行返回的结果快,我就用哪个CompletionStage的结果进行下一步的消耗操作。
public CompletionStage<Void> acceptEither(CompletionStage<? extends T> other,Consumer<? super T > action); public CompletionStage<Void> acceptEitherAsync(CompletionStage<? extends T> other,Consumer<? super T> action); public CompletionStage<Void> acceptEitherAsync(CompletionStage<? extends T> other,Consumer<? supeapplyToEither会将执行完成的任务的结果作为方法入参,并有返回值;
两个CompletionStage,谁执行返回的结果快,我就用那个CompletionStage的结果进行下一步的转化操作。
public <U> CompletionStage<U> applyToEither(CompletionStage<? extends T> other,Function<? super T, U> fn); public <U> CompletionStage<U> applyToEitherAsync(CompletionStage<? extends T> other,Function<? super T, U> fn); public <U> CompletionStage<U> applyToEitherAsync(CompletionStage<? extends T> other,Function<? sup注意两个任务中只要有一个执行异常,则在调用
CompletableFuture.get()时将该异常信息抛出。CompletableFuture<Object> future01 = CompletableFuture.supplyAsync(() -> { System.out.println("任务1线程:" + Thread.currentThread().getId()); int i = 10 / 5; System.out.println("任务1线程结束"); return i; }, executor); CompletableFuture<Object> future02 = CompletableFuture.supplyAsync(() -> { System.out.println("任务2线程:" + Thread.currentThread().getId()); try { Thread.sleep(3000); } catch (InterruptedException e) { e.printStackTrace(); System.out.println("任务2线程结束"); return "hello"; }, executor); CompletableFuture<String> applyToEitherAsync = future01.applyToEitherAsync(future02, (res) -> { System.out.println("任务三开始。。。" + res); return res.toString() + "-> haha"; }, executor);allOf
allOf是多个组合的任务都执行完成后才会返回,只要有一个任务执行异常,则返回的CompletableFuture执行
get()方法时会抛出异常。如果都是正常执行,则get()返回null。@Test public void testAll() throws Exception { System.out.println(getNowTime() + Thread.currentThread() + " main thread start!"); CompletableFuture<Integer> future1 = CompletableFuture.supplyAsync(() -> { System.out.println(getNowTime() + Thread.currentThread() + " task1 start"); try { Thread.sleep(3000); } catch (InterruptedException e) { e.printStackTrace(); //异常会在调用CompletableFuture.get()时重新抛出 if (false) { throw new RuntimeException("some error"); System.out.println(getNowTime() + Thread.currentThread() + " task1 end"); return 100; }); CompletableFuture<Integer> future2 = CompletableFuture .supplyAsync(() -> { System.out.println(getNowTime() + Thread.currentThread() + " task2 start"); try { Thread.sleep(2000); } catch (InterruptedException e) { e.printStackTrace(); //异常会在调用CompletableFuture.get()时重新抛出 if (false) { throw new RuntimeException("some error"); System.out.println(getNowTime() + Thread.currentThread() + " task2 end"); return 88; }); CompletableFuture<String> future3 = CompletableFuture.supplyAsync(() -> { System.out.println(getNowTime() + Thread.currentThread() + " task3 start"); try { Thread.sleep(1000); } catch (InterruptedException e) { e.printStackTrace(); //异常会在调用CompletableFuture.get()时重新抛出 if (false) { throw new RuntimeException("some error"); System.out.println(getNowTime() + Thread.currentThread() + " task3 end"); return "OK"; }); //allOf是多个任务都执行完成后才会继续执行,只要有一个任务执行异常,则调用返回的CompletableFuture的get方法时会抛出异常 // 如果都是正常执行,则get()返回null(这一点和anyOf不同,anyOf有返回值) // 本例中只有task1、task2、task3全部完成,task4才会执行 CompletableFuture<Void> future4 = CompletableFuture.allOf(future1, future2, future3).whenComplete((r, e) -> { System.out.println(getNowTime() + Thread.currentThread() + " task4 start"); System.out.println("res:" + r); System.out.println("exception:" + e); System.out.println(getNowTime() + Thread.currentThread() + " task4 end"); }); //allOf().join()会阻塞程序,直到所有的任务执行完成,实际开发中经常使用这种方式等待多个任务执行完成再做下一步处理 //CompletableFuture.allOf(future1, future2, future3).join(); //主线程在没有调用CompletableFuture.get()之前都不会阻塞(在没有调allOf().join()时) System.out.println(getNowTime() + Thread.currentThread() + "main thread go on!"); System.out.println("future4.get()=" + future4.get()); System.out.println(getNowTime() + Thread.currentThread() + "main thread over!");anyOf
anyOf是多个组合的CompletableFuture中只要有一个执行完成就会返回,调用
get()方法返回的是已经执行完成的任务的返回结果。如果该任务执行异常,则调用get()方法抛出异常。@Test public void testAny() throws Exception { System.out.println(getNowTime() + Thread.currentThread() + " main thread start!"); CompletableFuture<Integer> future1 = CompletableFuture.supplyAsync(() -> { System.out.println(getNowTime() + Thread.currentThread() + " task1 start"); try { Thread.sleep(100); } catch (InterruptedException e) { e.printStackTrace(); //异常会在调用CompletableFuture.get()时重新抛出 if (false) { throw new RuntimeException("some error"); System.out.println(getNowTime() + Thread.currentThread() + " task1 end"); return 100; }); CompletableFuture<Integer> future2 = CompletableFuture.supplyAsync(() -> { System.out.println(getNowTime() + Thread.currentThread() + " task2 start"); try { Thread.sleep(2000); } catch (InterruptedException e) { e.printStackTrace(); //异常会在调用CompletableFuture.get()时重新抛出 if (false) { throw new RuntimeException("some error"); System.out.println(getNowTime() + Thread.currentThread() + " task2 end"); return 88; }); CompletableFuture<String> future3 = CompletableFuture.supplyAsync(() -> { System.out.println(getNowTime() + Thread.currentThread() + " task3 start"); try { Thread.sleep(10); } catch (InterruptedException e) { e.printStackTrace(); //异常会在调用CompletableFuture.get()时重新抛出 if (true) { throw new RuntimeException("some error"); System.out.println(getNowTime() + Thread.currentThread() + " task3 end"); return "ok"; }); //anyOf是只要有一个任务执行完成,无论这个任务是正常执行或者执行异常,都会返回。 // 本例中只要task1、task2、task3中的一个执行完成(或者执行异常)就会执行继续执行task4,task4.get的结果就是已执行完成的任务的结果 CompletableFuture<Object> future = CompletableFuture.anyOf(future1, future2, future3).whenComplete((r, e) -> { System.out.println(getNowTime() + Thread.currentThread() + " task4 start"); System.out.println("res:" + r); System.out.println("exception:" + e); System.out.println(getNowTime() + Thread.currentThread() + " task4 end"); }); //主线程在没有调用CompletableFuture.get()之前都不会阻塞 System.out.println(getNowTime() + Thread.currentThread() + "main thread go on!"); //anyOf返回的结果是先执行完成的那个任务的结果 CompletableFuture<Object> future5 = CompletableFuture.anyOf(future1, future2, future3); System.out.println("future5.get()=" + future5.get()); System.out.println("future.get()=" + future.get()); System.out.println(getNowTime() + Thread.currentThread() + "main thread over!"); 目录Java线程池核心原理与最佳实践前言Java中的线程池功能快捷键合理的创建标题,有助于目录的生成如何改变文本的样式插入链接与图片如何插入一段漂亮的代码片生成一个适合你的列表创建一个表格设定内容居中、居左、居右SmartyPants创建一个自定义列表如何创建一个注脚注释也是必不可少的KaTeX数学公式新的甘特图功能,丰富你的文章UML 图表FLowchart流程图导出与导入导出导入Java线程池核心原理与最佳实践前言Java后端开发中我们经常使用线程池( ThreadPool )去提升程序的性能。通 在最近的工作中遇到一个需要批量生产百万数据并写入数据库的需求,先通过单线程的方式去实现,但是感觉效率一般,然后通过多线程的方式去改进,但是遇到下面的问题: 生成数据的时候,每生成一条数据,就将数据丢入到集合中进行缓存,当集合中的数据量达到 500 的时候,就进行一次数据库写入操作,并清空集合。 那么当我生成的数据量为 1200 的时候,就会出现...Java线程池的监控 如果想实现线程池的监控,必须要自定义线程池继承ThreadPoolExecutor类,并且实现beforeExecute,afterExecute和terminated方法,我们可以在任务执行前,执行后和线程池关闭前干一些事情。如监控任务的平均执行时间,最大执行时间和最小执行时间等。这几个方法在线程池里是空方法。如: //每执行一个工作任务线程之前都会执行此实现的方法在java开发中经常使用线程池去提升程序的性能,进行现场复用,降低系统资源消耗、提升系统响应速度。如并发请求的数量非常大,每个请求的实际处理耗时又非常短,就会频繁的创建和销毁线程,降低系统的性能。 java中的线程池:Executor接口》ExecutorService接口》ThreadPoolExecutor实现类 ThreadPoolExecutor构造方法: public ThreadPoolExecutor(int corePoolSize, int maximumPoolSize, long ke向线程池中提交任务的submit方法不是阻塞方法,而Future.get方法是一个阻塞方法,当submit提交多个任务时,只有所有任务都完成后,才能使用get按照任务的提交顺序得到返回结果。 Future虽然可以实现获取异步执行结果的需求,但是它没有提供通知的机制,要么使用阻塞,在future.get()的地方等待future返回的结果,这时又变成同步操作;要么使用isDone()轮询地判断Future是否完成,这样会耗费CPU的资源 1.首先使用spring自带的线程池ThreadPool参考:https://blog.csdn.net/l18848956739/article/details/89363321 但在实际开发过程中,在线程池使用过程中可能会遇到各方面的故障,如线程池阻塞,无法提交新任务等。 如果你想监控某一个线程池的执行状态,线程池执行类 ThreadPoolExecutor 也给出了相关的 API, 能实时获取线程池的当前活动线程数、正在排队中的线程...Java线程池该如何监控? 日常开发中,当我们开发一些复合型任务时,尝尝会使用线程池通过异步的方式解决一些对时效性要求不高的任务。下面小编列举几种线程池的使用方式,以便参考! Java JDK中默认封装好的Executors类: 下面简单的列举三种我们常用的线程池操作类: public static void main(String[] args) { //创建...(转)如果想监控一个线程池的执行状态,线程池执行类ThreadPoolExecutor给出了相关的 API, 能实时获取线程池的以下信息: 当前活动线程数 正在排队中的线程数 已经执行完成的线程数 总线程数 总线程数 = 排队线程数 + 活动线程数 + 执行完成的线程数 创建ThreadPoolExecutor实例: 通过ThreadPoolExecutor的API来获取线程运行信息: 代码运行分析 线程池提交了 100000 个任务,但同时只有 50 个线程在工作,我们每CompletableFuture是Java8引入的一个异步编程工具类,用于简化异步编程,提高代码可读性和可维护性。它可以让你在一个线程中进行异步编程,而无需显式地创建线程或使用回调函数。 CompletableFuture可以看作是对Future的扩展,它支持链式调用和组合操作,可以将多个CompletableFuture组合在一起,形成一个复杂的异步操作流程。它也提供了一些方法,比如thenApply、thenAccept、thenRun等,用于处理异步操作的结果。 在使用CompletableFuture时,我们可以将异步操作放在一个CompletableFuture对象中,然后通过链式调用的方式,将多个异步操作组合在一起,形成一个异步操作流程。当所有的异步操作都执行完毕后,可以使用CompletableFuture的get方法,获取异步操作的结果。 下面是一个使用CompletableFuture的示例代码: ```java CompletableFuture<Integer> future = CompletableFuture.supplyAsync(() -> { // 异步操作 return 10; }).thenApplyAsync(result -> { // 处理异步操作结果 return result * 2; }).thenApplyAsync(result -> { // 处理异步操作结果 return result + 3; // 获取异步操作的结果 Integer result = future.get(); 在上面的代码中,我们首先使用CompletableFuture的supplyAsync方法,将异步操作放在一个CompletableFuture对象中。然后通过thenApplyAsync方法,将两个处理异步操作结果的函数串联在一起,形成一个异步操作流程。最后通过get方法,获取异步操作的结果。 除了thenApplyAsync方法,CompletableFuture还提供了许多其他的方法,比如thenAcceptAsync、thenRunAsync、thenComposeAsync等,可以根据具体需求来选择使用。 总之,CompletableFuture是一个非常强大的异步编程工具类,可以让你写出更加简洁、易读、易维护的异步代码。java程序员CC: 博主您好,这样安装报错了,似乎是上面少了映射文件 ERROR org.springframework.boot.SpringApplication - Application run failed java.lang.IllegalStateException: java.io.FileNotFoundException: /home/nacos/conf/nacos-logback.xml (No such file or directory) Spring源码深度解析:三、容器的刷新 - refresh() qq_41242088: “refresh() 方法是 AnnotationConfigServletWebServerApplicationContext 上下文”这句是什么意思?refresh()方法不是ClassPathXmlApplicationContext继承自AbstractApplicationContext的吗 Java线程池监控及CompletableFuture详解 weixin_45059337: 拷贝LinkedBlockingQueue源码为CapacityResizableLinkedBlockingQueue为什么报错,很多编译报错,比如类型指定错误,引用错误等 谷粒商城-个人笔记(高级篇二)m0_67997875: 2)写模式(缓存与数据一致) 读写加锁; 引入canal,感知到mysql的更新去更新数据库; 读多写少,直接去数据库查询就行;这里错了 Spring源码深度解析:一、Spring整体架构和源码环境搭建 鬼剑灬红眼: 大佬, 步骤和你一样,但是到后面就启动不了东西
推荐文章