本文内容由阿里云实名注册用户自发贡献,版权归原作者所有,阿里云开发者社区不拥有其著作权,亦不承担相应法律责任。具体规则请查看《
5
TensorRT部署
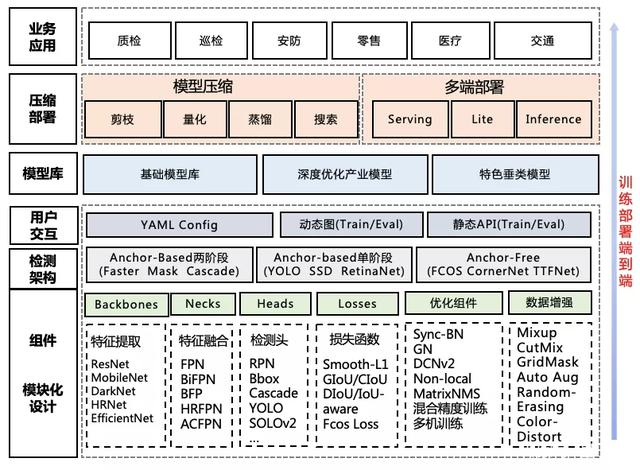
5.1 目标检测常见的落地形式
1、TensorRT是什么
TensorRT是推理优化器,能对训练好的模型进行优化。可以理解为只有前向传播的深度学习框架,这个框架可以将Caffe,TensorFlow的网络模型解析,然后与TensorRT中对应的层进行一一映射,把其他框架的模型统一全部转换到TensorRT中,然后在TensorRT中可以针对NVIDIA自家GPU实施优化策略,并进行部署加速。当你的网络训练完之后,可以将训练模型文件直接丢进TensorRT中,而不再需要依赖深度学习框架(Caffe,TensorFlow等)。
2、本文AI部署流程
先把onnx转化为TensorRT的Engine文件,然后让c++环境下的TensorRT直接加载Engine文件,从而构建engine,本文主要讲解onnx转换至Engine,然后进行基于TensorRT的C++推理检测。
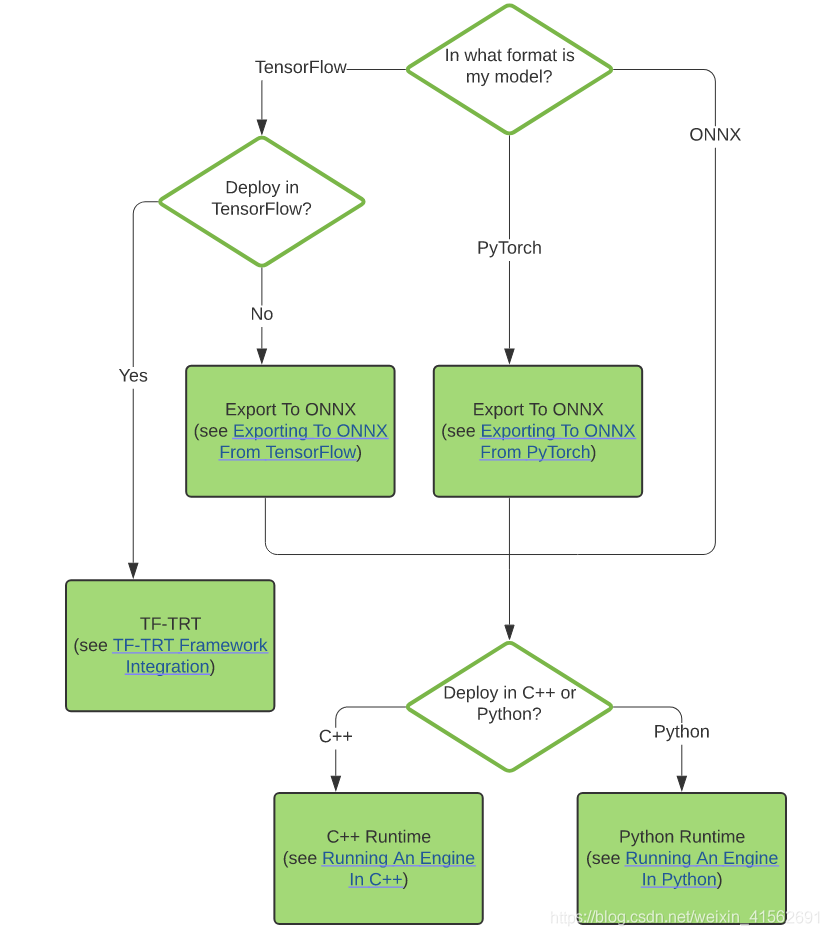
转换和部署模型5个基本步骤:
-
step1:获取模型
-
step2:选择batchsize
-
step3:选择精度
-
step4:模型转换
-
step5:模型部署
5.2 ONNX-TensorRT的部署流程
1、ONNX转化为TRT Engine
# 导出onnx文件
python export.py ---weights weights/v5lite-g.pt --batch-size 1 --imgsz 640 --include onnx --simplify
# 使用TensorRT官方的trtexec工具将onnx文件转换为engine
trtexec --explicitBatch --onnx=./v5lite-g.onnx --saveEngine=v5lite-g.trt --fp16
闲话不多说,这里已经拿到了trt的engine,那么如何进行推理呢?总的来说,分为3步:
-
首先load你的engine,拿到一个ICudaEngine, 这个是TensorRT推理的核心;
-
定位模型的输入和输出,有几个输入有几个输出;
-
forward模型,然后拿到输出,对输出进行后处理。
当然这里最核心的东西其实就两个,一个是如何导入拿到CudaEngine,第二个是比较麻烦的后处理。
2、加载TRT Engine
bool Model::readTrtFile() {
std::string cached_engine;
std::fstream file;
std::cout << "loading filename from:" << engine_file << std::endl;
nvinfer1::IRuntime *trtRuntime;
file.open(engine_file, std::ios::binary | std::ios::in);
if (!file.is_open()) {
std::cout << "read file error: " << engine_file << std::endl;
cached_engine = "";
while (file.peek() != EOF) {
std::stringstream buffer;
buffer << file.rdbuf();
cached_engine.append(buffer.str());
file.close();
trtRuntime = nvinfer1::createInferRuntime(gLogger.getTRTLogger());
engine = trtRuntime->deserializeCudaEngine(cached_engine.data(), cached_engine.size(), nullptr);
std::cout << "deserialize done" << std::endl;
// 加载 TensorRT Engine
void v5Lite::LoadEngine() {
// create and load engine
std::fstream existEngine;
existEngine.open(engine_file, std::ios::in);
// 如果存在已经转换完成的TensorRT Engine文件,则直接加载
if (existEngine) {
readTrtFile(engine_file, engine);
assert(engine != nullptr);
// 如果不存在已经转换完成的TensorRT Engine文件,则直接加载ONNX权重进行在线生成
else {
onnxToTRTModel(onnx_file, engine_file, engine, BATCH_SIZE);
assert(engine != nullptr);
}
3、后处理之坐标转换
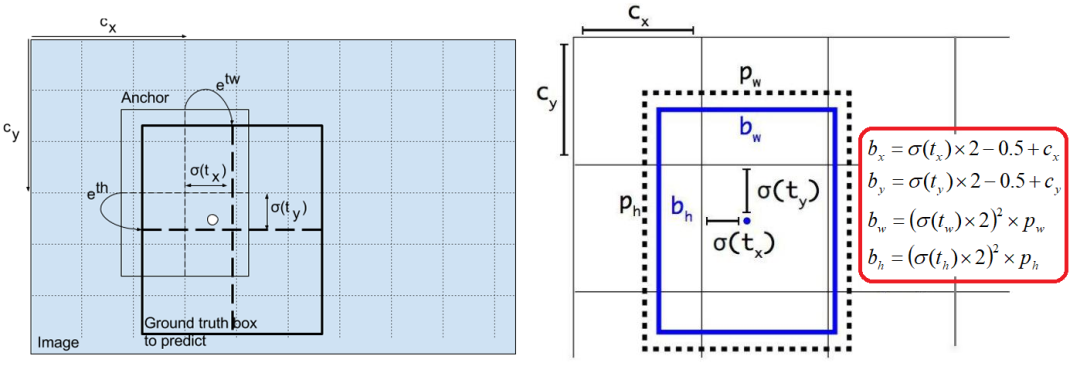 YOLOv5的坐标转换方法
std::vector<std::vector<V5lite::DetectRes>> V5lite::postProcess(const std::vector<cv::Mat> &vec_Mat, float *output,
const int &outSize) {
std::vector<std::vector<DetectRes>> vec_result;
int index = 0;
for (const cv::Mat &src_img : vec_Mat)
std::vector<DetectRes> result;
float ratio = float(src_img.cols) / float(IMAGE_WIDTH) > float(src_img.rows) / float(IMAGE_HEIGHT) ? float(src_img.cols) / float(IMAGE_WIDTH) : float(src_img.rows) / float(IMAGE_HEIGHT);
float *out = output + index * outSize;
int position = 0;
for (int n = 0; n < (int)grids.size(); n++)
for (int c = 0; c < grids[n][0]; c++)
std::vector<int> anchor = anchors[n * grids[n][0] + c];
for (int h = 0; h < grids[n][1]; h++)
for (int w = 0; w < grids[n][2]; w++)
float *row = out + position * (CATEGORY + 5);
position++;
DetectRes box;
auto max_pos = std::max_element(row + 5, row + CATEGORY + 5);
box.prob = row[4] * row[max_pos - row];
if (box.prob < obj_threshold)
continue;
box.classes = max_pos - row - 5;
// 坐标的反参数化,和前文的坐标转换对接
box.x = (row[0] * 2 - 0.5 + w) / grids[n][2] * IMAGE_WIDTH * ratio;
box.y = (row[1] * 2 - 0.5 + h) / grids[n][1] * IMAGE_HEIGHT * ratio;
box.w = pow(row[2] * 2, 2) * anchor[0] * ratio;
box.h = pow(row[3] * 2, 2) * anchor[1] * ratio;
result.push_back(box);
NmsDetect(result);
vec_result.push_back(result);
index++;
return vec_result;
}
4、进行模型推理
// 推理整个文件夹的文件
bool YOLOv5::InferenceFolder(const std::string &folder_name) {
// 读取文件夹下面的文件,并返回为一个 string vector 迭代器
std::vector<std::string> sample_images = readFolder(folder_name);
//get context
assert(engine != nullptr);
// 创建上下文,创建一些空间来存储中间值。一个engine可以创建多个context,分别执行多个推理任务。
context = engine->createExecutionContext();
assert(context != nullptr);
// 传递给Engine的输入输出buffers指针,这里对应一个输入和一个输出
assert(engine->getNbBindings() == 2);
void *buffers[2];
std::vector<int64_t> bufferSize;
int nbBindings = engine->getNbBindings();
bufferSize.resize(nbBindings);
for (int i = 0; i < nbBindings; ++i) {
// 获取输入或输出的维度信息
nvinfer1::Dims dims = engine->getBindingDimensions(i);
// 获取输入或输出的数据类型信息
nvinfer1::DataType dtype = engine->getBindingDataType(i);
int64_t totalSize = volume(dims) * 1 * getElementSize(dtype);
bufferSize[i] = totalSize;
std::cout << "binding" << i << ": " << totalSize << std::endl;
// &buffers是双重指针 相当于改变指针本身,这里就是把输入或输出进行向量化操作
cudaMalloc(&buffers[i], totalSize);
//get stream
cudaStream_t stream;
// 创建 Stream
cudaStreamCreate(&stream);
int outSize = bufferSize[1] / sizeof(float) / BATCH_SIZE;
// 执行推理
EngineInference(sample_images, outSize, buffers, bufferSize, stream);
// 释放 stream 和 buffers
cudaStreamDestroy(stream);
cudaFree(buffers[0]);
cudaFree(buffers[1]);
// destroy the engine
context->destroy();
engine->destroy();
void YOLOv5::EngineInference(const std::vector<std::string> &image_list, const int &outSize, void **buffers,
const std::vector<int64_t> &bufferSize, cudaStream_t stream) {
int index = 0;
int batch_id = 0;
std::vector<cv::Mat> vec_Mat(BATCH_SIZE);
std::vector<std::string> vec_name(BATCH_SIZE);
float total_time = 0;
// 遍历图像路径list
for (const std::string &image_name : image_list)
index++;
std::cout << "Processing: " << image_name << std::endl;
// 读取图像内容到cv_mat
cv::Mat src_img = cv::imread(image_name);
// 把图像和图像名分别保存在vec_Mat和vec_name之中
if (src_img.data)
vec_Mat[batch_id] = src_img.clone();
vec_name[batch_id] = image_name;
batch_id++;
if (batch_id == BATCH_SIZE or index == image_list.size())
// 声明时间戳 t_start_pre
auto t_start_pre = std::chrono::high_resolution_clock::now();
std::cout << "prepareImage" << std::endl;
std::vector<float>curInput = prepareImage(vec_Mat);
auto t_end_pre = std::chrono::high_resolution_clock::now();
// 至此,prepare Image的时间已经计算完成
float total_pre = std::chrono::duration<float, std::milli>(t_end_pre - t_start_pre).count();
std::cout << "prepare image take: " << total_pre << " ms." << std::endl;
total_time += total_pre;
batch_id = 0;
if (!curInput.data()) {
std::cout << "prepare images ERROR!" << std::endl;
continue;
// 将数据从CPU端传送到GPU端
std::cout << "host2device" << std::endl;
cudaMemcpyAsync(buffers[0], curInput.data(), bufferSize[0], cudaMemcpyHostToDevice, stream);
// 执行推理
std::cout << "execute" << std::endl;
auto t_start = std::chrono::high_resolution_clock::now();
context->execute(BATCH_SIZE, buffers);
auto t_end = std::chrono::high_resolution_clock::now();
float total_inf = std::chrono::duration<float, std::milli>(t_end - t_start).count();
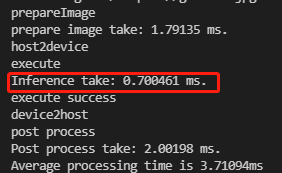
std::cout << "Inference take: " << total_inf << " ms." << std::endl;
total_time += total_inf;
std::cout << "execute success" << std::endl;
std::cout << "device2host" << std::endl;
std::cout << "post process" << std::endl;
auto r_start = std::chrono::high_resolution_clock::now();
auto *out = new float[outSize * BATCH_SIZE];
// Copy GPU端的推理结果到CPU端
cudaMemcpyAsync(out, buffers[1], bufferSize[1], cudaMemcpyDeviceToHost, stream);
// 阻塞当前程序的执行,直到所有任务都处理完毕,这样可以将计算和主机与设备之前的传输并行化,提高效率。
cudaStreamSynchronize(stream);
// 进行后处理操作
auto boxes = postProcess(vec_Mat, out, outSize);
auto r_end = std::chrono::high_resolution_clock::now();
float total_res = std::chrono::duration<float, std::milli>(r_end - r_start).count();
std::cout << "Post process take: " << total_res << " ms." << std::endl;
total_time += total_res;
for (int i = 0; i < (int)vec_Mat.size(); i++)
auto org_img = vec_Mat[i];
if (!org_img.data)
continue;
auto rects = boxes[i];
for(const auto &rect : rects)
char t[256];
sprintf(t, "%.2f", rect.prob);
std::string name = coco_labels[rect.classes] + "-" + t;
// 图书添加文字
cv::putText(org_img, name, cv::Point(rect.x - rect.w / 2, rect.y - rect.h / 2 - 5), cv::FONT_HERSHEY_COMPLEX, 0.7, class_colors[rect.classes], 2);
// 绘制矩形框
cv::Rect rst(rect.x - rect.w / 2, rect.y - rect.h / 2, rect.w, rect.h);
cv::rectangle(org_img, rst, class_colors[rect.classes], 2, cv::LINE_8, 0);
int pos = vec_name[i].find_last_of(".");
std::string rst_name = vec_name[i].insert(pos, "_");
std::cout << rst_name << std::endl;
// 保存检测结果
cv::imwrite(rst_name, org_img);
vec_Mat = std::vector<cv::Mat>(BATCH_SIZE);
delete[] out;
std::cout << "Average processing time is " << total_time / image_list.size() << "ms" << std::endl;
}
5、后处理之NMS C++实现
void V5lite::NmsDetect(std::vector<DetectRes> &detections) {
sort(detections.begin(), detections.end(), [=](const DetectRes &left, const DetectRes &right) {
return left.prob > right.prob;
for (int i = 0; i < (int)detections.size(); i++)
for (int j = i + 1; j < (int)detections.size(); j++)
if (detections[i].classes == detections[j].classes)
{ // 计算DIoU的值
float iou = IOUCalculate(detections[i], detections[j]);
if (iou > nms_threshold)
detections[j].prob = 0;
detections.erase(std::remove_if(detections.begin(), detections.end(), [](const DetectRes &det)
{ return det.prob == 0; }), detections.end());
// 计算 DIOU
float v5Lite::IOUCalculate(const YOLOv5::DetectRes &det_a, const YOLOv5::DetectRes &det_b) {
cv::Point2f center_a(det_a.x, det_a.y);
cv::Point2f center_b(det_b.x, det_b.y);
// 计算左上角角点坐标
cv::Point2f left_up(std::min(det_a.x - det_a.w / 2, det_b.x - det_b.w / 2),
std::min(det_a.y - det_a.h / 2, det_b.y - det_b.h / 2));
// 计算右下角角点坐标
cv::Point2f right_down(std::max(det_a.x + det_a.w / 2, det_b.x + det_b.w / 2),
std::max(det_a.y + det_a.h / 2, det_b.y + det_b.h / 2));
// 计算框的中心点距离
float distance_d = (center_a - center_b).x * (center_a - center_b).x + (center_a - center_b).y * (center_a - center_b).y;
// 计算框的角点距离
float distance_c = (left_up - right_down).x * (left_up - right_down).x + (left_up - right_down).y * (left_up - right_down).y;
float inter_l = det_a.x - det_a.w / 2 > det_b.x - det_b.w / 2 ? det_a.x - det_a.w / 2 : det_b.x - det_b.w / 2;
float inter_t = det_a.y - det_a.h / 2 > det_b.y - det_b.h / 2 ? det_a.y - det_a.h / 2 : det_b.y - det_b.h / 2;
float inter_r = det_a.x + det_a.w / 2 < det_b.x + det_b.w / 2 ? det_a.x + det_a.w / 2 : det_b.x + det_b.w / 2;
float inter_b = det_a.y + det_a.h / 2 < det_b.y + det_b.h / 2 ? det_a.y + det_a.h / 2 : det_b.y + det_b.h / 2;
if (inter_b < inter_t || inter_r < inter_l)
return 0;
// 计算交集
float inter_area = (inter_b - inter_t) * (inter_r - inter_l);
// 计算并集
float union_area = det_a.w * det_a.h + det_b.w * det_b.h - inter_area;
if (union_area == 0)
return 0;
return inter_area / union_area - distance_d / distance_c;
}
CMakeLists.txt如下:
cmake_minimum_required(VERSION 3.5)
project(v5lite_trt)
set(CMAKE_CXX_STANDARD 14)
# CUDA
find_package(CUDA REQUIRED)
message(STATUS "Find CUDA include at ${CUDA_INCLUDE_DIRS}")
message(STATUS "Find CUDA libraries: ${CUDA_LIBRARIES}")
# TensorRT
set(TENSORRT_ROOT "/home/chaucer/TensorRT-8.0.1.6")
find_path(TENSORRT_INCLUDE_DIR NvInfer.h
        HINTS ${TENSORRT_ROOT} PATH_SUFFIXES include/)
message(STATUS "Found TensorRT headers at ${TENSORRT_INCLUDE_DIR}")
find_library(TENSORRT_LIBRARY_INFER nvinfer
        HINTS ${TENSORRT_ROOT} ${TENSORRT_BUILD} ${CUDA_TOOLKIT_ROOT_DIR}
        PATH_SUFFIXES lib lib64 lib/x64)
find_library(TENSORRT_LIBRARY_ONNXPARSER nvonnxparser
        HINTS  ${TENSORRT_ROOT} ${TENSORRT_BUILD} ${CUDA_TOOLKIT_ROOT_DIR}
        PATH_SUFFIXES lib lib64 lib/x64)
set(TENSORRT_LIBRARY ${TENSORRT_LIBRARY_INFER} ${TENSORRT_LIBRARY_ONNXPARSER})
message(STATUS "Find TensorRT libs: ${TENSORRT_LIBRARY}")
# OpenCV
find_package(OpenCV REQUIRED)
message(STATUS "Find OpenCV include at ${OpenCV_INCLUDE_DIRS}")
message(STATUS "Find OpenCV libraries: ${OpenCV_LIBRARIES}")
set(COMMON_INCLUDE ./includes/common)
set(YAML_INCLUDE ./includes/yaml-cpp/include)
set(YAML_LIB_DIR ./includes/yaml-cpp/libs)
include_directories(${CUDA_INCLUDE_DIRS} ${TENSORRT_INCLUDE_DIR} ${OpenCV_INCLUDE_DIRS} ${COMMON_INCLUDE} ${YAML_INCLUDE})
link_directories(${YAML_LIB_DIR})
add_executable(v5lite_trt main.cpp v5lite.cpp)
target_link_libraries(v5lite_trt ${OpenCV_LIBRARIES} ${CUDA_LIBRARIES} ${TENSORRT_LIBRARY} yaml-cpp)
mkdir build
cd build
cmake ..
make -j8
v5lite_trt ../config.yaml ../samples/
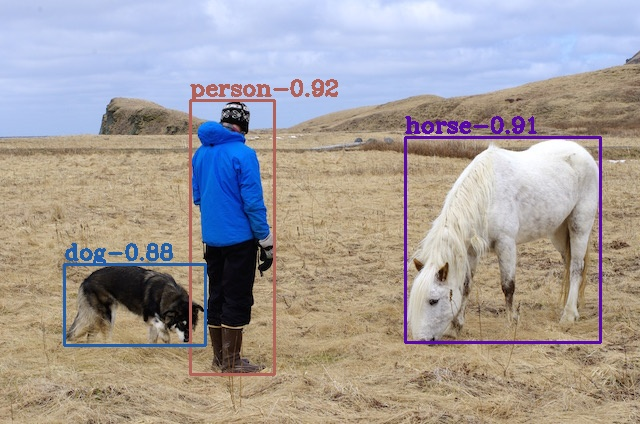
5、检测结果和时间
6
参考
[1].https://github.com/ppogg/YOLOv5-Lite
[2].https://zhuanlan.zhihu.com/p/400545131
[3].https://github.com/ultralytics/yolov5
[4].https://zhuanlan.zhihu.com/p/172121380
[5].https://zhuanlan.zhihu.com/p/143747206


