camunda
工作流源自activity5,是德国一家工作流程自动化软件开发商提供的、现在同时提供
camunda7
(组件方式)与
LAcamunda8
(基于云原生)两种平台。
BPMN2
(
Business Process Model and Notation
业务流程模型标记)
CMMN
(
Case Management Model and Notation
.案例管理模型标记)
DMN
(
Decision Model and Notation
决策模型标记)
学习文档与社区
官方文档:
docs.camunda.org/manual/7.17…
论坛:
forum.camunda.io/
有问题可以在论坛提问或搜索,会有人回答
github社区:
github.com/camunda-com…
github官方开源库:
github.com/camunda
国内开源社区:
www.oschina.net/informat/ca…
流程引擎下载安装与部署
docker方式部署
参考文档:
github.com/camunda/doc…
docker中camunda镜像地址
hub.docker.com/r/camunda/c…
docker pull camunda/camunda-bpm-platform:latest
docker run -d --name camunda -p 8080:8080 camunda/camunda-bpm-platform:latest
镜像运行成功后,访问地址http://localhost:8080/camunda-welcome/index.html
管理员账户和密码 demo demo
SpringBoot启动
参考文档 docs.camunda.org/manual/7.17…
jdk1.8以上
maven3.6以上
camunda.com/download/
start.camunda.com/
修改数据库
默认的是H2数据库,修改下载好的springboot项目中pom.xml文件,去掉H2驱动,添加mysql驱动
<dependency>
<groupId>mysql</groupId>
<artifactId>mysql-connector-java</artifactId>
</dependency>
修改项目根目录下src/main/resources/application.yaml内容如下
spring:
datasource:
url: jdbc:mysql:
driver-class-name: com.mysql.cj.jdbc.Driver
username: root
password: root
camunda.bpm.admin-user:
id: admin
password: 123456
server:
port: 9090
配置成功后,启动地址http://localhost:9090/camunda/app/admin/default/#/login
管理员账户和密码 admin 123456
在resources目录下添加META_INF目录,并在目录下添加processes.xml文件
<?xml version="1.0" encoding="UTF-8"?>
<process-application xmlns="http://www.camunda.org/schema/1.0/ProcessApplication"
xmlns:xsi="http://www.w3.org/2001/XMLSchema-instance">
<process-archive>
<process-engine>default</process-engine>
<properties>
<property name="isDeleteUponUndeploy">false</property>
<property name="isScanForProcessDefinitions">true</property>
</properties>
</process-archive>
</process-application>
在resources目录下添加BPMN目录,并将bpmn文件放在此目录下,重启服务器即可
流程设计器安装与使用
下载地址1
下载地址2
下载成功后,直接解压,目录如下
Camunda Modeler.exe可以直接运行
首次打开界面,样式如下
选择camunda7的bpm
部署成功,查看流程 http://localhost:9090/camunda/app/cockpit/default/#/processes
设计一个最简单购物流程,开始==》加入购物车==》付款》物流发货》结束。假设这是一个大型异构分布式系统,加入购物车,物流发货是java系统,付款是nodejs系统。
BPMN流程设计
打开modeler设计器依次单击_File > New File > BPMN Diagram (Camunda Platform)。
加入购物车流程节点
加入一个task,点击小扳手,选择Service Task
配置成外部任务,与业务完全解耦,设置一个topic:shopping_cart
付款流程节点
物流发货流程节点
搭建业务系统
pom依赖
<dependency>
<groupId>org.camunda.bpm</groupId>
<artifactId>camunda-external-task-client</artifactId>
<version>7.17.0</version>
</dependency>
<dependency>
<groupId>javax.xml.bind</groupId>
<artifactId>jaxb-api</artifactId>
<version>2.3.1</version>
</dependency>
package com.example.camundatest.shopping;
import lombok.extern.slf4j.Slf4j;
import org.camunda.bpm.client.ExternalTaskClient;
import org.camunda.bpm.engine.variable.Variables;
import org.springframework.stereotype.Component;
import javax.annotation.PostConstruct;
import java.util.Map;
* @author Helen
* @version 1.0
* @createTime 2023/3/25
* @Description
@Slf4j
@Component
public class SubscribeTask {
* 流程引擎部署url前缀
private final static String CAMUNDA_BASE_URL = "http://localhost:9090/engine-rest";
private ExternalTaskClient client = null;
public ExternalTaskClient getClient() {
if (client == null) {
client = ExternalTaskClient.create()
.baseUrl(CAMUNDA_BASE_URL)
.asyncResponseTimeout(10000)
.build();
return client;
@PostConstruct
public void handleShoppingCart() {
getClient().subscribe("shopping_cart")
.processDefinitionKey("Process_shopping")
.lockDuration(2000)
.handler(((externalTask, externalTaskService) -> {
log.info("订阅加入购物车任务");
Map<String, Object> goodVariable = Variables.createVariables()
.putValue("size", "xl")
.putValue("count", 2);
externalTaskService.complete(externalTask, goodVariable);
})).open();
@PostConstruct
public void handleLogisticsDelivery() {
getClient().subscribe("logistic_delivery")
.processDefinitionKey("Process_shopping")
.lockDuration(2000)
.handler(((externalTask, externalTaskService) -> {
Object toWhere = externalTask.getVariable("toWhere");
log.info("收到任务,目的地:{}", String.valueOf(toWhere));
})).open();
搭建NodeJS工程
安装nodejs
mkdir shopping-service-nodejs
cd shopping-service-nodejs
npm init -v
安装camunda-external-task-cient-js
npm install camunda-external-task-client-js
npm install -D open
const { Client, logger ,Variables} = require('camunda-external-task-client-js');
const open = require('open');
const config = { baseUrl: 'http://localhost:9090/engine-rest', use: logger, asyncResponseTimeout: 10000 };
const client = new Client(config);
client.subscribe('pay', { processDefinitionKey: "Process_shopping" },
async function ({ task, taskService }) {
const size = task.variables.get('size');
const count = task.variables.get('count');
console.log(`顾客下单尺寸: ${size} 数量:'${count}'...`);
const processVariables = new Variables()
.set("toWhere", "shanghai China");
try {
await taskService.complete(task,processVariables);
console.log('I completed my task successfully!!');
} catch (e) {
console.error(`Failed completing my task, ${e}`);
camunda的使用方式
将camunda引擎与业务系统整合到一起,适合java单体小型项目,流程引擎的生命周期与应用程序相同,可以使用引擎的所有内部API直接调用。
优点:使用方便,不用单独部署和维护。缺点:与业务深度耦合,不方便扩容,只能本项目使用。
组件式用法流程引擎在运行时容器(Servlet容器、应用程序服务器……)中启动。流程引擎作为容器服务提供,可以由部署在容器内的所有应用程序共享。这个概念可以与运行时提供的JMS消息队列进行比较,它可以被所有应用程序使用。流程部署和应用程序之间存在一对一的映射:流程引擎跟踪由应用程序部署的流程定义,并将执行委托给相关应用程序。(不常用)
将流程引擎单独部署成平台模式,是一种单实例SAAS模式,支持多项目共用,最常用的是通过Rest api方式来通信。前面快速入门用的就是此种用法。
优点:与业务完全解耦,方便扩容,同时支持多项目,支持多租户用法;缺点:存在单点风险,远程调用有一定性能损耗,
是中间件用法的扩展,部署多个流程引擎实例,连接相同流程数据库
优点:在中间件的优点上增加高可用性,支持配置负载均衡
缺点:共享数据库可能会成为瓶颈,多实例引擎负载均衡要自己实现(比如nginx反射代理)
camunda8云原生
camunda8是与camunda7并行开发的云原生版本,基于云原生部署在k8s集群中,采用天然分布式存储elasticsearch存储数据,适合大型微服务项目。上述中间件和集群用法与业务完全解解耦,方便在业务达到瓶颈时升级到camunda8云原生用法。
可视化控制台介绍
驾驶舱地址 http://localhost:9090/camunda/app/cockpit/default/#/dashboard
添加用户地址 http://localhost:9090/camunda/app/admin/default/#/users
添加用户到用户组
把xiaoming添加到amunda-admin用户组中http://localhost:9090/camunda/app/admin/default/#/users/xiaoming?tab=groups
BPMN(Business Process Modeling Notation)指业务流程建模与标记,由BPMI Notation Working Group超过2年的努力于2004年5月对外发布了BPMN 1.0规范,后BPMI并入到OMG组织,OMG于2011年推出BPMN2.0标准BPMN定义了业务流程图,其基于流程图技术,同时为创建业务流程操作的图形化模型进行了裁减。业务流程的模型就是图形化对象的网图,包括活动(也可以说工作)和定义操作顺序的流控制。
BPMN官网:www.bpmn.org/
| 英文名称 | 含义 |
|---|
| BPM | Business Process Management,业务流程管理,"通过建模、自动化、管理和优化流程,打破跨部门跨系统业务过程依赖,提高业务效率和效果”。 |
| BPMN | 业务流程模型和标记法(Business Process Model and Notation),是对象管理组织(Object Management Group,缩写为OMG)维护的关于业务流程建模的行业性标准。目标是通过提供一套既符合业务人员直观又能表现复杂流程语义的标记法,同时为技术人员和业务人员从事业务流程管理提供支持。它是工作流和流程自动化的标准 |
| DMN | Decision Model and Notation,DMN的目的是提供一个模型决策结构,从而使组织的策略可以用图形清晰的描绘出来,通过业务分析准确的定义,使其自动化(可选的),是业务决策管理的标准。 |
| CMMN | Case Management Model and Notation,CMMN是一种图形化的符号,以响应不断变化的情况。通过使用以事件为中心的方法和案例文件的概念,CMMN扩展了可以用BPMN建模的边界,包括结构化程度较低的工作和由知识工人驱动的工作。结合使用BPMN和CMMN,用户可以涵盖更广泛的工作方法,它是案例管理的标准。 |
| pvm | 流程虚拟机(pricess virtual machine),是由jbpm定义的,一套流程定义和运行的规范。流程定义是静态的,类似于Java的类;流程执行也称为流程实例,类似于Java对象。 |
| Process Instance | 流程实例:开启一个流程就会产生一个流程实例。流程实例是流程定义的单独执行,流程定义和流程实例是一对多关系。流程实例与流程定义的关系与面向对象编程中对象与类的关系相同(在这种类比中,流程实例扮演对象的角色,流程定义扮演类的角色)。 |
| Execution | 流程执行实例,如果流程实例包含多个执行路径(例如,在并行网关之后,)则会同时产生多个执行实例,即execution,通过excutionId能够区分流程实例的当前活动路径 |
| Activity Instance | 活动实例,活动实例概念与执行概念类似,但采用了不同的视角。虽然可以将执行想象为在流程中移动的令牌,但活动实例标识活动(任务、子流程等)的单个实例。因此,活动实例的概念更面向状态。 |
| Process Variable | 流程变量,流程变量在整个工作流中扮演很重要的作用,是业务和流程引擎之间交互信息的载体,业务可以把数据放到流程变量里传递给流程引擎,流程引擎也可以把信息放到流程变量给传递到业务,流程变量的用途有路由条件表达式、流程执行事件参数等。例如:请假流程中有请假参数、请假原因等一些参数都为流程变量的范围。流程变量的作用域范围是流程实例,也就是说各个流程实例的流程变量是不相互影响的。 |
| TaskList | 任务列表,也就是待办任务。当流程节点是人工任务类型时,才产生任务列表 |
| Human task | 人工任务,需要人工参与的任务,如审批 |
| camunda-modeler | canunda建模器,完成流程定义、流程部署等操作 |
| Job&Job Definition | 作业执行器,Camunda流程引擎包含一个名为Job Executor的组件。作业执行器是一个调度组件、负责执行异步后台工作。考虑一个计时器事件的例子:每当流程引擎到达计时器事件时,它将停止执行,将当前状态保存到数据库,并创建一个作业以在将来继续执行。部署流程时,流程引擎会为流程中的每个活动床架作业定义,这些活动将在运行时创建作业。 |
| incidents | 事件 |
用户任务:需要人工处理后才能流转任务的任务类型
假设员工小明请假,并备注,请假人名,请假原因和请假天数,直接上级王兵审批通过即可。
设计流程图
设置任务启动人为申请人,启动流程时候,传入变量starter
设置请假人表单
设置审批人
设置审批人表单
保存流程图到bpm中
<?xml version="1.0" encoding="UTF-8"?>
<bpmn:definitions xmlns:bpmn="http://www.omg.org/spec/BPMN/20100524/MODEL" xmlns:bpmndi="http://www.omg.org/spec/BPMN/20100524/DI" xmlns:dc="http://www.omg.org/spec/DD/20100524/DC" xmlns:camunda="http://camunda.org/schema/1.0/bpmn" xmlns:di="http://www.omg.org/spec/DD/20100524/DI" xmlns:modeler="http://camunda.org/schema/modeler/1.0" id="Definitions_0i6noob" targetNamespace="http://bpmn.io/schema/bpmn" exporter="Camunda Modeler" exporterVersion="5.9.0" modeler:executionPlatform="Camunda Platform" modeler:executionPlatformVersion="7.18.0">
<bpmn:process id="Process_user_task" isExecutable="true">
<bpmn:startEvent id="StartEvent_1" camunda:initiator="starter">
<bpmn:outgoing>Flow_027k9cf</bpmn:outgoing>
</bpmn:startEvent>
<bpmn:userTask id="Activity_0yzudo9" name="员工请假" camunda:assignee="${starter}">
<bpmn:extensionElements>
<camunda:formData>
<camunda:formField id="name" label="姓名" type="string" />
<camunda:formField id="reason" label="请假原因" type="string" />
<camunda:formField id="leaveday" label="请假天数" type="long" />
</camunda:formData>
</bpmn:extensionElements>
<bpmn:incoming>Flow_027k9cf</bpmn:incoming>
<bpmn:outgoing>Flow_0ji7j6y</bpmn:outgoing>
</bpmn:userTask>
<bpmn:sequenceFlow id="Flow_027k9cf" sourceRef="StartEvent_1" targetRef="Activity_0yzudo9" />
<bpmn:userTask id="Activity_18mbj2c" name="直接上级审批" camunda:assignee="zhangsan">
<bpmn:extensionElements>
<camunda:formData>
<camunda:formField id="comment" label="评论" type="string" defaultValue="同意" />
</camunda:formData>
</bpmn:extensionElements>
<bpmn:incoming>Flow_0ji7j6y</bpmn:incoming>
<bpmn:outgoing>Flow_0trsadr</bpmn:outgoing>
</bpmn:userTask>
<bpmn:sequenceFlow id="Flow_0ji7j6y" sourceRef="Activity_0yzudo9" targetRef="Activity_18mbj2c" />
<bpmn:endEvent id="Event_079lhib">
<bpmn:incoming>Flow_0trsadr</bpmn:incoming>
</bpmn:endEvent>
<bpmn:sequenceFlow id="Flow_0trsadr" sourceRef="Activity_18mbj2c" targetRef="Event_079lhib" />
</bpmn:process>
<bpmndi:BPMNDiagram id="BPMNDiagram_1">
<bpmndi:BPMNPlane id="BPMNPlane_1" bpmnElement="Process_user_task">
<bpmndi:BPMNShape id="_BPMNShape_StartEvent_2" bpmnElement="StartEvent_1">
<dc:Bounds x="179" y="99" width="36" height="36" />
</bpmndi:BPMNShape>
<bpmndi:BPMNShape id="Activity_0yzudo9_di" bpmnElement="Activity_0yzudo9">
<dc:Bounds x="270" y="77" width="100" height="80" />
<bpmndi:BPMNLabel />
</bpmndi:BPMNShape>
<bpmndi:BPMNShape id="Activity_18mbj2c_di" bpmnElement="Activity_18mbj2c">
<dc:Bounds x="430" y="77" width="100" height="80" />
<bpmndi:BPMNLabel />
</bpmndi:BPMNShape>
<bpmndi:BPMNShape id="Event_079lhib_di" bpmnElement="Event_079lhib">
<dc:Bounds x="592" y="99" width="36" height="36" />
</bpmndi:BPMNShape>
<bpmndi:BPMNEdge id="Flow_027k9cf_di" bpmnElement="Flow_027k9cf">
<di:waypoint x="215" y="117" />
<di:waypoint x="270" y="117" />
</bpmndi:BPMNEdge>
<bpmndi:BPMNEdge id="Flow_0ji7j6y_di" bpmnElement="Flow_0ji7j6y">
<di:waypoint x="370" y="117" />
<di:waypoint x="430" y="117" />
</bpmndi:BPMNEdge>
<bpmndi:BPMNEdge id="Flow_0trsadr_di" bpmnElement="Flow_0trsadr">
<di:waypoint x="530" y="117" />
<di:waypoint x="592" y="117" />
</bpmndi:BPMNEdge>
</bpmndi:BPMNPlane>
</bpmndi:BPMNDiagram>
</bpmn:definitions>
添加接口启动
package com.example.workflow;
import org.camunda.bpm.engine.IdentityService;
import org.camunda.bpm.engine.RuntimeService;
import org.springframework.beans.factory.annotation.Autowired;
import org.springframework.boot.SpringApplication;
import org.springframework.boot.autoconfigure.SpringBootApplication;
import org.springframework.web.bind.annotation.GetMapping;
import org.springframework.web.bind.annotation.PathVariable;
import org.springframework.web.bind.annotation.RestController;
@SpringBootApplication
@RestController
public class Application {
@Autowired
private IdentityService identityService;
@Autowired
private RuntimeService runtimeService;
public static void main(String... args) {
SpringApplication.run(Application.class, args);
@GetMapping("/start/{processKey}")
public void start(@PathVariable(value = "processKey") String processKey) {
identityService.setAuthenticatedUserId("xiaoming");
runtimeService.startProcessInstanceByKey(processKey);
用xiaoming账号登录,填写请假信息,点击Complete当前流程节点结束
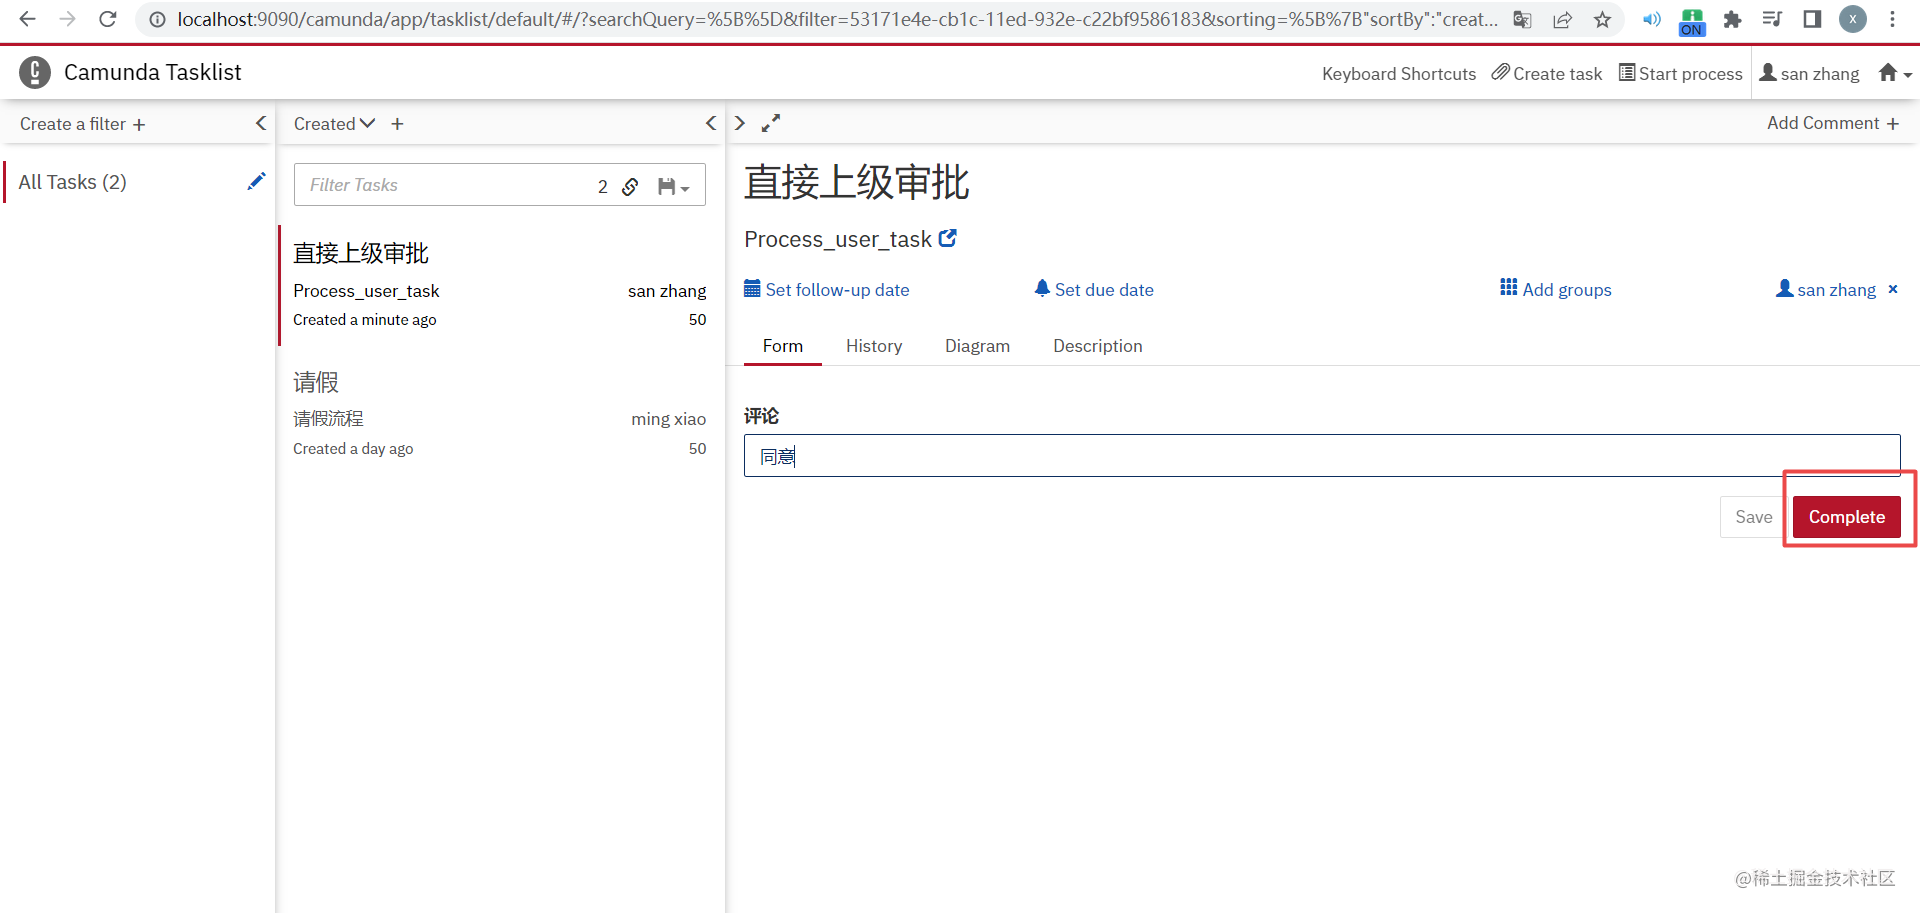
用zhangsan的账户登录,填写审批结果
