Microsoft has recently launched SQL Server 2016 with lots of new features like row level security, always encrypted, stretch database, PolyBase, R Services, hybrid cloud capabilities, Dynamic Data Masking, query store, etc. There is a rich set of business intelligence, security features, and high availability solutions.
Microsoft最近发布了SQL Server 2016,具有许多新功能,例如行级安全性,始终加密,拉伸数据库,PolyBase,R Services,混合云功能,动态数据屏蔽,查询存储等。其中有丰富的商业智能,安全功能和高可用性解决方案。
There were no major enhancements to SSRS in previous versions of SQL Server. With the release of SQL Server 2016 though, there are many new features in SSRS, along with a change in existing reporting layouts. Some of the important changes in SSRS are:
在早期版本SQL Server中,SSRS没有重大增强。 但是,随着SQL Server 2016的发布,SSRS中有许多新功能,以及现有报告布局的更改。 SSRS的一些重要变化包括:
SQL Server中的移动报告
(
Mobile reports in SQL Server
)
SQL Server 2016 takes a next step in reporting services by introducing Mobile reports. With the increase of smartphones and tablets, it is very much necessary to create the reports that are accessible, compatible on mobile and tablets. There are different screens sizes available for mobiles and tablets so the reports should have optimal viewing experience on these devices.
SQL Server 2016通过引入移动报告在报告服务方面迈出了下一步。 随着智能手机和平板电脑的增长,迫切需要创建可访问且兼容手机和平板电脑的报告。 手机和平板电脑有不同的屏幕尺寸,因此报告在这些设备上应具有最佳的观看体验。
Microsoft acquired mobile business intelligence and data visualization leader Datazen Software in 2015. SSRS mobile reports are built on Datazen technology.
微软在2015年收购了移动商务智能和数据可视化领导者DatazenSoftware。SSRS移动报表基于Datazen技术构建。
移动报表发布器工具安装
(
Mobile report publisher tool Installation
)
We need to install the Mobile Report Publisher tool to create mobile reports. Use
this link
to download the tool.
我们需要安装Mobile Report Publisher工具来创建移动报告。 使用
此链接
下载该工具。
This application requires .NET Framework 4.5 (or later) and Visual C++ Redistributable for Visual Studio 2012 (x86). We get the error if Visual C++ Redistributable for Visual Studio 2012 (x86) is not present.
此应用程序需要.NET Framework 4.5(或更高版本)和Visual Studio 2012(x86)的Visual C ++可再发行组件。 如果不存在针对Visual Studio 2012(x86)的Visual C ++可再发行组件,则会出现错误。
To create reports, launch Microsoft SQL Server Mobile Publisher and it will appear as below
要创建报告,请启动Microsoft SQL Server Mobile Publisher,它将显示如下
SQL Server Mobile Report Publisher consists of multiple parts as below.
SQL Server Mobile Report Publisher由多个部分组成,如下所示。
-
Layout (Navigators, Gauges, Charts)
布局(导航器,量规,图表)
-
Data (Add data, Refresh all data, Export all data)
数据(添加数据,刷新所有数据,导出所有数据)
-
Reports settings
报告设定
-
Preview ( master, tablet, mobile mode)
预览(主版,平板电脑,移动模式)
-
Grid control
网格控制
-
Layout control
布局控制
创建新的移动报告
(
Create new mobile report
)
To create new mobile report, we need to import data. We can add data from either an Excel worksheet or the Report Server.
要创建新的移动报告,我们需要导入数据。 我们可以从Excel工作表或报表服务器中添加数据。
Click on add data provides options as shown below
单击添加数据提供如下所示的选项
If we want to add the data from the report server, click on the report server and provide the report server address along with the credentials.
如果我们要从报表服务器添加数据,请单击报表服务器,然后提供报表服务器地址和凭据。
Now click on connect and it will display the reporting site name after connected. The dataset should be created first to be utilized here. We can select the dataset that we want for the data purpose.
现在单击连接,连接后将显示报告站点名称。 首先应创建数据集以在此处使用。 我们可以选择想要用于数据目的的数据集。
If we want to update the data, later on, we can use option
‘Refresh all data’
. Apart from this ‘Export, all data’ option can be used to export data into excel sheet.
如果我们要更新数据,稍后可以使用选项
“刷新所有数据”
。 除了此“导出,所有数据”选项之外,还可以用于将数据导出到Excel工作表中。
报告设定
(
Report settings
)
Before we start configuring new reports, we can do some customization for the reports. Click on Settings tab shows the options.
在开始配置新报告之前,我们可以对报告进行一些自定义。 单击设置选项卡显示选项。
Report Title:
The report title will appear in the report header. By default, it is New Mobile Report.
报告标题:
报告标题将显示在报告标题中。 默认情况下,它是“新移动报告”。
Currency:
By default, it will take currency like USD, there are various currency options available as a drop-down.
货币:
默认情况下,它将采用美元之类的货币,下拉菜单中提供了多种货币选项。
Fiscal year start:
we can specify the fiscal year start as well. Some countries have their fiscal year start from April so we can change it accordingly.
会计年度开始:
我们也可以指定会计年度开始。 一些国家的会计年度从4月开始,因此我们可以相应地对其进行更改。
The first day of the week:
We can define the first day of the week, by default it is Sunday.
一周的第一天:
我们可以定义
一周
的第一天,默认情况下为星期日。
Effective date:
we can also define an effective date for “Today” in the format of yyyy-mm-dd or yyyy-mm-dd hh:mm:ss.
生效日期:
我们还可以使用yyyy-mm-dd或yyyy-mm-dd hh:mm:ss的格式为“今天”定义生效日期。
Enable client data caching:
this option gives the ability to enable or disable client data caching, this is default enabled.
启用客户端数据缓存:
此选项提供启用或禁用客户端数据缓存的功能,默认情况下启用。
Encrypt data stored on the client:
If we want to store the sensitive data at the client level, we can enable this.
加密存储在客户端上的数据:
如果我们想在客户端级别存储敏感数据,则可以启用它。
移动报告的布局
(
Layout of mobile reports
)
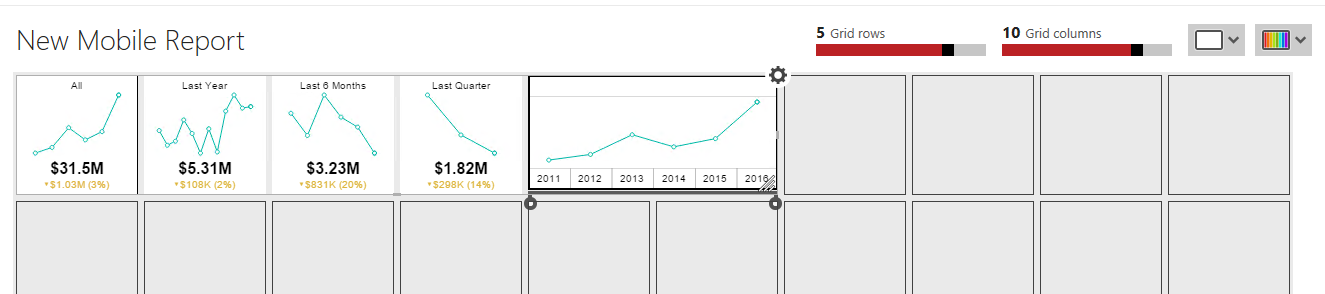
We can choose from the layout mode as Master, Tablet, and Phone. By default, it is the master layout.
我们可以从布局模式中选择“主机”,“平板电脑”和“电话”。 默认情况下,它是主布局。
我们还可以从提供的不同调色板中选择调色板。
Grid Rows and Columns:
We can choose the no of grid rows and columns for our report. The default value is five grid rows and ten grid columns. We can easily change these values just by click on the line bar.
网格行和列:
我们可以为报告选择网格行和列数。 默认值为五个网格行和十个网格列。 我们只需单击线栏即可轻松更改这些值。
设计移动报告
(
Design mobile report
)
Suppose we want to build the mobile report with the below components
假设我们要使用以下组件构建移动报告
-
Time Navigator
时间导航器
-
Gauges
量规
-
Charts
图表
-
Data grids
数据网格
For my report, I have used the sample data provided along with the mobile report publisher tool. Now, I will go through each item and see how we can configure those.
对于我的报告,我使用了随移动报告发布器工具一起提供的示例数据。 现在,我将遍历每个项目,并了解如何配置它们。
-
Time navigator
时间导航器
It provides an option to see the data based on different time intervals. To add this drag this into one of the columns and it will look like as
它提供了一个选项,可以根据不同的时间间隔查看数据。 要添加此内容,请将其拖到其中一列中,它看起来像
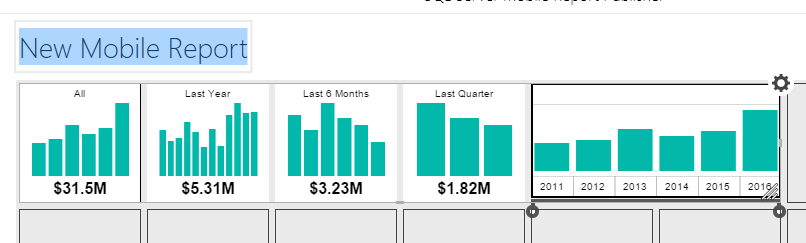
Now to expand the time intervals i.e. last year, last quarter keeps dragging it towards right.
现在要扩大时间间隔,即去年,最后一个季度将其拖向右边。
If we want to change the size of the graph, just drag this to multiple rows.
如果要更改图形的大小,只需将其拖动到多行即可。
Time intervals:
it gives options to define time intervals to years, months, weeks, days, hours.
时间间隔:
它提供了将时间间隔定义为年,月,周,天,小时的选项。
Number format:
We can select from the various number format provided.
数字格式:
我们可以从提供的各种数字格式中进行选择。
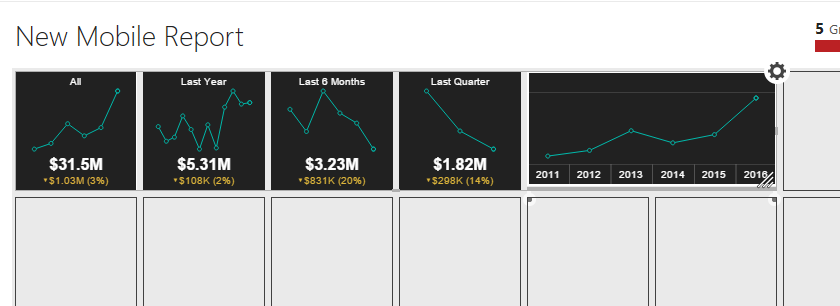
Visualization type:
We can select graph type as bar, line, area, and step area.
可视化类型:
我们可以选择图形类型为条形,线形,面积和台阶面积。
Time range pre-sets:
here we can define what should be the time range. There are a couple of options provided here.
时间范围预设:
在这里我们可以定义时间范围。 这里提供了两个选项。
Show comparison delta:
this provides further details into the graph by including comparison delta details.
显示比较增量:
通过包括比较增量详细信息,从而在图表中提供更多详细信息。
Accent:
By default, the accent is off. If we enable it, the background of the graph appears as shown below.
重音:
默认情况下,重音处于关闭状态。 如果启用它,则图形的背景如下所示。
Suppose we want line visualization with Delta show comparison on so that time navigator will look like
假设我们希望将线形可视化与Delta显示进行比较,以便时间导航器看起来像
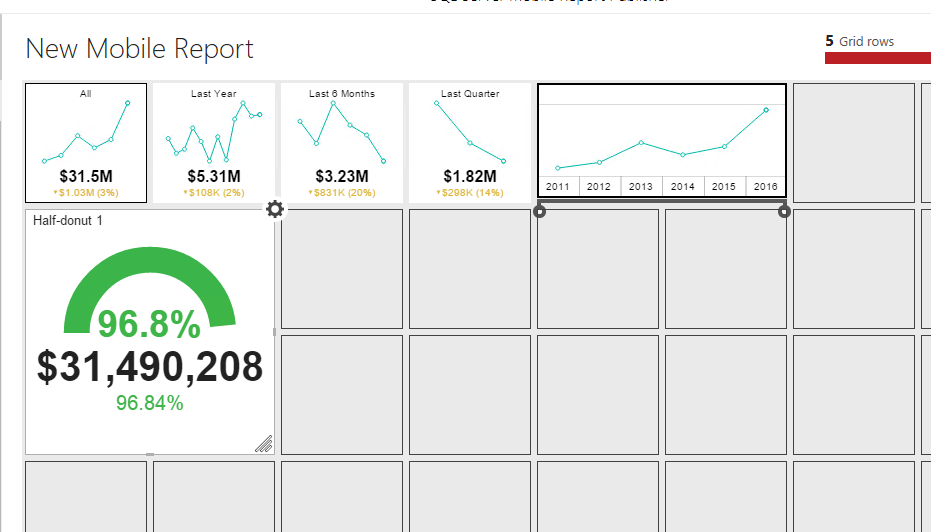
-
Gauges
量规
SSRS Mobile reports provide many gauges to select as shown below
SSRS Mobile报告提供了许多量规供选择,如下所示
Now we want to add gauges to the report. For this report, I have used half–donut. Similar to time navigator we can adjust it to multiple columns and rows.
现在我们要向报告添加量规。 在本报告中,我使用了半圆面包。 与时间导航器类似,我们可以将其调整为多列和多行。
It is also having configuration option available similar to the previous one. Few important configurations are below.
它还具有与上一个类似的可用配置选项。 以下是一些重要的配置。
Title:
By default, it displays as half donut 1. I change it to “Gauges”
标题:
默认情况下,它显示为半甜甜圈1。我将其更改为“ Gauges”
Ring type:
it is showing half ring as of now. If we want to have a full ring, change this property to the full ring.
铃声类型:
截至目前显示半个铃声。 如果我们想要一个完整的铃声,请将此属性更改为完整的铃声。
-
Charts
图表
We have a couple of chart options to choose as shown below.
我们有两个图表选项可供选择,如下所示。
Suppose we want to add funnel chart into our report so drag it to the report and customize it from the options provided.
假设我们要将漏斗图添加到报告中,因此将其拖到报告中并从提供的选项中对其进行自定义。
-
Data grids
数据网格
We can select the data grid from the options provided and configure it similar to the time navigator.
我们可以从提供的选项中选择数据网格,并类似于时间导航器进行配置。
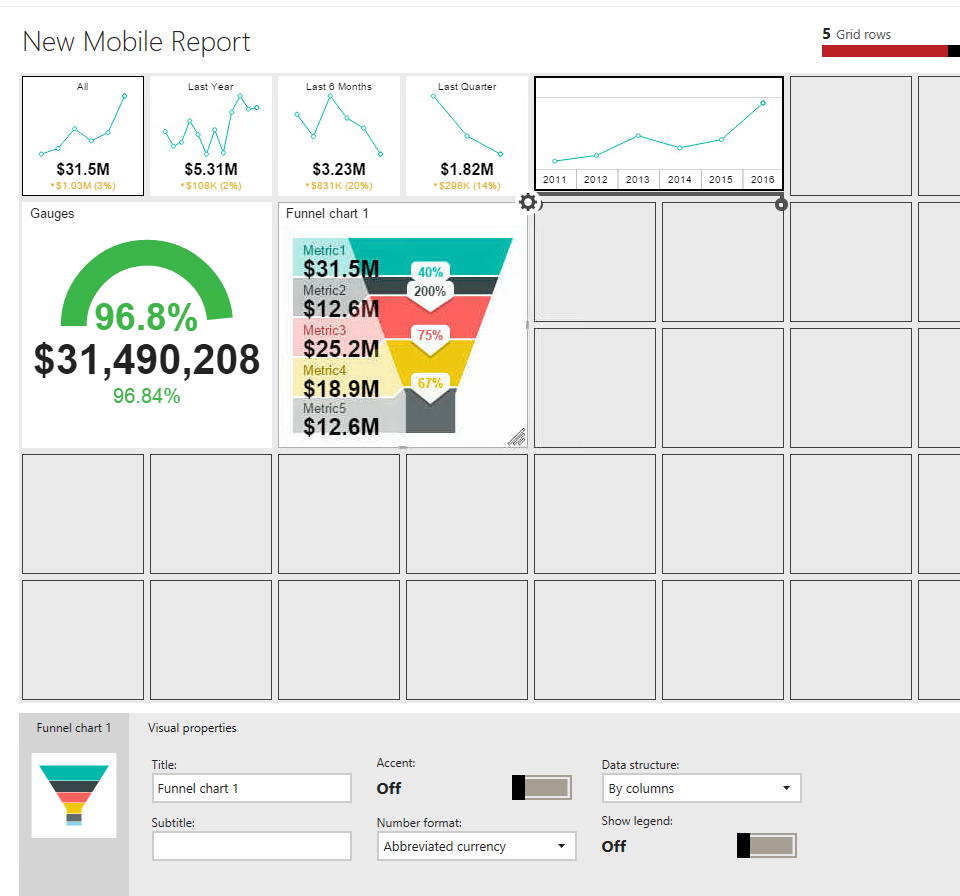
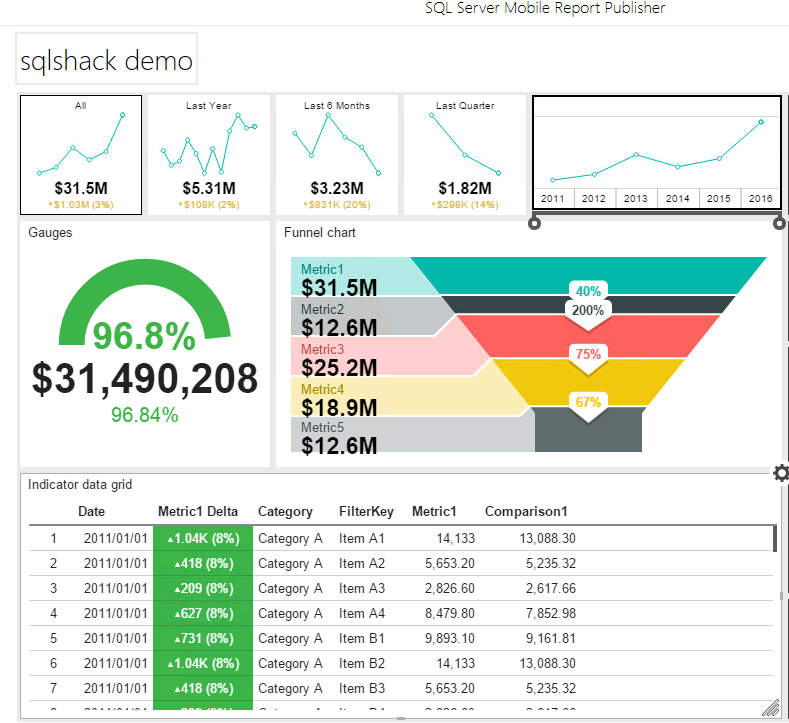
I have renamed the report to “sqlshack demo”, and my final report preview looks as shown below
我已将报告重命名为“ sqlshack demo”,并且最终报告预览如下图所示
将报告从母版转换为平板电脑
(
Converting report from master to tablet
)
Now to convert the master report to tablet layout click on a tablet from the drop-down. The report layout is now as shown below
现在要将主报表转换为平板电脑布局,请从下拉菜单中单击平板电脑。 现在,报告布局如下图所示
A report element shows the elements like a graph, gauge, data, chart we used in the master report.
报表元素显示了我们在主报表中使用的元素,例如图形,量表,数据,图表。
Now drag and drop the elements into the tablet layout like below
现在,将元素拖放到平板电脑布局中,如下所示
将报告转换为手机
(
Converting report to mobile
)
We can convert the report to mobile layout as similar to the previous one, just change the layout mode to the phone, drag-drop the report elements and preview the report.
我们可以像以前一样将报告转换为移动版式,只需将布局模式更改为手机,将报告元素拖放到并预览报告即可。
Once we have created the report, click on save mobile report. We can save the report to the file system or the server. If we select the server, we can choose the report name, server name, and location where we want to publish it.
创建报告后,请点击保存移动报告。 我们可以将报告保存到文件系统或服务器。 如果选择服务器,则可以选择报告名称,服务器名称以及要在其中发布的位置。
Once deployed we can see the report showing as a thumbnail. The report is now accessible on the mobile, tablets format.
部署后,我们可以看到报告显示为缩略图。 现在可以通过移动平板电脑格式访问该报告。
结论
(
Conclusion
)
Mobile Reports are an exciting feature in the SQL Server Reporting Services. It is easy to develop reports using the mobile report publisher tool. Explore these reports in your environment and take advantage of the rich functionality.
移动报表是SQL Server Reporting Services中令人兴奋的功能。 使用移动报告发布器工具可以轻松地开发报告。 在您的环境中浏览这些报告,并利用其丰富的功能。
有用的链接
(
Useful links
)
翻译自:
https://www.sqlshack.com/create-configure-sql-server-mobile-reports/
Microsoft has recently launched SQL Server 2016 with lots of new features like row level security, always encrypted, stretch database, PolyBase, R Services, hybrid cloud capabilities, Dynamic Data...
二:建域test.com
在域控主机192.168.9.176上安装域
1 设置DC的ip 192.168.9.176
INCLUDEPICTURE \d "http://blog.itpub.net/attachment/201408/11/29500582_1407739037lWe2.png" \* MERGEFORMATINET
2 在DC中使用DCPROMO命令
创建
域 (后面的步骤中需要更新windows组件,必须先挂载安装盘)
INCLUDEPICTURE \d "http://blog.itpub.net/attachment/201408/11/29500582_14077391708Ti6.jpg" \* MERGEFORMATINET
3 下一步
INCLUDEPICTURE \d "http://blog.itpub.net/attachment/201408/11/29500582_1407739247Oq09.jpg" \* MERGEFORMATINET
4 下一步
INCLUDEPICTURE \d "http://blog.itpub.net/attachment/201408/11/29500582_1407739274XN5X.jpg" \* MERGEFORMATINET
5 下一步
INCLUDEPICTURE \d "http://blog.itpub.net/attachment/201408/11/29500582_14077393012nbo.png" \* MERGEFORMATINET
6 选择新林中的域
INCLUDEPICTURE \d "http://blog.itpub.net/attachment/201408/11/29500582_1407739354rKwn.png" \* MERGEFORMATINET
7 填入所要
创建
域的完整的域名
INCLUDEPICTURE \d "http://blog.itpub.net/attachment/201408/11/29500582_1407739377CMKf.png" \* MERGEFORMATINET
8 下一步
INCLUDEPICTURE \d "http://blog.itpub.net/attachment/201408/11/29500582_1407739509vRI0.png" \* MERGEFORMATINET
9 选择AD数据库和日志文件的存放位置
INCLUDEPICTURE \d "http://blog.itpub.net/attachment/201408/11/29500582_1407739565AxuX.png" \* MERGEFORMATINET
10 存放SYSVOL的存放位置(注意:一定要放在NTFS的分区中)
INCLUDEPICTURE \d "http://blog.itpub.net/attachment/201408/11/29500582_1407739603KBsU.png" \* MERGEFORMATINET
11 注意:AD是离不开DNS服务的,因为客户机加入域和登录域都需要把域名解析为IP地址,因为此时DC没有DNS服务器,所以选择第二项让系统在
创建
DC的同时把DNS服务随之一起安装上.当然你也可以安装DC后自己手动再安装和
配置
DNS服务器(当时是您给会正确
配置
DNS服务器),建议和DC一起让系统帮我们
创建
,因为省事
INCLUDEPICTURE \d "http://blog.itpub.net/attachment/201408/11/29500582_1407739851kpky.png" \* MERGEFORMATINET
12 选择兼容的模式,为了以后可以方便windows2000和2003兼容
INCLUDEPICTURE \d "http://blog.itpub.net/attachment/201408/11/29500582_1407739883TU02.jpg" \* MERGEFORMATINET
13 设置AD的还原密码(为了以后对AD数据库做完备份,开机按F8进入AD还原模式需要的还原密码,如果在此设置了密码,一定切记):
INCLUDEPICTURE \d "http://blog.itpub.net/attachment/201408/11/29500582_14077399565Eoz.jpg" \* MERGEFORMATINET
14 下一步
INCLUDEPICTURE \d "http://blog.itpub.net/attachment/201408/11/29500582_1407740932ypMd.jpg" \* MERGEFORMATINET
15 下一步
INCLUDEPICTURE \d "http://blog.itpub.net/attachment/201408/11/29500582_1407741371FFnB.jpg" \* MERGEFORMATINET
16 需要挂载有关盘,才会自动安装DNS
INCLUDEPICTURE \d "http://blog.itpub.net/attachment/201408/11/29500582_1407741434D07d.jpg" \* MERGEFORMATINET
17 完成
INCLUDEPICTURE \d "http://blog.itpub.net/attachment/201408/11/29500582_14077425689rnx.jpg" \* MERGEFORMATINET
18 重启
INCLUDEPICTURE \d "http://blog.itpub.net/attachment/201408/11/29500582_1407742596D44S.jpg" \* MERGEFORMATINET
19 安装完重起系统后登录界面为使用域中的管理员和密码登录到域
INCLUDEPICTURE \d "http://blog.itpub.net/attachment/201408/11/29500582_14077426257kHs.png" \* MERGEFORMATINET
20 进入系统后查看计算机的状态
INCLUDEPICTURE \d "http://blog.itpub.net/attachment/201408/11/29500582_1407742652R7uD.png" \* MERGEFORMATINET
21查看管理工具会增加DNS和有关AD的工具,以及安全策略
INCLUDEPICTURE \d "http://blog.itpub.net/attachment/201408/11/29500582_1407742694MvtT.png" \* MERGEFORMATINET
22 点开用户和计算机域控管理界面 (
创建
域test.com完成)
INCLUDEPICTURE \d "http://blog.itpub.net/attachment/201408/11/29500582_1407742729f3b0.png" \* MERGEFORMATINET
三:
配置
节点win1 和 节点win2的网络,并添加到域中
1 网络
配置
win1 网络
配置
DNS需要
配置
DC的IP
INCLUDEPICTURE \d "http://blog.itpub.net/attachment/201408/11/29500582_1407742769IgEN.jpg" \* MERGEFORMATINET
INCLUDEPICTURE \d "http://blog.itpub.net/attachment/201408/11/29500582_1407742840A6l3.jpg" \* MERGEFORMATINET
“高级”里面
配置
一下禁用NetBIOS 不勾选前面两项
INCLUDEPICTURE \d "http://blog.itpub.net/attachment/201408/11/29500582_1407742943Fy03.jpg" \* MERGEFORMATINET
Win2网络设置
INCLUDEPICTURE \d "http://blog.itpub.net/attachment/201408/11/29500582_1407743537GJ7l.jpg" \* MERGEFORMATINET
INCLUDEPICTURE \d "http://blog.itpub.net/attachment/201408/11/29500582_14077435693D38.png" \* MERGEFORMATINET
Win1 win2 进行相同的操作
2 更改计算机名,以及加入域test.com
INCLUDEPICTURE \d "http://blog.itpub.net/attachment/201408/11/29500582_1407743633bYBe.png" \* MERGEFORMATINET
3 属于域控制账号密码
INCLUDEPICTURE \d "http://blog.itpub.net/attachment/201408/11/29500582_1407743676gbuo.jpg" \* MERGEFORMATINET
4 完成后重启
INCLUDEPICTURE \d "http://blog.itpub.net/attachment/201408/11/29500582_1407743709vOFZ.jpg" \* MERGEFORMATINET
5 域登录
INCLUDEPICTURE \d "http://blog.itpub.net/attachment/201408/11/29500582_1407743759G5G5.png" \* MERGEFORMATINET
6 加入域后的计算机属性
INCLUDEPICTURE \d "http://blog.itpub.net/attachment/201408/11/29500582_1407743787p33j.png" \* MERGEFORMATINET
Win2 也是一样的步骤加入到域中
6 在域控主机192.168.9.176中可以看到新添加的成员
INCLUDEPICTURE \d "http://blog.itpub.net/attachment/201408/11/29500582_1407743817WsaU.png" \* MERGEFORMATINET
在步骤五中可能会提示报错指定域的名称或安全标识(SID)与该域的信任信息不一致 (因为指定域的名称或安全标识(SID)与该域的信任信息不一致)需要修改
修改方法:
1 .从安装盘中 support\tools\deploy.cab中提取sysprep.exe和setuppcl.exe 到桌面
INCLUDEPICTURE \d "http://blog.itpub.net/attachment/201408/11/29500582_1407743850SDwD.png" \* MERGEFORMATINET
INCLUDEPICTURE \d "http://blog.itpub.net/attachment/201408/11/29500582_1407743871Py6C.png" \* MERGEFORMATINET
INCLUDEPICTURE \d "http://blog.itpub.net/attachment/201408/11/29500582_1407743888vP01.png" \* MERGEFORMATINET
2 运行sysprep.exe"确定"开始重新封装
往下就是下一步下一步安装即可 (不能远程操作,封装一次即可,不作详述了)
四:安装win
server
2003集群
Win1节点上进行操作,关闭其他节点
1 依次单击“开始”、“所有程序”和“管理工具”,然后单击“群集管理器”
INCLUDEPICTURE \d "http://blog.itpub.net/attachment/201408/11/29500582_14077439293FFp.png" \* MERGEFORMATINET
2 下一步
INCLUDEPICTURE \d "http://blog.itpub.net/attachment/201408/11/29500582_14077440578D3X.png" \* MERGEFORMATINET
3 选择域(test.com),键入群集名win2003cluster。下一步
INCLUDEPICTURE \d "http://blog.itpub.net/attachment/201408/11/29500582_1407744070JRQx.png" \* MERGEFORMATINET
4 机器名输入 win1。下一步
INCLUDEPICTURE \d "http://blog.itpub.net/attachment/201408/11/29500582_1407744154ehw0.png" \* MERGEFORMATINET
5 这一步是检测硬件环境是否符合群集要求。如果这一步出现错误提示,可以点击“查看日志”,按照提示检查网络设置和磁盘阵列连接是否正确
INCLUDEPICTURE \d "http://blog.itpub.net/attachment/201408/11/29500582_1407744230SSkp.gif" \* MERGEFORMATINET
1 通过下一步,输入集群的IP地址,操作系统虚拟服务器的IP 地址
INCLUDEPICTURE \d "http://blog.itpub.net/attachment/201408/11/29500582_1407744249x6HR.gif" \* MERGEFORMATINET
6 输入域用户名和密码,这里使用的是域管理员administrator
INCLUDEPICTURE \d "http://blog.itpub.net/attachment/201408/11/29500582_1407744263857b.gif" \* MERGEFORMATINET
说明:在项目实施时一定不能用域的管理员administrator。应该要求用户网络管理员提供一个专门管理
群集的新用户。这个新用户在各个群集节点中应该在本地管理员组(local administrator group)中。
7 点击“仲裁”按钮,在弹出的窗口中选择仲裁资源。我们选择磁盘Q(QDisk)作为仲裁盘
INCLUDEPICTURE \d "http://blog.itpub.net/attachment/201408/11/29500582_1407744272ks9Q.gif" \* MERGEFORMATINET
INCLUDEPICTURE \d "http://blog.itpub.net/attachment/201408/11/29500582_1407744294mA7n.gif" \* MERGEFORMATINET
INCLUDEPICTURE \d "http://blog.itpub.net/attachment/201408/11/29500582_1407744319FJ6n.gif" \* MERGEFORMATINET
10 群集 win2003cluster 已经
配置
成功。但是目前只有win1,我们需要将第二个节点加入,构建出容灾群集。
INCLUDEPICTURE \d "http://blog.itpub.net/attachment/201408/11/29500582_1407744358n8K5.gif" \* MERGEFORMATINET
11 新建节点
INCLUDEPICTURE \d "http://blog.itpub.net/attachment/201408/11/29500582_1407744371gd4L.gif" \* MERGEFORMATINET
12 下一步
INCLUDEPICTURE \d "http://blog.itpub.net/attachment/201408/11/29500582_1407744385peeG.gif" \* MERGEFORMATINET
13 输入“win2”
INCLUDEPICTURE \d "http://blog.itpub.net/attachment/201408/11/29500582_1407744396zcBj.png" \* MERGEFORMATINET
14 下一步
INCLUDEPICTURE \d "http://blog.itpub.net/attachment/201408/11/29500582_1407744468rsZ5.gif" \* MERGEFORMATINET
15 下一步
INCLUDEPICTURE \d "http://blog.itpub.net/attachment/201408/11/29500582_1407744481R038.gif" \* MERGEFORMATINET
16 下一步
INCLUDEPICTURE \d "http://blog.itpub.net/attachment/201408/11/29500582_1407744502HRQ7.gif" \* MERGEFORMATINET
17 下一步
INCLUDEPICTURE \d "http://blog.itpub.net/attachment/201408/11/29500582_1407744520a8xd.gif" \* MERGEFORMATINET
Win2上的共享磁盘QDisk 和ClusterData 已经被win1 所独占。这个警告不用理会
18 下一步,完成win2节点添加
INCLUDEPICTURE \d "http://blog.itpub.net/attachment/201408/11/29500582_1407744536ppLl.gif" \* MERGEFORMATINET
19 操作系统容灾群集已经安装完毕。
INCLUDEPICTURE \d "http://blog.itpub.net/attachment/201408/11/29500582_1407744552ya8d.gif" \* MERGEFORMATINET
20
配置
群集网络通信 右键选择群集“属性”
INCLUDEPICTURE \d "http://blog.itpub.net/attachment/201408/11/29500582_1407744587KWB4.gif" \* MERGEFORMATINET
21 本地连接2 -à属性
INCLUDEPICTURE \d "http://blog.itpub.net/attachment/201408/11/29500582_1407744602x808.png" \* MERGEFORMATINET
22 专门用于群集节点内部通讯使用的
INCLUDEPICTURE \d "http://blog.itpub.net/attachment/201408/11/29500582_14077446226FNs.png" \* MERGEFORMATINET
23确保private 在public 上面(private 优先级更高)。确定完成网络设置。
INCLUDEPICTURE \d "http://blog.itpub.net/attachment/201408/11/29500582_1407744651WcyM.jpg" \* MERGEFORMATINET
24 测试操作系统群集
INCLUDEPICTURE \d "http://blog.itpub.net/attachment/201408/11/29500582_1407744660XhOo.gif" \* MERGEFORMATINET
25 点击
移动
组可以相互切换资源
INCLUDEPICTURE \d "http://blog.itpub.net/attachment/201408/11/29500582_1407744686wgRC.png" \* MERGEFORMATINET
26为了测试群集的可用性,在win1 上右键选择“停止群集服务”
INCLUDEPICTURE \d "http://blog.itpub.net/attachment/201408/11/29500582_1407744699WCOe.png" \* MERGEFORMATINET
27 Win2 接管了资源,成为目前群集的工作节点
INCLUDEPICTURE \d "http://blog.itpub.net/attachment/201408/11/29500582_1407744712kFdi.png" \* MERGEFORMATINET
INCLUDEPICTURE \d "http://blog.itpub.net/attachment/201408/11/29500582_1407744730Lazx.png" \* MERGEFORMATINET
28 重新启动win1
INCLUDEPICTURE \d "http://blog.itpub.net/attachment/201408/11/29500582_1407744745g883.jpg" \* MERGEFORMATINET
Windowns
server
2003集群完成
配置
五 :
配置
SQL
Server
2005 群集
1说明:如果群集环境不需要安装
报表
服务(
SQL
Server
Reporting Services),可以忽略此步骤。
安装IIS
2 打开组件服务---计算机---我的电脑---属性—安全
配置
,选择administrator 用户登陆,输入administrator
这一步是必须的,否则在安装
SQL
server
2005 的时候会出现COM+错误。
INCLUDEPICTURE \d "http://blog.itpub.net/attachment/201408/11/29500582_14077447844cHJ.gif" \* MERGEFORMATINET
INCLUDEPICTURE \d "http://blog.itpub.net/attachment/201408/11/29500582_14077447977j94.gif" \* MERGEFORMATINET
3
配置
MSDTC 到资源组中
进入 CMD 运行
net stop msdtc
msdtc –uninstall
msdtc –install
net start msdtc
此操作之后在群集组直接出现 MSDTC 资源
如果出现msdtc无法正常使用,也可以用此方法重新
配置
一般性增加MSDTC资源方法:
INCLUDEPICTURE \d "http://blog.itpub.net/attachment/201408/11/29500582_140774481409IC.png" \* MERGEFORMATINET
“资源类型”选择“分布式事务协调器(DTC)”
INCLUDEPICTURE \d "http://blog.itpub.net/attachment/201408/11/29500582_14077448256dP6.gif" \* MERGEFORMATINET
INCLUDEPICTURE \d "http://blog.itpub.net/attachment/201408/11/29500582_1407744854jfNM.gif" \* MERGEFORMATINET
选择仲裁盘和群集名作为其依存资源。完成
INCLUDEPICTURE \d "http://blog.itpub.net/attachment/201408/11/29500582_1407744867nQMJ.gif" \* MERGEFORMATINET
确定,完成MSDTC
配置
。
INCLUDEPICTURE \d "http://blog.itpub.net/attachment/201408/11/29500582_1407744885M46X.gif" \* MERGEFORMATINET
4 注意,在安装
SQL
server
2005 前, 如果主机是多核心的处理器,请修改boot.ini 文件,把CPU 核心数
.可以在msconfig 选项中直接选择修改 ,这个是2005 本身的bug,等完成安装后打SP3 或更高的补丁。
补丁打完之后可修改回正常核心数量
INCLUDEPICTURE \d "http://blog.itpub.net/attachment/201408/11/29500582_1407744896HzT9.gif" \* MERGEFORMATINET
5安装
SQL
Server
2005
INCLUDEPICTURE \d "http://blog.itpub.net/attachment/201408/11/29500582_1407744939QYbK.png" \* MERGEFORMATINET
INCLUDEPICTURE \d "http://blog.itpub.net/attachment/201408/11/29500582_14077449503Df3.png" \* MERGEFORMATINET
INCLUDEPICTURE \d "http://blog.itpub.net/attachment/201408/11/29500582_1407744968I81t.png" \* MERGEFORMATINET
下一步(步骤2处理不好,会出现com+错误)
INCLUDEPICTURE \d "http://blog.itpub.net/attachment/201408/11/29500582_14077449795J34.png" \* MERGEFORMATINET
开始安装必备组件
INCLUDEPICTURE \d "http://blog.itpub.net/attachment/201408/11/29500582_1407744989AIgW.png" \* MERGEFORMATINET
系统
配置
检查
INCLUDEPICTURE \d "http://blog.itpub.net/attachment/201408/11/29500582_1407745003rYzQ.png" \* MERGEFORMATINET
INCLUDEPICTURE \d "http://blog.itpub.net/attachment/201408/11/29500582_14077450180cuh.gif" \* MERGEFORMATINET
输入注册信息
INCLUDEPICTURE \d "http://blog.itpub.net/attachment/201408/11/29500582_1407745031baoA.png" \* MERGEFORMATINET
选择要安装的组件
INCLUDEPICTURE \d "http://blog.itpub.net/attachment/201408/11/29500582_1407745057vz41.png" \* MERGEFORMATINET
(所提供光盘只有
SQL
Server
Database Services组件)
输入实例名:MS
SQL
2005
INCLUDEPICTURE \d "http://blog.itpub.net/attachment/201408/11/29500582_1407745072podT.png" \* MERGEFORMATINET
输入虚拟服务器的名称:SH-
sql
dbc
INCLUDEPICTURE \d "http://blog.itpub.net/attachment/201408/11/29500582_1407745107ArP0.png" \* MERGEFORMATINET
输入虚拟服务器名称,下一步(区别于集群虚拟服务器IP)
INCLUDEPICTURE \d "http://blog.itpub.net/attachment/201408/11/29500582_1407745121U1uU.gif" \* MERGEFORMATINET
为虚拟服务器指定IP 地址,点击“添加”
INCLUDEPICTURE \d "http://blog.itpub.net/attachment/201408/11/29500582_1407745126XcS5.gif" \* MERGEFORMATINET
为数据文件指定安装路径,请注意这里的S 盘是数据存储盘(ClusterData),千万不要把数据文件安装到仲裁盘(QDisk)上。
INCLUDEPICTURE \d "http://blog.itpub.net/attachment/201408/11/29500582_1407745139mnRW.gif" \* MERGEFORMATINET
可以在集群管理器上分一下组
INCLUDEPICTURE \d "http://blog.itpub.net/attachment/201408/11/29500582_1407745149zX6d.gif" \* MERGEFORMATINET
该用户其实应该是cluster,如果用administrator,会造成不能在远程计算机安装(后面述修改方法,也可以之前在域中建好用户)
INCLUDEPICTURE \d "http://blog.itpub.net/attachment/201408/11/29500582_1407745155lTGS.png" \* MERGEFORMATINET
INCLUDEPICTURE \d "http://blog.itpub.net/attachment/201408/11/29500582_1407745190BL3x.gif" \* MERGEFORMATINET
INCLUDEPICTURE \d "http://blog.itpub.net/attachment/201408/11/29500582_14077451973Bma.png" \* MERGEFORMATINET
INCLUDEPICTURE \d "http://blog.itpub.net/attachment/201408/11/29500582_1407745210d8k8.png" \* MERGEFORMATINET
INCLUDEPICTURE \d "http://blog.itpub.net/attachment/201408/11/29500582_14077452234KZ9.png" \* MERGEFORMATINET
选择混合模式验证
INCLUDEPICTURE \d "http://blog.itpub.net/attachment/201408/11/29500582_1407745234SblE.png" \* MERGEFORMATINET
INCLUDEPICTURE \d "http://blog.itpub.net/attachment/201408/11/29500582_1407745246Aqpq.png" \* MERGEFORMATINET
INCLUDEPICTURE \d "http://blog.itpub.net/attachment/201408/11/29500582_1407745262pPPB.png" \* MERGEFORMATINET
INCLUDEPICTURE \d "http://blog.itpub.net/attachment/201408/11/29500582_1407745273LV55.png" \* MERGEFORMATINET
INCLUDEPICTURE \d "http://blog.itpub.net/attachment/201408/11/29500582_1407745288YFsc.png" \* MERGEFORMATINET
INCLUDEPICTURE \d "http://blog.itpub.net/attachment/201408/11/29500582_1407745350t0Wp.png" \* MERGEFORMATINET
安装程序。
INCLUDEPICTURE \d "http://blog.itpub.net/attachment/201408/11/29500582_1407745365spAH.png" \* MERGEFORMATINET
完成后在另一个节点安装。
六:解决远程不能安装问题,
创建
swg域用户,委托管理
1 打开域控制管理
INCLUDEPICTURE \d "http://blog.itpub.net/attachment/201408/11/29500582_14077453825h6y.png" \* MERGEFORMATINET
2 新建用户
INCLUDEPICTURE \d "http://blog.itpub.net/attachment/201408/11/29500582_1407745628BIXb.png" \* MERGEFORMATINET
3 添加到组
INCLUDEPICTURE \d "http://blog.itpub.net/attachment/201408/11/29500582_1407745724heZa.png" \* MERGEFORMATINET
4 添加到administrator组中
INCLUDEPICTURE \d "http://blog.itpub.net/attachment/201408/11/29500582_1407745737U5xo.png" \* MERGEFORMATINET
5 查看属性
INCLUDEPICTURE \d "http://blog.itpub.net/attachment/201408/11/29500582_1407745745VMv1.jpg" \* MERGEFORMATINET
6 win1 win2 节点上加用户权限
INCLUDEPICTURE \d "http://blog.itpub.net/attachment/201408/11/29500582_1407745754s7Nj.jpg" \* MERGEFORMATINET
7 添加到swg组
INCLUDEPICTURE \d "http://blog.itpub.net/attachment/201408/11/29500582_1407745762t1Z5.jpg" \* MERGEFORMATINET
8 最后全部用swg用户等test.com域上的主机win1,win2
INCLUDEPICTURE \d "http://blog.itpub.net/attachment/201408/11/29500582_1407745778Klvg.jpg" \* MERGEFORMATINET
2 停止其中win1节点,服务自动转移
INCLUDEPICTURE \d "http://blog.itpub.net/attachment/201408/11/29500582_1407745807BB77.jpg" \* MERGEFORMATINET
INCLUDEPICTURE \d "http://blog.itpub.net/attachment/201408/11/29500582_1407745813HCSC.jpg" \* MERGEFORMATINET
八:访问数据库,导入数据
1 右键“数据库” “附加”
INCLUDEPICTURE \d "http://blog.itpub.net/attachment/201408/11/29500582_1407745821o56o.jpg" \* MERGEFORMATINET
2 导入整个数据库
INCLUDEPICTURE \d "http://blog.itpub.net/attachment/201408/11/29500582_1407745830HtaT.jpg" \* MERGEFORMATINET
3 导入完成后,显示数据
INCLUDEPICTURE \d "http://blog.itpub.net/attachment/201408/11/29500582_1407745846B7dG.jpg" \* MERGEFORMATINET
4 做故障转移时,数据库可以正常被访问
INCLUDEPICTURE \d "http://blog.itpub.net/attachment/201408/11/29500582_1407745935DEw2.jpg" \* MERGEFORMATINET
SQL
Server
报表
服务:基于服务器的平台,用来
创建
、管理和发送
报表
。也可以使用
SQL
Server
创建
、分发和管理
报表
。
1、启动SSRS服务
步骤:我的电脑->管理->服务和应用程序->
Sql
Server
配置
管理器->
Sql
Server
服务->
Sql
Server
(MS
SQL
SERVER
)右键启动服务
2、
创建
报表
服务器项目
步骤:(1)打开Microsoft
SQL
S
借助
SQL
Server
移动
报表
发布服务器,你可以在包含可调整的网格行和列以及灵活的
移动
报表
元素的设计图面上快速
创建
SQL
Server
SQL
Server
移动
报表
,这些
报表
可轻松缩放至任意屏幕大小。你可以使用本地
SQL
Server
或 Excel
工作簿和其他数据源来
创建
移动
报表
。
然后,将它们保存到 Reporting Services Web
门户,并在浏览器
Reporting Service,也就是我们平时经常看到的,
报表
商业智能,BI,基于
SQL
Server
的
报表
制作工具,这里的例子,是如何通过visual studio 2010,开发Reporting Service
报表
.
1. 打开
sql
server
2012,
创建
,一个存储过程
ALTER proc
[dbo].[ProTest2]
@StartSubmitTime
上周,Tim与我们分享了
SQL
Server
2008
报表
服务的管理
配置
及
创建
报表
的方法。
SQL
Server
2008
报表
服务是一个完整的基于服务器的平台,它可以建立、管理、发布传统的基于纸张的
报表
或者交互的、基于Web的
报表
。
SQL
Server
2008
报表
服务包括周到的
报表
打造工具,和一些
报表
格式创新。
报表
服务的安装与
配置
开发
报表
的过程
需要找到
SQL
Server
的
配置
管理器(configuration manager)
Microsoft 管理控制台程序的一个管理单元而不是单独的程序。win10下不作显示:
需要到磁盘下去找:
路径:C:\Windows\SysWOW64\
SQL
Server
Manager13.msc
不同的
SQL
Server
版本的号不一样,
SQL
Server
是一种数据库管理系统,由Microsoft公司开发和维护,用于存储、管理和处理数据。它运行在Windows操作系统上,广泛应用于企业级应用程序和网站。
SQL
Server
提供了各种可用性选项,如备份、复制和故障转移,以确保数据的高可用性和安全性。它还提供了多种方式来管理和优化数据库的性能,包括索引、视图和存储过程等功能。
SQL
Server
也支持多个编程语言与之交互,如C、C++、
Java
和C#等。通过.NET框架的支持,可以用Visual Studio轻松地
创建
和维护
SQL
Server
应用程序。
总之,
SQL
Server
是一款可靠、高效、易用和功能强大的数据库管理系统,适用于各种规模的企业和应用场景。

