@SpringBootApplication
public class Word2PDFApplication {
public static void main(String[] args) {
SpringApplication.run(Word2PDFApplication.class, args);
String wordTemplatePath = "src/main/resources/templates/简历模板.docx";
String wordOutputPath = "src/main/resources/templates/简历模板-output.docx";
String pdfOutputPath = "src/main/resources/templates/简历模板.pdf";
String pdfWithMarkerOutputPath = "src/main/resources/templates/简历模板-marker.pdf";
Map<String, Object> dataMap = getPersonDataMap();
writeDataToWord(dataMap, wordTemplatePath, wordOutputPath);
convertWordToPdf(wordOutputPath, pdfOutputPath);
addMarkerToPdf(pdfOutputPath, pdfWithMarkerOutputPath);
private static Map<String, Object> getPersonDataMap() {
Map<String, Object> personDataMap = new HashMap<>();
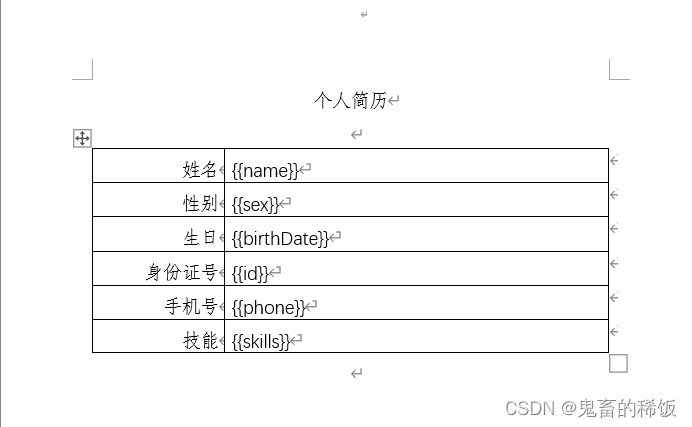
personDataMap.put("name", "张三");
personDataMap.put("sex", "男");
personDataMap.put("birthDate", "1998-12-02");
personDataMap.put("id", "420202199812020011");
personDataMap.put("phone", "18819297766");
personDataMap.put("skills", "java Spring MySQL ...");
return personDataMap;
private static void writeDataToWord(Map<String, Object> dataMap, String wordTemplatePath, String wordOutputPath) {
XWPFTemplate render = XWPFTemplate.compile(wordTemplatePath).render(dataMap);
File dest = new File(wordOutputPath);
if (!dest.getParentFile().exists()) {
dest.getParentFile().mkdirs();
try {
render.writeToFile(wordOutputPath);
} catch (IOException
e) {
throw new RuntimeException(e);
private static void convertWordToPdf(String wordOutputPath, String pdfOutputPath) {
if (!getAsposeWordLicense()) {
return;
FileOutputStream os = null;
try {
long old = System.currentTimeMillis();
File file = new File(pdfOutputPath);
os = new FileOutputStream(file);
Document doc = new Document(wordOutputPath);
doc.save(os, SaveFormat.PDF);
long now = System.currentTimeMillis();
System.out.println("pdf转换成功,共耗时:" + ((now - old) / 1000.0) + "秒");
} catch (Exception e) {
e.printStackTrace();
} finally {
if (os != null) {
try {
os.flush();
os.close();
} catch (IOException e) {
e.printStackTrace();
private static void addMarkerToPdf(String pdfOutputPath, String pdfWithMarkerOutputPath) {
boolean asposePdfLicense = getAsposePdfLicense();
if (!asposePdfLicense) {
return;
com.aspose.pdf.Document pdfDocument = new com.aspose.pdf.Document(pdfOutputPath);
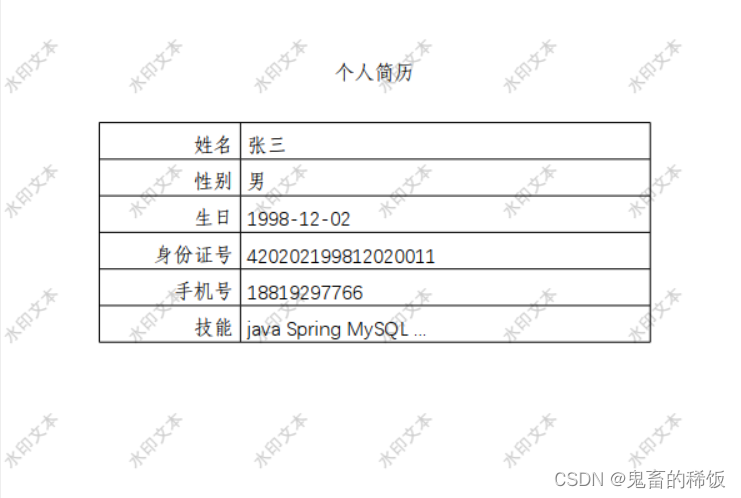
TextStamp textStamp = new TextStamp("水印文本");
textStamp.getTextState().setFontSize(14.0F);
textStamp.getTextState().setFontStyle(FontStyles.Bold);
textStamp.setRotateAngle(45);
textStamp.setOpacity(0.2);
float xOffset = 100;
float yOffset = 100;
for (Page page : pdfDocument.getPages()) {
float xPosition = 0;
float yPosition = 0;
while (yPosition < page.getRect().getHeight()) {
textStamp.setXIndent(xPosition);
textStamp.setYIndent(yPosition);
page.addStamp(textStamp);
xPosition += xOffset;
if (xPosition + textStamp.getWidth() > page.getRect().getWidth()) {
xPosition = 0;
yPosition += yOffset;
pdfDocument.save(pdfWithMarkerOutputPath);
private static boolean getAsposeWordLicense() {
boolean result = false;
InputStream is = null;
try {
ResourcePatternResolver resolver = new PathMatchingResourcePatternResolver();
org.springframework.core.io.Resource[] resources = resolver.getResources("classpath:license.xml");
is = resources[0].getInputStream();
License asposeLic = new License();
asposeLic.setLicense(is);
result = true;
} catch (Exception e) {
e.printStackTrace();
} finally {
if (is != null) {
try {
is.close();
} catch (IOException e) {
e.printStackTrace();
return result;
private static boolean getAsposePdfLicense() {
boolean result = false;
InputStream is = null;
try {
ResourcePatternResolver resolver = new PathMatchingResourcePatternResolver();
org.springframework.core.io.Resource[] resources = resolver.getResources("classpath:license.xml");
is = resources[0].getInputStream();
com.aspose.pdf.License asposeLic = new com.aspose.pdf.License();
asposeLic.setLicense(is);
result = true;
} catch (Exception e) {
e.printStackTrace();
} finally {
if (is != null) {
try {
is.close();
} catch (IOException e) {
e.printStackTrace();
return result;
import cn.hutool.core.io.FileUtil;
import com.aspose.words.Document;
import com.aspose.words.License;
import com.aspose.words.SaveFormat;
import java.io.ByteArrayInputStre...
前段时间,项目需要自动生成word文档,用WordFreeMarker生成word文档后,又要求生成的文档能在浏览器浏览,思来想去,把word文档转成pdf就好了,于是乎研究了一下。
将word文档转化为PDF是项目中常见的需求之一,目前主流的方法可以分为两大类,一类是利用各种Office应用进行转换,譬如Microsoft Office、WPS以及LiberOffice,另一种是利用各种语言提供的对于Office文档读取的接口(譬如Apache POI,jacob,docx4j,openoffice),
之前使用poi-tl进行word模板生成word文件,在生成word之后,现在需求需要给word添加一个水印的功能,先贴图生成后的效果,部分内容涉及公司信息打了马赛克贴一下代码
service的代码
单元测试测一下,完美输出
工具类的代码贴一下
import java.io.FileInputStream;
import java.io.FileOutputStream;
import java.io.IOException;
import java.util.HashMap;
import java.util.Map;
import org.apache.poi.ss.usermodel.Cell;
import org.apache.poi.ss.usermodel.CellType;
import org.apache.poi.ss.usermodel.Row;
import org.apache.poi.ss.usermodel.Sheet;
import org.apache.poi.ss.usermodel.Workbook;
import org.apache.poi.ss.usermodel.WorkbookFactory;
public class ExcelWriter {
private File file;
private Workbook workbook;
public ExcelWriter(String filePath) throws IOException {
file = new File(filePath);
workbook = WorkbookFactory.create(new FileInputStream(file));
public void writeData(String[] sheetNames, Map<String, Object[][]> data) throws IOException {
for (String sheetName : sheetNames) {
Sheet sheet = workbook.getSheet(sheetName);
Object[][] sheetData = data.get(sheetName);
if (sheetData != null) {
int rowIndex = 0;
for (Object[] rowData : sheetData) {
Row row = sheet.getRow(rowIndex);
if (row == null) {
row = sheet.createRow(rowIndex);
int columnIndex = 0;
for (Object cellData : rowData) {
Cell cell = row.getCell(columnIndex);
if (cell == null) {
cell = row.createCell(columnIndex);
if (cellData != null) {
if (cellData instanceof Number) {
cell.setCellValue(((Number) cellData).doubleValue());
} else if (cellData instanceof String) {
cell.setCellValue((String) cellData);
} else if (cellData instanceof Boolean) {
cell.setCellValue((Boolean) cellData);
} else {
cell.setCellValue(cellData.toString());
columnIndex++;
rowIndex++;
public void save() throws IOException {
workbook.write(new FileOutputStream(file));
workbook.close();
public static void main(String[] args) throws IOException {
ExcelWriter writer = new ExcelWriter("template.xlsx");
Map<String, Object[][]> data = new HashMap<String, Object[][]>();
data.put("Sheet1", new Object[][] { { "A1", "B1", "C1" }, { "A2", "B2", "C2" } });
data.put("Sheet2", new Object[][] { { "X1", "Y1", "Z1" }, { "X2", "Y2", "Z2" } });
writer.writeData(new String[] { "Sheet1", "Sheet2" }, data);
writer.save();
使用示例:
1. 创建Excel文件"template.xlsx",在Sheet1和Sheet2中分别添加3列数据;
2. 在Java中使用ExcelWriter类读取"template.xlsx"文件;
3. 调用writeData方法向Sheet1和Sheet2中写入新数据;
4. 调用save方法保存更新后的Excel文件。
注意:ExcelWriter类中的写入数据方法是覆盖式写入,即会清空原有数据,再写入新数据。如果需要追加数据,需要修改方法实现。

