
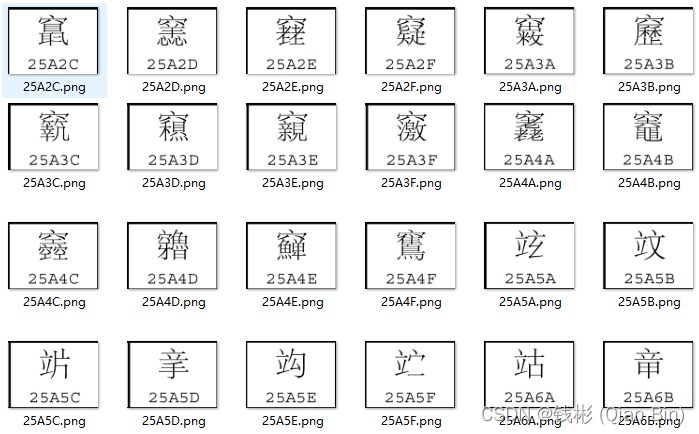
任务要求
:需要将上述生僻字png图片批量自动转成ttf字体文件,该字体对应的unicode码为图中下半部分对应的16进制值。
整个任务分成几个部分实现:
-
OCR识别:识别出图片下半部分对应的16进制数值;
-
图形文字精确提取:提取出图片上半部分精确的文字图形区域;
-
png图片转svg: 通过图像处理算法提取上半部分图片的字形轮廓,将其转成svg文件;
-
svg转ttf:通过FontForge提供的Python工具实现批量转换;
综合考虑识别精度和CPU推理速度要求,本文使用
PaddleOCR
实现。
python -m pip install paddlepaddle==2.3.0 -i https://mirror.baidu.com/pypi/simple
pip install paddlehub -i https://pypi.tuna.tsinghua.edu.cn/simple
pip install shapely -i https://pypi.tuna.tsinghua.edu.cn/simple
import cv2
import os
import paddlehub as hub
from tools import sim_code
def main():
img_list = list()
img_dir = './screenshot/25A2C_2625F'
target_width, target_height = 363, 269
for file in os.listdir(img_dir):
if os.path.splitext(file)[1].lower() in '.png|.jpg':
img_list.append(file)
print('当前总图片数量: %d' % len(img_list))
ocr = hub.Module(name="chinese_ocr_db_crnn_server")
index = 0
error_index = 0
for img_path in img_list:
img = cv2.imread(os.path.join(img_dir,img_path),cv2.IMREAD_COLOR)
h, w, _=img.shape
if h != target_height or w != target_width:
img = cv2.resize(img, dsize=(target_width, target_height))
ocrimg = img[170:259,40:310,:]
h,w,_= ocrimg.shape
ocrimg = cv2.copyMakeBorder(ocrimg,2*h,2*h,2*w,2*w, cv2.BORDER_CONSTANT,value=[255,255,255])
result = ocr.recognize_text([ocrimg])
code = result[0]['data']
if len(code)==0:
error_index+=1
cv2.imwrite('error/%d.png' % error_index, img)
continue
code = code[0]["text"].strip()
code = sim_code(code)
if len(code)!=5:
error_index+=1
cv2.imwrite('error/%d.png' % error_index, img)
continue
try:
a = int(code,16)
except Exception as e:
error_index+=1
cv2.imwrite('error/%d.png' % error_index, img)
continue
index += 1
print(img_path+' 识读结果:'+code)
save_path = 'ocr/%s.png' % code
if os.path.exists(save_path):
error_index+=1
cv2.imwrite('error/%d_repeat.png' % error_index, img)
continue
textimg = img
cv2.imwrite(save_path, textimg)
if __name__ == "__main__":
main()
其中sim_code函数定义如下:
def sim_code(code):
code = code.strip()
code = code.upper()
code = code.replace("G", "")
code = code.replace("H", "")
code = code.replace("I", "1")
code = code.replace("J", "")
code = code.replace("K", "")
code = code.replace("L", "")
code = code.replace("M", "")
code = code.replace("N", "")
code = code.replace("O", "0")
code = code.replace("P", "")
code = code.replace("Q", "")
code = code.replace("R", "")
code = code.replace("S", "")
code = code.replace("T", "")
code = code.replace("U", "")
code = code.replace("V", "")
code = code.replace(
"W", "")
code = code.replace("X", "")
code = code.replace("Y", "")
code = code.replace("Z", "")
code = code.replace("0", "0")
return code
识读结果如下图所示:
完整代码如下:
import cv2
import os
import numpy as np
def main():
img_list = list()
img_dir = './ocr'
target_width, target_height = 363, 269
for file in os.listdir(img_dir):
if os.path.splitext(file)[1].lower() in '.png|.jpg':
img_list.append(file)
print('当前总图片数量: %d' % len(img_list))
index = 0
error_index = 0
for img_path in img_list:
img = cv2.imread(os.path.join(img_dir,img_path),cv2.IMREAD_COLOR)
h, w, _=img.shape
if h != target_height or w != target_width:
img = cv2.resize(img, dsize=(target_width, target_height))
image_gray = cv2.cvtColor(img, cv2.COLOR_BGR2GRAY)
edges = cv2.Canny(image_gray, 170, 220, apertureSize=3)
lines = cv2.HoughLines(edges, 1, np.pi / 180, 250)
for line in lines:
rho, theta = line[0]
a = np.cos(theta)
b = np.sin(theta)
x0 = a * rho
y0 = b * rho
x1 = int(x0 + 1000 * (-b))
y1 = int(y0 + 1000 * (a))
x2 = int(x0 - 1000 * (-b))
y2 = int(y0 - 1000 * (a))
cv2.line(img, (x1, y1), (x2, y2), (255, 255, 255), thickness=20)
img = img[5:155,100:270,:]
gray = cv2.cvtColor(img, cv2.COLOR_BGR2GRAY)
ret, thresh = cv2.threshold(gray,127,255,cv2.THRESH_BINARY_INV)
coords = np.column_stack(np.where(thresh > 0))
coords = np.array(coords, dtype=np.float32)
rect = cv2.boundingRect(coords)
[y, x, h, w] = rect
img = img[y:y+h,x:x+w,:]
h,w,_ = img.shape
if h>w:
pad = int((h-w)/2.0)
img = cv2.copyMakeBorder(img,0,0,pad,pad, cv2.BORDER_CONSTANT,value=[255,255,255])
elif w>h:
pad = int((w-h)/2.0)
img = cv2.copyMakeBorder(img,pad,pad,0,0, cv2.BORDER_CONSTANT,value=[255,255,255])
img = cv2.resize(img, dsize=(128, 128))
img = cv2.copyMakeBorder(img,10,10,10,10, cv2.BORDER_CONSTANT,value=[255,255,255])
code = os.path.splitext(img_path)[0]
save_path = 'crop/%s.png' % code
cv2.imwrite(save_path, img)
index += 1
print(img_path)
if __name__ == "__main__":
main()
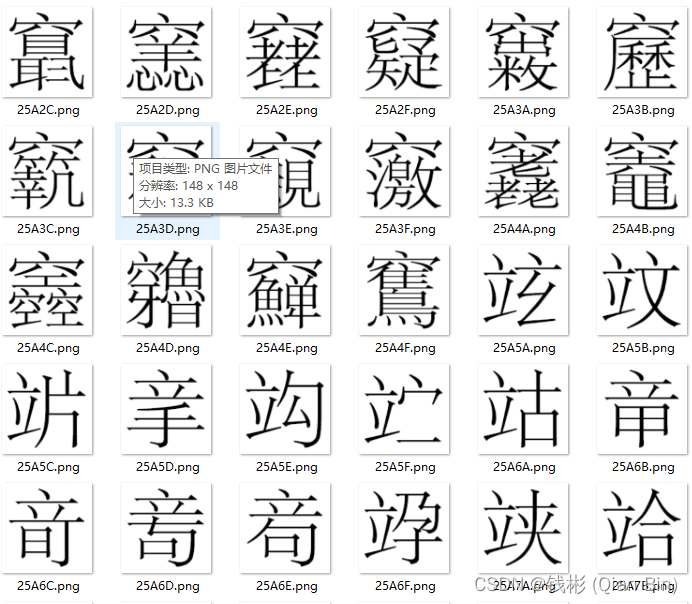
效果如下图所示:
这里主要通过opencv的形态学操作提取图像轮廓实现转换。
import cv2
import os
def main():
'''主函数'''
img_list = list()
img_dir = './crop'
for file in os.listdir(img_dir):
if os.path.splitext(file)[1].lower() in '.png|.jpg':
img_list.append(file)
print('当前总图片数量: %d' % len(img_list))
index = 0
for img_path in img_list:
textimg = cv2.imread(os.path.join(img_dir,img_path),cv2.IMREAD_COLOR)
textimg = cv2.resize(textimg, dsize=(640, 640))
blur = cv2.GaussianBlur(textimg, (3, 3), 0)
gray = cv2.cvtColor(blur, cv2.COLOR_BGR2GRAY)
ret, thresh = cv2.threshold(gray, 10, 255, cv2.THRESH_BINARY_INV + cv2.THRESH_OTSU)
contours,hierarchy = cv2.findContours(thresh, mode=cv2.RETR_TREE, method=cv2.CHAIN_APPROX_SIMPLE)
epsilon = 10
h, w, _ = textimg.shape
code = os.path.splitext(img_path)[0]
svg_path = 'svg/'+code+'.svg'
with open(svg_path, "w+") as f:
f.write(f'<svg version="1.0" xmlns="http://www.w3.org/2000/svg" width="{w}.000000pt" height="{h}.000000pt" viewBox="0 0 680.000000 680.000000" preserveAspectRatio="xMidYMid meet">')
f.write(f'<g transform="scale(1.00000,1.00000)">')
for c in contours:
f.write('<path d="M')
approx = cv2.approxPolyDP(c,epsilon,False)
for i in range(len(approx)):
x, y = approx[i][0]
if i == len(approx)-1:
f.write(f"{x} {y}")
else:
f.write(f"{x} {y} ")
f.write('"/>')
f.write(f'</g>')
f.write("</svg>")
index +=1
print('当前处理完 %d 张图片' % index)
print('全部处理结束')
if __name__ == "__main__":
'''程序入口'''
main()
部分样例转换结果如下图所示:

ttf是专门的字体库文件,目前能够支持ttf编辑的软件并不多。这里推荐使用FontForge,该软件提供了python处理接口,可以使用python脚本批量转换svg到ttf。
首先从官网下载windows版的FontForge并安装,本文将其安装到D盘的toolplace的文件夹中。要使用FontForge提供的python接口,我们必须要使用FontForge的python执行器,这个执行器位于FontForge安装目录的bin文件夹中,完整路径如下图所示:
D:\toolplace\FontForgeBuilds\bin
在这个目录下面有个名为ffpython.exe的可执行文件,这个就是FontForge提供的python执行器。为了能够正常使用这个执行器,我们需要将我们的可执行目录切换到bin文件夹下面,然后创建一个转换脚本main_ttf.py,内容如下:
from time import sleep
import fontforge, os,psMat
def main():
img_list = list()
img_dir = './svg'
for file in os.listdir(img_dir):
if os.path.splitext(file)[1].lower() in '.svg':
img_list.append(file)
print('当前总图片数量: %d' % len(img_list))
index = 0
for img_path in img_list:
print('当前处理 '+img_path)
codestr = os.path.splitext(img_path)[0]
code = int(codestr,16)
font = fontforge.font()
font.encoding = 'UnicodeFull'
font.version = '1.0'
font.weight = 'Regular'
font.fontname = 'uni'+codestr
font.familyname = 'uni'+codestr
font.fullname = 'uni'+codestr
glyph = font.createChar(code, "uni"+codestr)
glyph.importOutlines(os.path.join(img_dir,img_path))
base_matrix = psMat.translate(0,0)
glyph.transform(base_matrix)
font.generate('./ttf/'+codestr+'.ttf')
index +=1
print('当前处理完 %d 张图片' % index)
os.remove(os.path.join(img_dir,img_path))
print('全部处理结束')
if __name__ == "__main__":
main()
然后使用下面的命令执行该脚本:
./ffpython.exe main_ttf.py
最后在当前目录下会生成一个个的ttf文件。
我们可以使用FontForge的客户端查看我们这个生成的字体文件,打开后在菜单栏上选择Encoding-Compact,如下图所示:
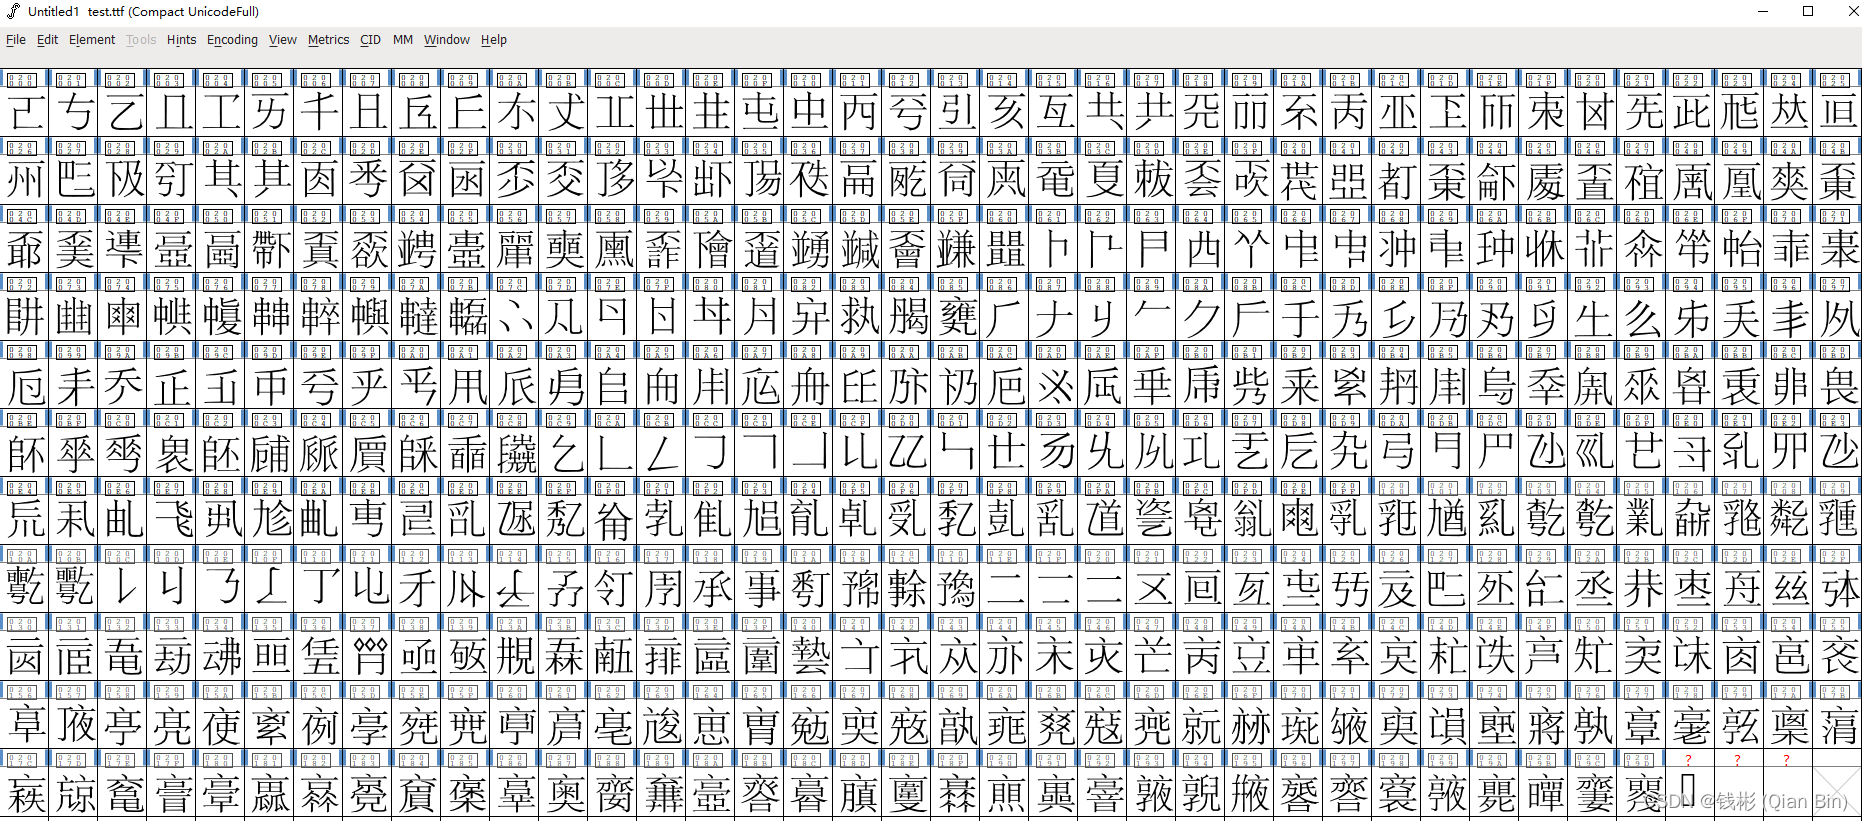
可以看到我们已经成功的将png图片批量转换成了ttf文件。
将SVG字体转换为TTF格式。 它最初是为编写的,但是您会发现它对您的项目很有用。
对于开发人员:
内部API与FontForge的API类似。 由于主要目标是生成图标字体,因此源可能缺少某些特定的TTF / OTF功能,例如字距调整等。 无论如何,当前代码是开发的良好基础,因为它将节省大量时间来实现正确的编写和优化TTF表。
从CLI使用
npm install -g svg2ttf
用法示例:
svg2ttf fontello.svg fontello.ttf
svg2ttf(svgFontString,选项)-> buf
svgFontString -SVG字体内容
options
copyright -版权字符串(可选)
description说明字符串(可选)
ts覆盖创建时间的Unix时间戳(以秒为单位)(可选)
url制造
python-fontforge-script
使用FontForge模块进行字体操作的Python脚本
请先安装python-fontforge模块以及PyQt5
在单词列表检查Missing Glyph
单词列表格式
## start with "##" line will be ignore to read
通过引用将字形“ A”复制到字形“ B”的Python脚本
使用作为输入单词列表
单词列表格式(将字形“ A”复制到字形“ B”,将字形“ C”复制到字形“ D”)
## start with "##" line will be ignore to read
Python生成手写字体已经成为越来越多的设计师的选择。这种技术可以为你的设计提供独特的个性风格,并使你的设计与众不同。在本文中,我们介绍了如何使用Python生成手写字体,以及它的价值。有了这些技术,你将能够以一种更具创造性和艺术性的方式设计字体,从而使你的设计更有魅力和吸引力。本文由chatgpt生成,文章没有在chatgpt生成的基础上进行任何的修改。以上只是chatgpt能力的冰山一角。作为通用的Aigc大模型,只是展现它原本的实力。对于颠覆工作方式的ChatGPT。
首先要安装图像处理标准库,win+R打开运行窗口,输入cmd,在命令行中输入pip install pillow安装完成即可。
from PIL import Image
zoom = 0.5 #图片比例调整
vscale = 0.75 #图片长宽比例调整(中文字符大概长宽比为4:3)
img = Image.open("image.png") #打开待转化图像
out = img.convert("L")
out.show()
width,height = out.size
打造属于自己的字体(转)[@more@]
不少做平面的朋友可能都有过这样的经历:在自己的作品中要使用某种特效字体,但是到处都找不到符合自己要求的。于是有些朋友选择了自己绘制,这当然解决了当时的问题,可你有没有想过,把你绘制...
在这段代码中,我们首先创建了一个256个等差数列的LUT表,然后使用cv2.applyColorMap函数创建了一个蓝色-红色的颜色映射表。接下来,我们加载输入图像并使用cv2.LUT函数将图像中的像素值通过LUT表映射到对应的颜色。LUT函数是一种非常快速的像素值转换方法,它可以将输入像素值映射到一个指定的输出像素值。值得注意的是,上述代码只是演示了如何将图像亮度映射到不同的色彩空间,具体的色彩映射方案需要根据具体应用场景进行选择。在图像处理中,将不同亮度的像素映射到不同的色彩空间是一项常见任务。
系统自带的字体文件在:C:\Windows\Fonts。)生成自己的字体文件(ttf格式的文件)感觉不好看,换了几个字体了也一样。该方式貌似只支持英文。1.首先去这个网站(
对于一个webapp,我需要一种方法来防止浏览器返回到另一种字体,如果我的web字体不包含字符。似乎唯一的方法是向fontstack添加另一种字体,其中包括“所有”可能的字符1。在已经存在fallbackfonts,但是这些都是更多的调试助手,因为它们将代码点显示为数字,因此它们非常重(>;2MB)。在我的用例的后备字体应该只显示一个类似于方框的东西来表示缺少的字符。在我的想法是生成一...
fis3-command-webfont
背景与简介
目前移动端webfont字体使用越来越广泛,由于缺少比较好的自动化工具,开发者在修改字体图标时需要在2个平台进行转换(svg转ttf再转woff2,woff2普遍不支持)才能完成字体生成工作。
经过调研,基于改造成fis插件,实现一键转换svg图标为svg,oet,ttf,woff的功能。
您可以通过第三方平台来了解字体生成与转换过程: 、
开始使用
执行 npm install -g fis3-command-webfont 全局安装
配置插件(也可通过命令行来配置)
在fis-conf.js里面添加配置:
fis.config.set("webfont",{
src : 'fonts/*.svg',//或['./fonts/home2.svg', './fonts/home3.svg']
字体图标不仅可以随意调整大小,而且可以避免在页面制作过程中引用N多的图片,发送请求造成的流量浪费,因此,我们可以将图标的icon转换成字体图标:
1.将png格式的图片转换成svg格式;
网址:https://www.jinaconvert.com/cn/convert-to-svg.php
2.将svg格式的图标转成字体图标:
网址:https://icomoon.io/app/#/s...
尝试重建你的Fonforge.因为代码应该工作.我测试了它,运行正常.我用Homebrew成功安装了Fontforge和Python扩展.这是信息:06000设置PYTHONPATH运行brew install fontforge当然还有你需要的所有标志.运行brew linkappsUPDATE以空字体开头,因此字体不是问题:import fontforgefont = fontforge.fo...

